Using DIY chicken coop plans to make a home for your hens is so fun – we built our own coops, and we know that when we need another one, we have the skill set to create it easily.

I get lots of questions about how to build a chicken coopwhat chicken coops need, what the best chicken coop ideas are to keep your hens safe, and whether you should spend a lot of money on your coop (you definitely don’t need to).

So I put together the ultimate list of free chicken coop plans – and I’ve examined them to make sure the plans are actually free (and available) and that the homes are appropriate accommodations for your flock.

If you have chickens, then here’s 55+ free DIY chicken coop plans you can use to make a home for your flock!

Before we get started, many of these chicken coops call for hardware cloth. I recommend 1/2-inch hardware cloth like this. It’s not to expensive and proven to keep chickens safe.

diy chicken coop plans

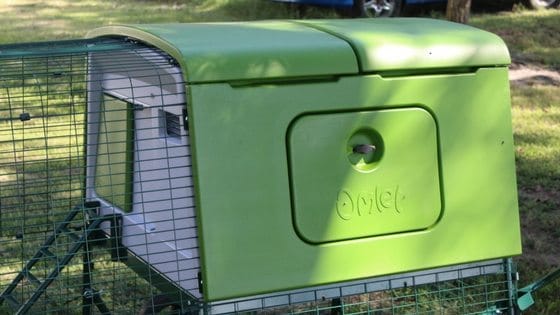
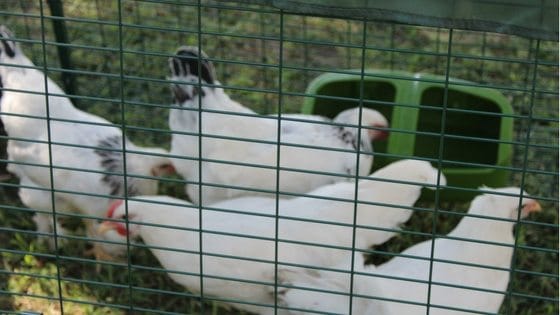
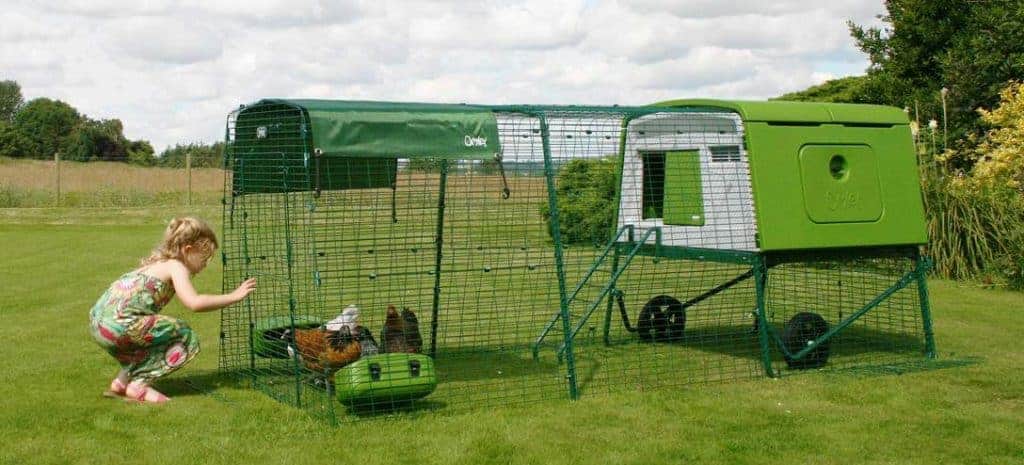
(Don’t want to be bothered with building a chicken coop? Here’s one you can buy on Amazon for less than $300, shipping included):
Click here to buy this coop on Amazon

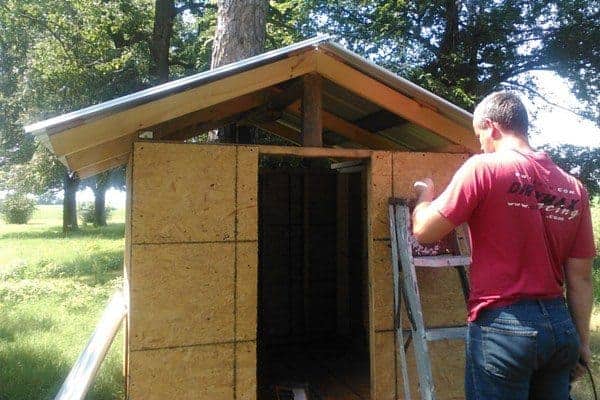
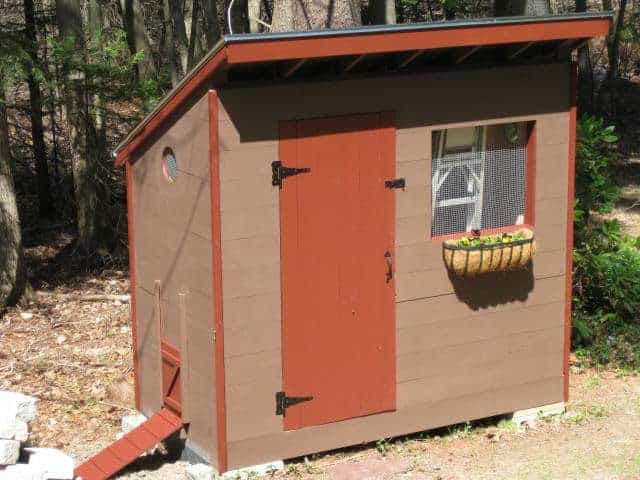
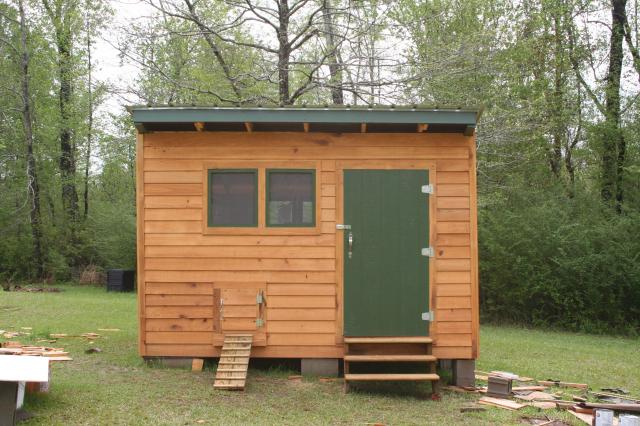
Chicken Coop With Great Ventilation (for under $500)

We built this 8’x8′ chicken coop for less than $500 – and we built it in a weekend! We used 2×4 studs and 2×6’s for the frame, and OSB for the siding. The roof is made of metal roofing material. It took us only a few hours to build, and the chickens love it! For the door, we used a $30 storm door you can get at any big box store (we bought ours at Home Depot). We currently keep 4 chickens in it. It kept them nice and cozy during a recent winter storm – all our chickens survived and we’ve never had any get respiratory issues in this coop!

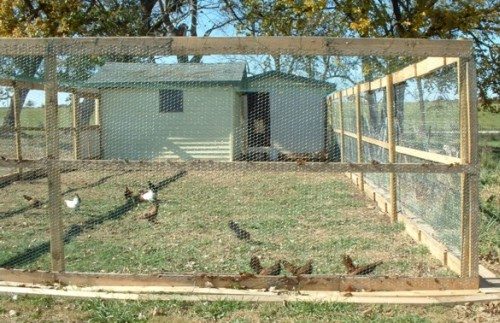
Free Chicken Coop Plans

diy chicken coop plans

Here are the free plans we developed for a coop on our farm. Our chicken coop design can house 4-5 hens. It took us just a few hours to put this coop together, and just a couple hundred dollars. Years later, it’s still housing chickens and works great!

I have detailed plans about how to build this coop here: Get the plans

$50 DIY Tractor

We built this tractor for rabbits, but it can easily house 3 hens.

The best part is it cost us less than $50 to make. Particularly if you have chicks, you’ll want to try to make this tractor!

It uses a dog crate (which is secure against predators, as long as you set it up correctly) and a wood top, which keeps your darling chicks safe from hawks.

In case you didn’t know, hawks are one of the biggest predators of chickens, and can easily kill an entire flock very quickly. So, it’s important to make sure your chickens are safe!

Get the plans

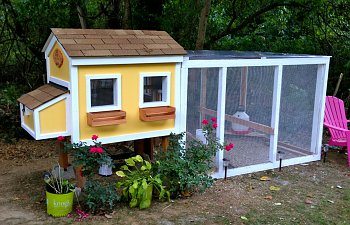
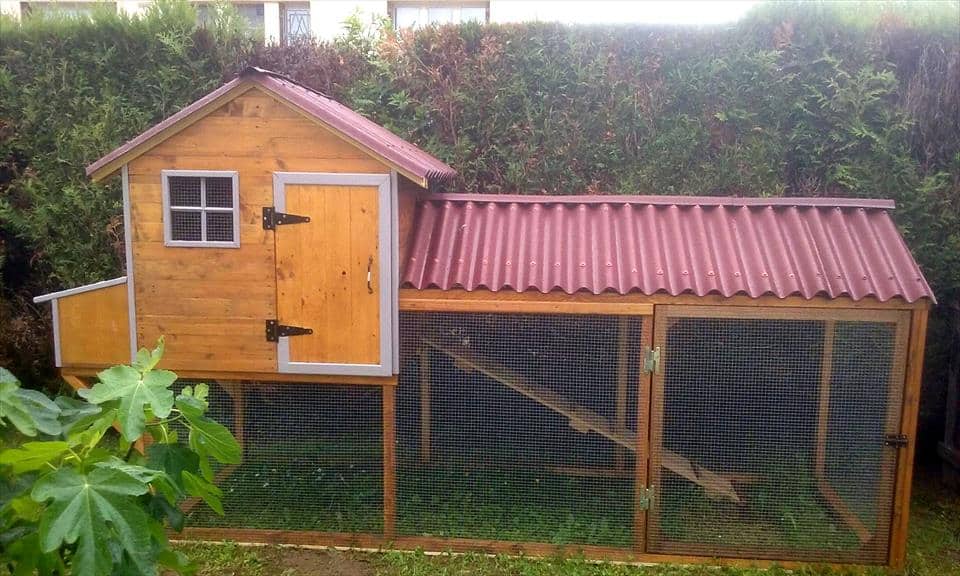
The ‘South City’ Chicken Coop​

diy-chicken-coop-plans

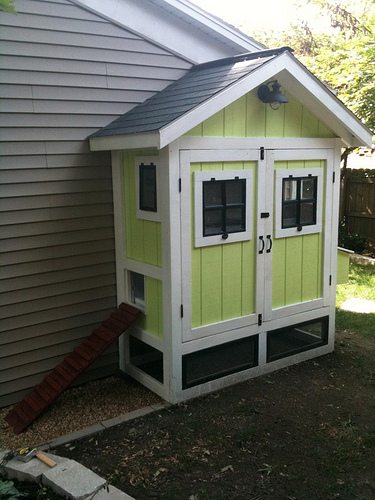
This cute chicken house has lots of natural light, and plenty of ventilation from open windows and vents. The windows can be opened or closed depending on weather conditions. Big enough for 3 hens.

This would look adorable in your backyard, and even your neighbors will love seeing your chickens in it! I love cute chicken houses!

Get the plans

My 6 Chicks’s Chicken Coop

diy chicken coop plans

This DIY chicken coop has removable roosts for easy cleaning, a large door for easy cleaning, electricity for the heated waterer, lights, and infrared camera. It also has good ventilation with windows, end vents, and roof vents. This is another one of those cute chicken houses you can make!

These are very important features to keep your chickens cool in summer!

Get the plans

Home Depot Easy To Build Coop

diy chicken coop plans

This DIY chicken coop can be completed in a weekend! How convenient! Can house 3-4 hens if your flock will free range.

Get the plans

Farmer Kitty’s Chick Coop

diy chicken coop plans

This DIY chicken coop will work without a lot of hassle. Designed after wooden calf hutches. 8 feet by 4 feet, so will easily house 3 hens.

Get the plans

Shed Chicken Coop

diy chicken coop plans

If you use these chicken coop plans, just make sure you put a door that you can fit through so you can clean it. This one can comfortably house 3 hens. It is 4-foot by 8-foot. Great nesting boxes so you get healthy eggs.

Get the plans 

Hoop Coop

diy chicken coop plans

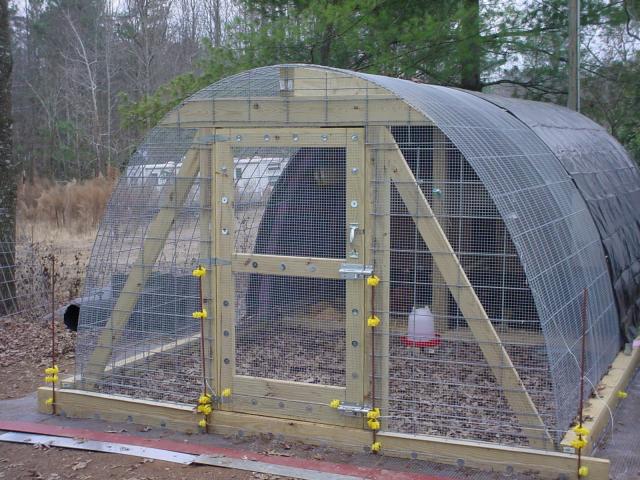
These DIY chicken coop plans are inexpensive and easy to build. LOVE how easy the cattle panels make building the frame a snap and they will last a long time and are sturdy. The 16 ft x 10 ft space can hold 16 hens.

Get the plans

Pastured Poultry Pen

Inexpensive to build with these plans. Movable PVC coop so your hens can feel like they’re free ranging.

Get the plans

Easy DIY Chicken Coop Plans

Plans for a coop that can house 4 – 5 birds. Coop is 28 inches by 40 inches. Chicken coop run is 40 inches by 144 inches.

Get the plans

The Kerr Center Chicken Tractor 1.0

This DIY chicken coop (or tractor) is 60 inches wide and 8 inches long. The original cost approximately $290.00 to construct, but if you repurpose lumber or upcycle pallets, it will cost you less.

Get the plans

Kansas Barn Chicken Coop Plans

diy chicken coop plans

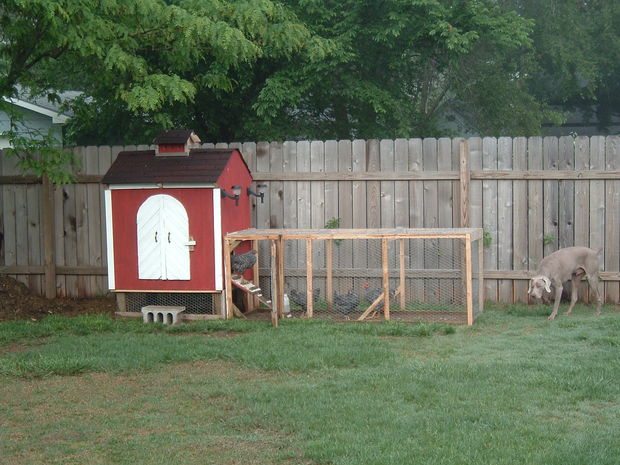
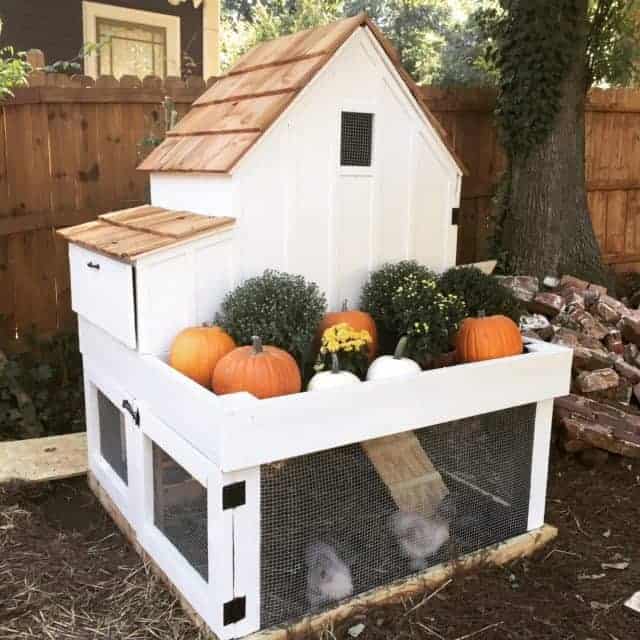
This pretty chicken coop is meant for 3-5 laying hens. Inspired by some Kansas barns and perfect if you have neighbors.

Get the plans

Large Chicken Coop Design

4-foot by 8-foot coop that can house 3 hens. 

Get the plans

Green Living Chicken Coop

diy chicken coop plans

Small coop that takes advantage of your house heat. Not the best option if its warm where you live, but great for cooler areas, especially in winter to keep your backyard chickens warm.

Get the plans

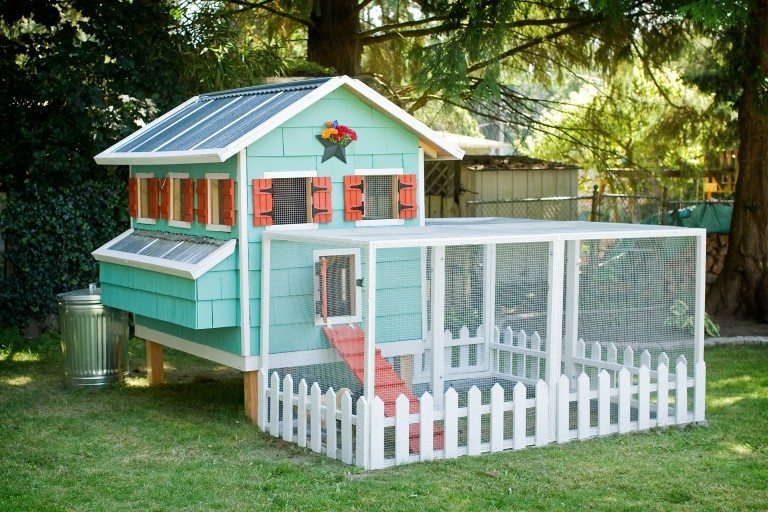
The Feather Factory Chicken Coop

diy chicken coop plans

Attractive DIY plans that can house up to 5 birds. Great if you’re handy and want something good looking. Super cute and makes feeding your chickens easy since it’s tall enough for a person to stand in.

Get the plans

6 Hen Chicken House

diy chicken coop plans

Easy to follow plans for a well-constructed coop.  8×8 foot coop can house 6 hens.

Get the plans

Downeast Thunder Farm Chicken Coop Plans

diy chicken coop plans

32 square foot coop can house 3 birds. Boasts an outside door for egg collection, north facing opening windows covered with chicken wire and south facing windows for sun. If you live in a hot environment, you might want to make windows on both sides open for ventilation.

Get the plans

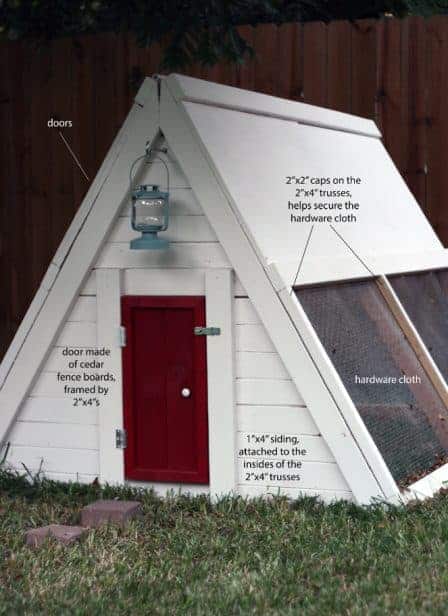
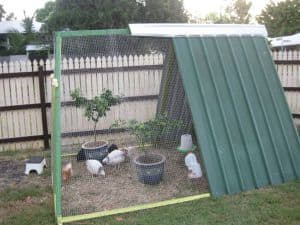
A-Frame Chicken Coop

diy chicken coop plans

Great option if your hens can’t free range, and can easily be adapted to become a tractor. Original built for less than $100. Can house up to 4 hens.

Get the plans

Fox’s Log Cabin Chicken Coop

diy chicken coop plans

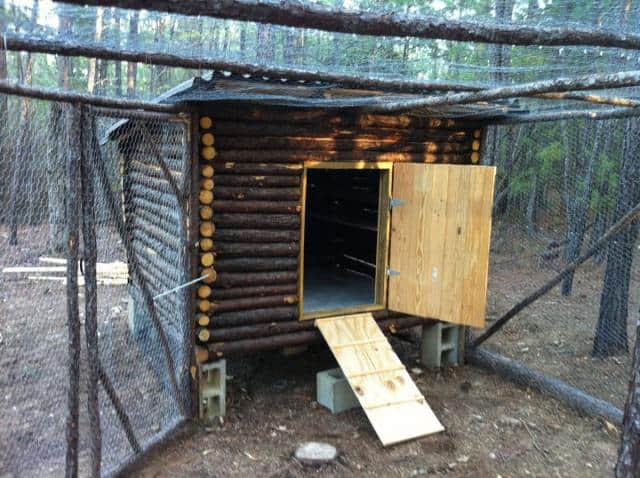
6-foot by 6-foot DIY coop can house up to 3 hens if they will be cooped all the time. Original built for $400.

Get the plans

Tarter Farm Chicken Coop

Coop is 20 feet by 20 feet, and has 6 nesting boxes. Can house up to 40 hens. 

Get the plans

Small Backyard DIY Chicken Coop

Can fit 2 chickens.

Get the plans

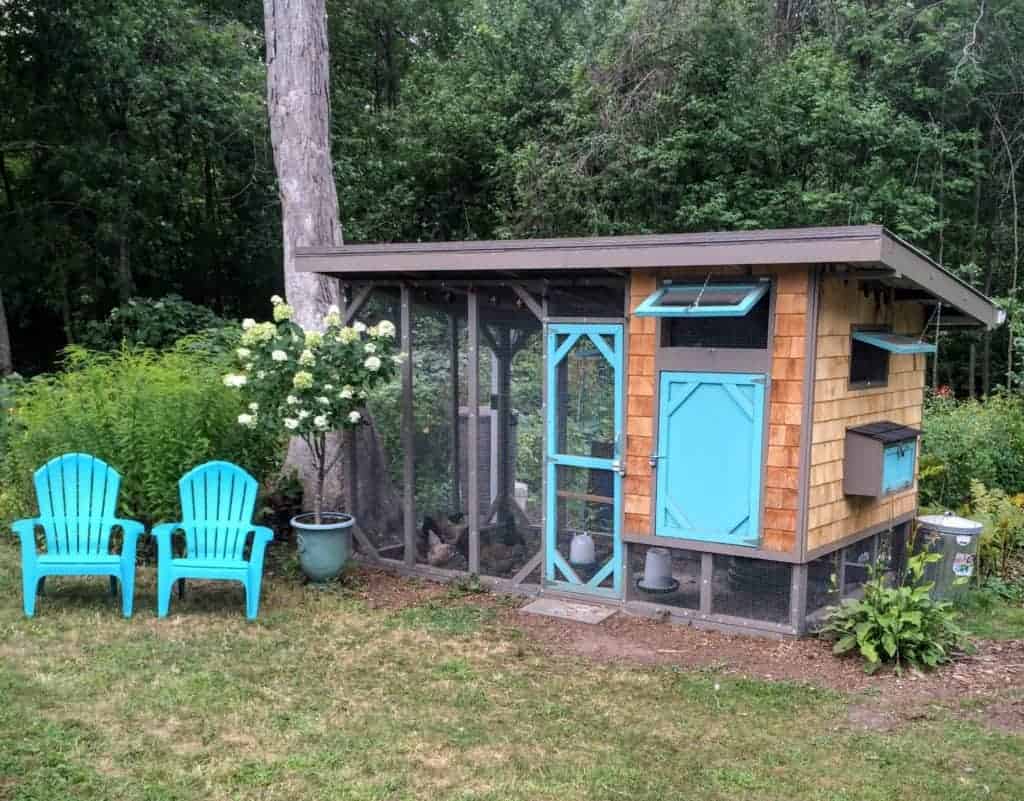
Sunrise Chicks Chicken Coop

diy chicken coop plans

This chicken coop is large and roomy and can fit at least 10 chickens. Looks great in any backyard, and the ramp would make it perfect as a duck house. Definitely one of the cute chicken houses you can make!

Get the plans

13 Hen DIY Chicken Coop

Coop is 132 feet squared, and has 3 nesting boxes. If you use these free plans, you might want to add more nesting boxes or a dust bath for chickens. 

Get the plans

Coq au Vin

diy chicken coop plans

This DIY coop houses up to 6 chickens. The original cost about $1500. The 4×4 wood posts are painted and put on cinder blocks that the creator buried and leveled in gravel at ground level to reinforce the structure.

Such a cute color and such a cute chicken house!

Get the plans

Baby Crib DIY Chicken Coop

diy chicken coop plans

A good idea for recycling a used baby crib that you can’t donate. The drop side comes down so you can gather eggs easily. Can house 2-3 hens in it. If you live in a cool area, you will need to think about how to insulate it in the winter so your flock stays warm and your chicken’s water doesn’t freeze easily.

Get the plans

Trampoline DIY Chicken Coop

diy chicken coop plans

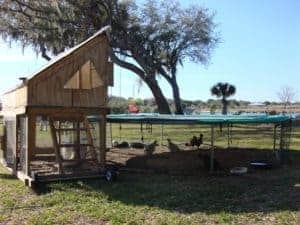
Roomy and can house quite a few hens. You will need to make sure it’s predator proof.

Get the plans

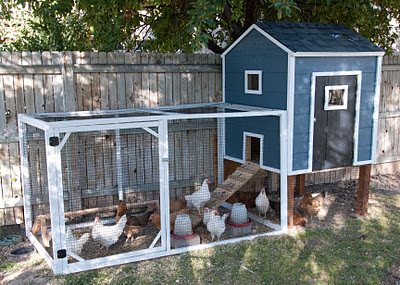
City Farm Chicken Coop

diy chicken coop plans

Original was built for about $350. This is a cute little coop that can house 4 hens.  And Silkies are perfect chickens as pets!

Get the plans

Cute Trevor Made Chicken Coop

diy chicken coop plans

DIY plans for a coop large enough to house up to 12 chickens. Original builders raised the floor of the coop about 2 feet above the ground both to deter predators and to give the hens a shady place to hang out during warm weather. I just love all of these creative and cute chicken houses!

Get the plans

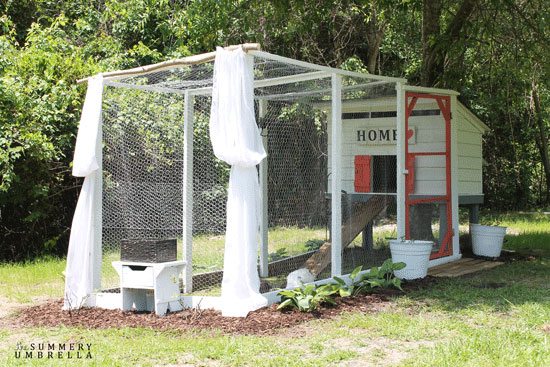
The REAL Housewives of Riverton Chicken Coop Plans

diy chicken coop plans

Stylish chicken coop built for about $290. Can house up to 5 chickens.

Get the plans

Chick Brooding Cabinet Coop

If you have chicks, you’ll need a brooder. Here’s DIY chicken brooder plans you can make out of an old cabinet.

Get the plans

“The Coop” est. 2013

diy chicken coop plans

This cute DIY chicken coop is 12 square feet, and can house 3 hens if they free range (2 if not). Has a nesting box and is 2 feet off the ground.

Get the plans

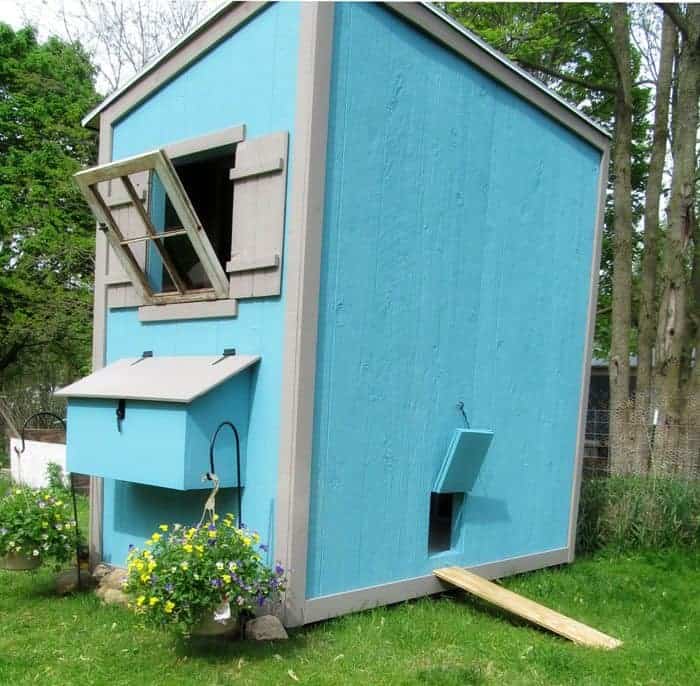
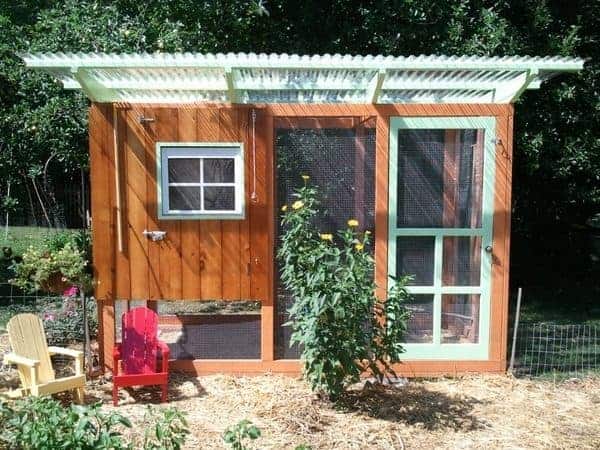
PRETTY AND FUNCTIONAL CHICKEN COOP

diy chicken coop plans

Has three doors for easy access: One on the front for the chicken flock to exit, one to collect eggs, and one for easy cleaning. Can house 4 hens.
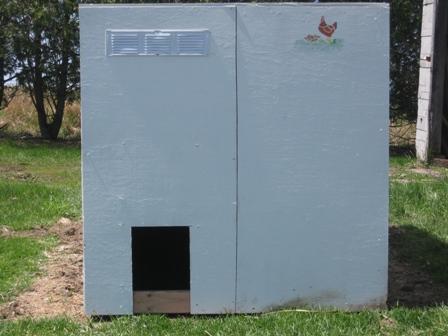
Get the plans

Bluegrass Coop

diy chicken coop plans

Has wire under the coop to keep out predators. Cute and functional coop.

Get the plans

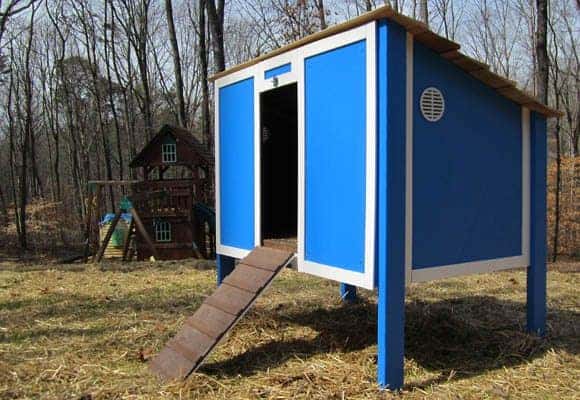
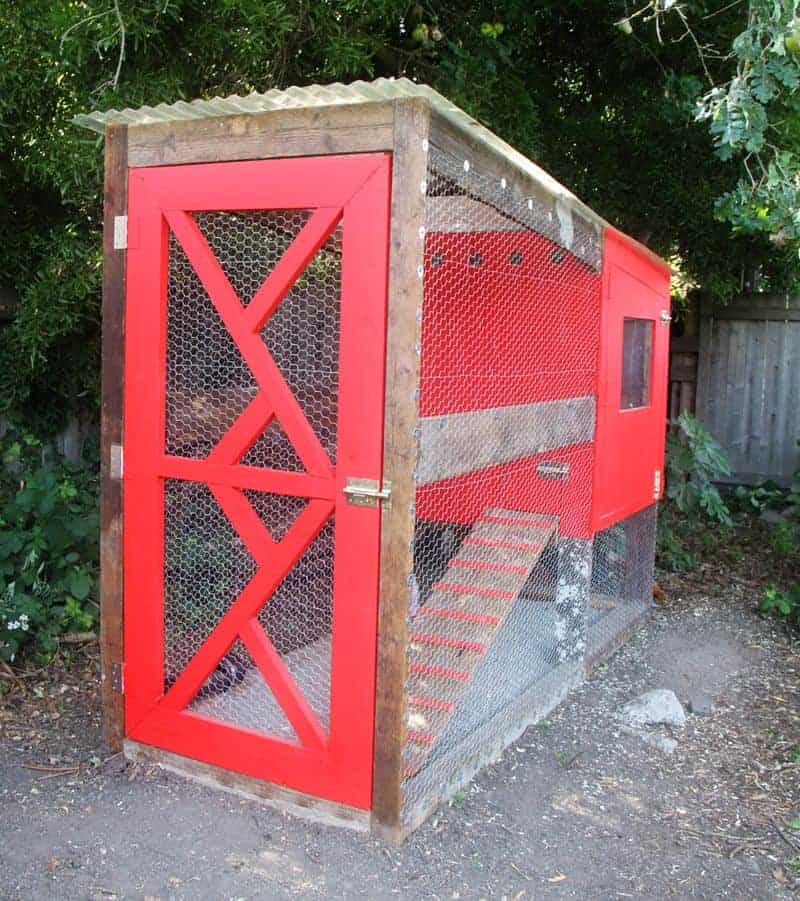
Red, White, and Blue Chicken Coop

diy chicken coop plans

A-frame DIY coop with enough room for 4 hens. Very rustic and sturdy. 

Get the plans

The Eggcelsior

Built for free, can fit up to 6 hens.

Get the plans

Geodesic Dome Chicken House

diy chicken coop plans

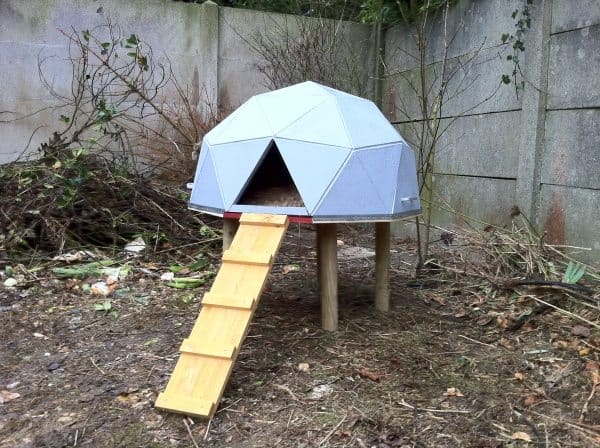
Houses 2-3 hens. Cheap to make, and the design means it will be warmer in winter than a traditional chicken coop. Raised off the ground so the chicken flock is safe from moisture creeping up from the ground – good for your hens’ lungs.
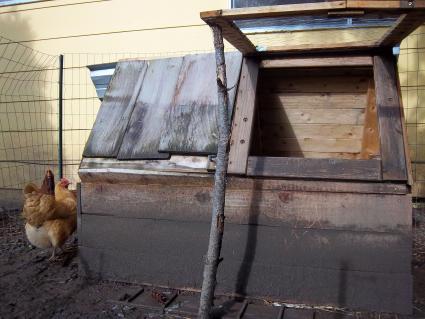
Get the plans

Doghouse Coop

diy chicken coop plans

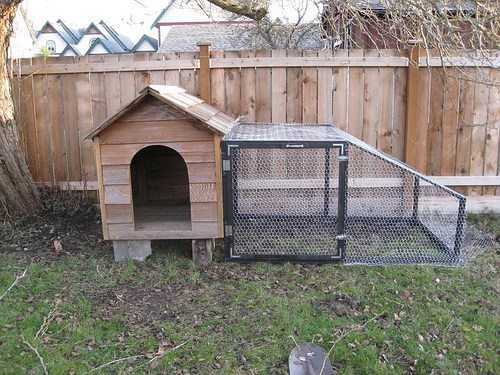
This DIY chicken coop is 12 square feet and can house 2-3 hens. The original builder used a branch as a perch – a good idea that chickens love.

Get the plans

The Chicken Cube

diy chicken coop plans

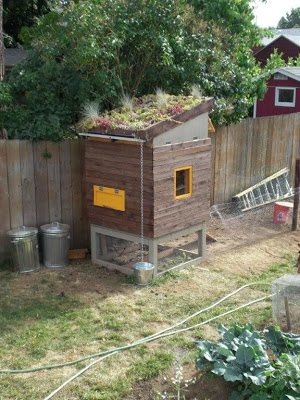
Cute dual-purpose coop – keep your chickens inside, and grow free food for the on the top!

Get the plans

Wee Kirk Coop

diy chicken coop plans

A cute chicken coop shaped like a church. Doubles as a chicken tractor. Can house up to 4 hens. One of many wonderful backyard chicken run ideas.

Get the plans

THE CHOO CHOO COOP

diy chicken coop plans

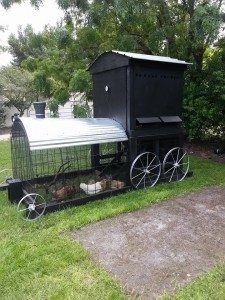
DIY chicken coop that looks like a train. This is certainly another one (of many) cute chicken houses! It has a double-top door for gathering eggs and for changing food and water. Can house 3-4 hens.

Get the plans

Pallet DIY Chicken Coop Plans

Pallet Palace

diy chicken coop plans

Totally made out of free pallets. This design is great for chicken coop builders who don’t want to frame walls, roofs, etc. It also saves you quite a bit of money on lumber costs for you can get pallets free!

Get the plans

Judy’s Free Pallet Chicken Coop

diy chicken coop plans

Another free pallet DIY chicken coop. The only things purchased were the vinyl siding and the roofing, and the nails and hinges. The builders saved about $1000 in lumber by using the free pallets. It also showcases one of the many clever backyard chicken run ideas mentioned in this DIY chicken coop list.

Get the plans


Wire Spool Chicken Coop

diy chicken coop plans

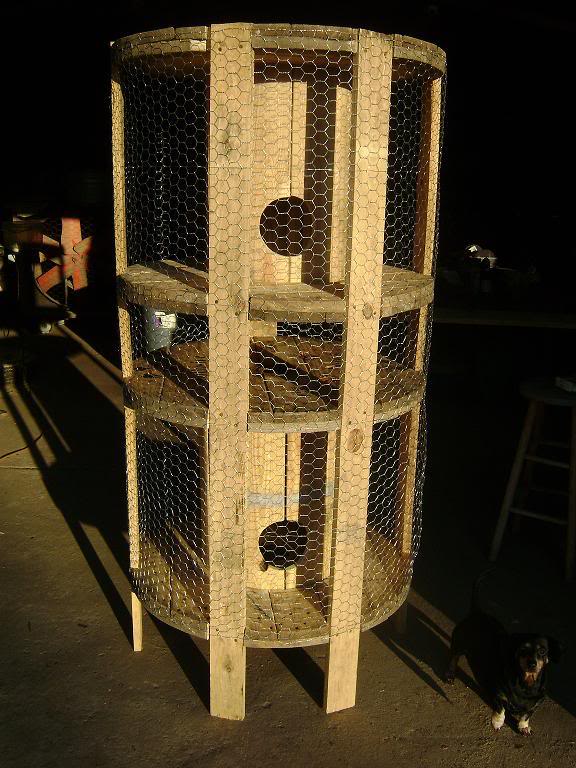
Made from free recycled wire spools. Total cost was $45 after the chicken wire was purchased.

Get the plans


3 Sided Pallet Coop

diy chicken coop plans

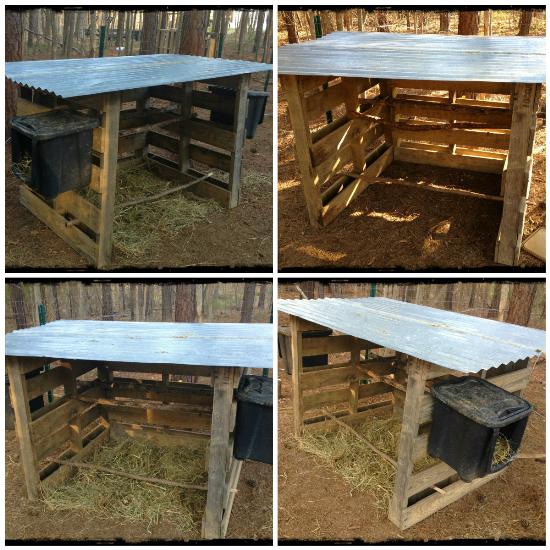
When the original was built, the plans creator used recycled pallet coops, and only paid for the tin roof. If you use these plans, you might want to add a door to keep your hens safe from predators.

Get the plans

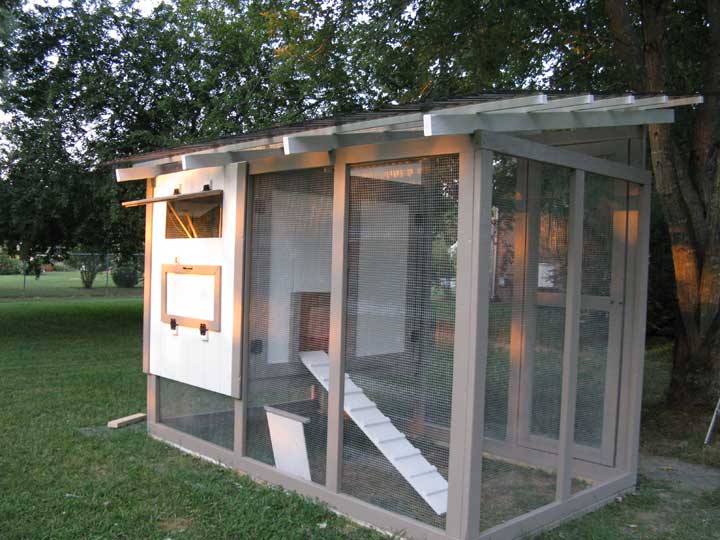
Modern Design Chicken Coop

diy chicken coop plans

This chicken coop is made entirely out of reclaimed wood. Predator proof with skylights, vinyl flooring, nesting boxes, roosting bars, and lots of ventilation.  Perfect for 4 free ranging hens.

Get the plans

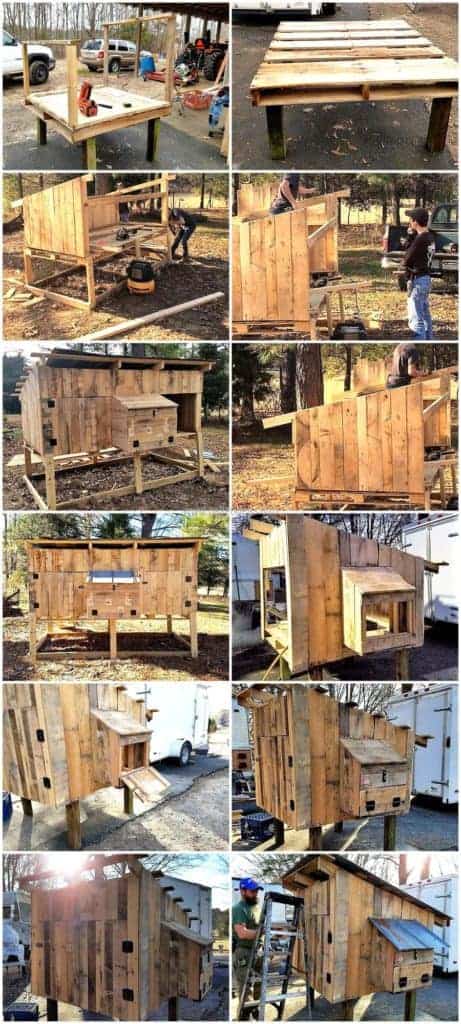
Chicken Coop From Pallets

diy chicken coop plans

Great design and cute chicken coop made from free pallets. Has a metal chevron roof with curved texture. Can house up to 6 chickens.

Get the plans

Another Rustic Pallet DIY Chicken Coop

diy chicken coop plans

DIY wood pallet chicken coop plans that can house up to 4 chickens. 

Get the plans

8×10 Large Chicken Coop

Can house up to 8 chickens (the original plans say up to 30 hens, but that’s way too many for the space.)

Get the plans


DIY Chicken Coop Plans Made Out Of Swing Sets

Steadfast’s Chicken Coop

Chicken coop made out of an old swing set. Original was built for $1000. Looks like it can house up to 6 hens.

Get the plans

Swing Set Into an Upcycled Chicken Coop

diy chicken coop plans

Another swing set created into a coop for about 5 chickens.

Get the plans

Other Chicken Coop Plans

Tongue and Groove Cedar Coop

Can house up to 4 chickens. The original cost about $400 and is made of tongue and groove cedar – should last a long time outside.

Get the plans

The Chicken Ranch: Eggceptional Lays

Upcycled children’s playhouse. Total cost was only $3, and it houses up to 4 chickens.

Get the plans

THE RUSTIC / WHIMSICAL COOP

Built for $35, and houses up to 8 hens. Old windows-turned-doors are fully functional and open out to make cleaning easy.

Get the plans

Build Easy Chicken Coop

This chicken coop should comfortably house at least 4 hens,if your flock will free range. Has 4.5 sq ft of space per chicken, 3 nesting boxes, a door, ventilation, lots of light and a human-sized door.

Get the plans

Got hens? They'll need a coop! Here's 55 of the best chicken coop plans FREE!

Did you plant cloves of spicy-smelling garlic and now you’re wondering how to store garlic long term?

Garlic is a wonderful addition to any garden, and it’s a wonderful sense of satisfaction harvest it – especially after you cure it and realize you won’t be needing to buy garlic from the grocery store anymore!

The first year we planted garlic, we weren’t sure when to harvest it – it can be different for every zone and even ever microclimate.

So we waited months – and came up with a GREAT harvest.

But then came the next step – how to store garlic long term without ruining it or losing it to bugs, dust, and other pests like mice.

Should you remove the papery skins? What about bulbs that seem ok except for 1 or 2 spots? Could we store those, or did we need to use them right away? What happens if they’re rained on while curing them straight from the garden?

You might have these same questions.

Luckily, a lot of our worries were unfounded – we were able to cure and store garlic long term with very few issues (and it took us quite a while to work through all that garlic!)

If you want to store garlic long term, it’s fairly straight forward as long as you follow some simple rules.

how to store garlic long term #garlic

Selecting Garlic For Long Term Storage

After you pull up all your garlic, you’ll want to let them cure for an hour or two in the sun – be sure to do this on a sunny day. This initial cure helps them dry, prepares them, and is how to store garlic from the garden without ruining your hard-earned harvest.

Next, you’ll want to examine the bulbs – take note of their condition. If any garlic bulbs have damage or seem soft, use them right away. They’re not good candidates to store long term.

Once you’ve selected your garlic, you will want to cure them for an additional 2 weeks in a relatively cool environment – no warmer than 65 degrees. Higher temperatures can trigger mold or prompt your garlic to sprout.

Humidity is another consideration when trying to store garlic long term – too high and it might cause your garlic to mold or rot, and too high will cause garlic cloves to shrivel and become useless.

You will notice a lot of the dirt will fall away – this is a good thing. You can also brush the garlic very gently, although I’ve noticed this can damage them. If there’s excessive amounts of dirt, then you can try gently brushing it off, but if there’s just a little dirt, chances are it will fall off on its own.

Don’t remove any of the papery skins – this will also damage the garlic, making it unsuitable to store long term.

After the 2 weeks are up, you can then transfer them to mesh bags like these or braid them if they’re a soft-neck variety (hard necked garlic can’t be braided easily – keep these in a mesh bag).

Air circulation is very important, which is why braiding or mesh bags are ideal garlic storage containers – they allow you to store a lot of garlic in a small space without reducing the garlic’s change to “breathe.”

As you store your garlic, don’t let the temperature rise – this WILL prompt your garlic to sprout since it’s no longer chilled (it thinks winter is over and it needs to grow!)

how to store garlic long term #garlic

Drying to Store Garlic Long Term

If braiding or storing in mesh bags isn’t your thing or you’re lacking the space, then you can dry your garlic. This process is simple and great because it produces a shelf-stable product that won’t sprout.

Start by slicing peeled garlic into thin strips and then dehydrate them either in a commercial food dehydrator or by placing them on a cookie sheet and drying them in your oven at around 120 degrees for a few hours. Leave the door slightly open to allow for air circulation.

Once dry, store garlic long term in an airtight container and use as needed.

Preserve Garlic In Honey

This hack has the added benefit of being great for colds. So if you have some spare cloves or just want to try something different, then preserve and store garlic long term in honey.

Honey has antimicrobial properties and stored correctly, it’s nearly impossible for bacteria to grow.

To preserve garlic in honey, peel the cloves, then drop them into a mason jar filled with honey. As long as the cloves remain submerged, they will keep for a long time.

Pull them as needed, or drink the honey in tea whenever you’re sick – as the garlic stores, it will steep it’s immune boosting properties into the honey. Yum!

It’s the end of the growing season for tubers – and you’re probably wondering how to cure and store potatoes for long term storage.

Curing potatoes is a simple process….and it is very necessary if you want your potatoes to stay edible into the winter.

By now, if you haven’t harvested your tubers, the green stems are likely drooping, and you’re itching to get your hands dirty and pull up those treasures you’ve waited all year to harvest.

And you should be excited – you’ve worked hard & should enjoy your haul!

Nothing is worse than working so hard – only to have the tubers rot because you didn’t properly cure and store potatoes for long term storage in the right conditions.

In this article, I will show you how to cure and store potatoes for long term storage so you can enjoy them in stews and combined with cheese and bacon all season. We’ll also cover how to prepare potatoes for storage after they’ve gone through the cure process.

This is a time tested process for how to cure and store potatoes for long term storage that our ancestors used!

How To Cure And Store Potatoes For Long Term Storage

How To Cure and Store Potatoes For Long Term Storage

After you’ve carefully dug up your potatoes, leave them outdoors in the sun (and away from hungry critters) for an hour or so to dry.

Don’t wash them – just let them dry. Washing them could result in dampness or mold.

If they’re still excessively dirty after they’ve dried, use a soft brush and gently sweep off clumps of dirt. Only do this if you must – any sort of brushing runs the risk of damaging your potatoes and they won’t last in long term storage.

At this point, you should examine your tubers – if any show signs of damage, such as a tear in the outer skin or holes, eat them right away.

The potatoes will heal some damage as they cure, but ones with excessive damage might not store well, so it’s simplest to just consume them ASAP.


Want to know more about growing herbs? Click here to learn more about my book, Herbs In Your Backyard.


How To Cure And Store Potatoes For Long Term Storage

How to Cure and Store Potatoes for Long Term Storage Tip: Keep Out Of The Light

To cure and store potatoes for long term storage (up to 7 months), the next step is to allow them to dry for a longer period, 1 – 2 weeks, this time out of the light.

Have you ever seen potatoes with green skin?  These are potatoes that have been allowed to cure too long in the sun. After enough time, the skins are no longer edible.

Sunlight causes potatoes to produce solanine, which turns potatoes bitter and is poisonous. So, it’s critical to store them out of the light once they’ve completed the first cure.

Allow the potatoes to cure in a dark place where temperatures are about 55 degrees. For the first 2 weeks, the humidity should be close to 85 percent.

To ensure the temperature and humidity are adequate while you cure potatoes, use a thermometer like this one. It has both a humidity and temperature gauge, and it’s cheap enough – it’s a sound investment.

I’ve found it’s best to lay the potatoes out during this phase – you want the air to circulate around them so they finish drying. It’s important they form a thick skin, which stands up to the storage process better.

During this time, the potatoes are also “healing” wounds that occurred earlier in the the cure process. This, also, allows them to withstand the long time in storage and remain fresh.

After this phase of the curing potatoes process is complete, move the potatoes to a dark storage area where temps are cooler – no more than 40 degrees F. A cellar in your home – or a root cellar if you’re so lucky – is a perfect spot.

The consistent temperature is important; if temps are higher, your potatoes might sprout eyes or even start to shrivel.

To store potatoes for long term storage, once they’re dry, 6-inch bins with slatted sides like these are a good option. The air can still circulate, and saves space. Just be sure critters can’t get into the bins.

Another option that’s recommended is to use perforated plastic or paper bags. These allow the potatoes to “breathe” while you store them. 

If any of your potatoes sprout eyes while they’re in your store room, double check the temperatures and light. If you spot mold or notice shriveling, check the humidity as well. If you cure and store potatoes for long term storage in just the right conditions, your potatoes should store for quite a long time – up to 7 months.

Now you know how to cure and store potatoes for long term storage!


In my book Organic By Choice: The (Secret) Rebel’s Guide To Backyard Gardening, I show you how to build cold frames and raised beds so you can start growing your own food. You can get it on Amazon here. If you buy directly from me, you save 20% off the Amazon price and get the digital version for free.)


More Organic Gardening Tips:

We all know fresh eggs are best, but we also need to know just how long they last. Follow me to find out – the last one to finish reading is a rotten egg…

We’ve made the mistake every so often of forgetting that we left eggs on the counter, or one of the kids hid an egg in an undisclosed location. We’ve always found them eventually – and it’s not been a pleasant find.

When eggs rot, not only do they stink – they turn black and gooey. It’s really an experience you’re better off not having.

In this article, I’m going to show you how you can keep your eggs as fresh as possible, how you can tell if eggs are bad, and answer the age-old question “how long do fresh eggs last?”

Eggs in a carton on a shaby chic teal table

Why Do Eggs Go Bad?

Eggs go bad even when they’re refrigerated – they definitely have an expiration date. It’s not usually the date printed on the carton (if you happen to have store bought eggs – if you do, consider getting chickens).

First, let’s talk about the bloom. When eggs are laid, they’re covered with something called “the bloom,” a cuticle or natural covering that keeps bacteria out of the egg, keeping it fresher for longer.

It’s an advantage that helps chickens reproduce successfully – an egg that can easily be contaminated won’t hatch or will hatch weak and sickly chicks.

Store-bought eggs (at least in the US) have had the bloom removed – so if you’re wondering “how long do eggs last?” not only do eggs go bad, store eggs will rot faster than farm fresh eggs even when refrigerated. This is because they’re more susceptible to bacteria entering through the shell and contaminating the albumen (egg whites) and the yolk (because the bloom was removed). Not a good thing!

Farm fresh eggs that haven’t had the bloom removed will still spoil, but at a slower rate.

Do Eggs Go Bad? Here's What You Need To Know!


How Do Eggs Go Bad?

As the bacteria enters the egg, it will reproduce and grow, feeding on the nutrients – particularly if you’ve left the eggs on your shelf or counter and not in the refrigerator. Eventually, so much bacteria gets into the egg that the insides turn black – and very stinky. Learn more about the insides of a chicken egg.

How Long Do Eggs Last Unrefrigerated?

How long you can leave eggs out before they become rotten? There are a few different answers to this question.

Farm Fresh eggs with the bloom on can last 2 to 3 weeks unrefrigerated. However, they WON’T be fresh or as healthy for you.

So what is the official shelf life of eggs? According to the United States Food Safety and Inspection Service refrigerated eggs can still be refrigerated 4-5 weeks after their expiration date.

If you want to preserve fresh eggs for long-term storage, here’s an article that shows you how.

How To Tell If Eggs Are Bad

If you wonder how you can tell if eggs are bad, there are a few different ways.

Well, for starters they will have bad odors and eventually turn black inside. It’s a smell and sight you will never forget if you experience it. But the real danger is when they first go bad, because you may not even realize it at first glance.

Here are a couple of easy guidelines:

  • Does it pass the smell test (in other words, does it stink)? If you smell anything, just toss it. Fresh, healthy eggs don’t smell at all.
  • You might notice when you crack them, that the yolk might break super easy and be really runny (this is because the membrane holding the yolk together weakens over time), that’s a sign of an older egg.
  • Another great option is the Egg Float test – you can learn how to do that in this video:

How Long Do Raw Eggs Out Of The Shell Last?

Once you crack an egg and empty the contents, you have 1-2 hours to safely use them. Although, it’s best to keep them refrigerated at that point (since bacteria grows better at room temperature)- and then you have 2 to 4 days to use them.

How Long Do Hard-Boiled Eggs Last?

Hard-boiled eggs will last up to one week in the refrigerator and in the shell. Eating the egg within 1 to 2 days is best if you have peeled it and kept it in the fridge. Putting them in the freezer is not recommended.

What Happens If You Eat A Bad Egg?

When an egg goes bad it has the possibility of salmonella contamination, a bacteria in the intestines that is common to food poisoning. The symptoms of this illness are pretty gruesome and include fever, vomiting, and diarrhea. It can be very dangerous and even life-threatening in some situations.

Of course, not all old eggs end in a horrific story of salmonella poisoning – but it’s nothing to mess around with. So, avoid eating old eggs.

Summary

So, if you’ve been wondering “do eggs go bad?” or “how long do eggs last?” you can feel quite sure that as long as you leave the bloom on and keep them in a cool area, they’ll last for several weeks. You can also rest assured for a longer period of time, if your eggs are refrigerated.

More Chicken Egg Resources


The Backyard Chicken Bundle is a unique ebook bundle with every resource you need to start raising a flock of healthy hens! (Total value $250 for just $24.99). START spending every possible minute playing with & enjoying your pets, without the worry!

Included in the bundle:

  • 5 individual ebooks with over 40 gorgeous full-color photographs, charts, and recipes for all-natural coop cleaners, layer feeds, herbal first aid salves, and more.
  • 34-page Herbal Encyclopedia to growing 30 different herbs for your hens right in your own backyard
  • 3 downloadable checklists to save your flock from bad weather & predators, and to keep them healthy while molting.
  • 1 Apple Cider Vinegar for Backyard Chickens video that shows you step-by-step how to make organic apple cider vinegar in your own kitchen
  • Information you can TRUST by a recognized backyard chicken expert featured in Reader’s Digest, Glamour, and on major news networks like ABC, CBS, & NBC.

Get your Backyard Chicken Bundle here!

Backyard Chicken Bundle

This article is sponsored by Omlet. In exchange for an Eglu Cube and run, we agreed to review the coop. However, this review is our objective opinion and honest thoughts about our experience with the Eglu Cube.

Testing out Omlet’s Eglu Cube

We tested the Eglu Cube with 5 young chickens – 3 pullets and 2 young roosters. We had been eyeing it for a while, and thought it would be perfect for our latest crop of Brahmas, Speckled Sussex, and Jersey Giant chickens. We’re very excited about this coop – it’s beautifully designed for any backyard farm, and we were thrilled to give it a test run and review it.

During the 2 weeks we tested it before writing this review, our flock was very happy – every day they got fresh grass (aka new bugs to eat!) and happily spent a few hours every morning eating nutritious greens in addition to their grower feed. 

The first night, they didn’t understand they could go up the ladder and spend the night in the coop area – we had to put them inside it. However, the second night, they surprised us – they went into it themselves. So, clearly they felt happy and secure in it. (If you want to buy the Eglu Cube, go here and use the coupon code FRUGALCHICKEN – you’ll save $90 on this exact set up).

What’s the Eglu Cube look like?

Here’s a full video walk through:

https://www.facebook.com/thefrugalchicken/videos/1953513794927888/

The coop arrives in the mail in several boxes – it was easy to put together though. No special tools were needed, and the manual was easy to follow. Our chickens were able to go inside their new home in just a couple hours!

The Good

The Eglu Cube has several features that make it a great choice for your flock. The design is attractive – it will fit easily into any backyard and your neighbors will love how it looks.

It’s also important to note that this is a tractor, and not a permanent structure – this is an important distinction since many areas have laws about building structures in your backyard.  You might be able to slide around those laws with the Eglu Cube.

The entire coop is secure – predators will have a hard time getting into the run, and as long as the doors are all closed, they don’t stand a chance against the safety features. To open the main coop door, you have to pull up on the knob and twist. The backdoor and the door to the nesting box are also twist and pull – no predator will be able to figure it out.

Ever try an eglu cube?

The run has wire safety features that make it difficult for digging predators, such as dogs, to dig under the coop to get at your chickens. It’s also hard to knock over (we did test it!), so a dog can’t just pounce on it to get at your birds.

Ever try an eglu cube?

The coop also comes with wheel attachments, and it’s easy to push the tractor to move it to a different area of your yard. The advantage, besides getting green grass, is your chickens aren’t living on their own feces – this could potentially reduce illness because their not reinfecting themselves with bacteria or inhaling their urine.

The coop is also easy to clean. It’s made of durable plastic, so we were able to just wipe it down with all-natural cleaners. There’s also a drop tray to collect manure, so your chickens aren’t sitting on their own poop. It also makes composting their manure very easy.

Ever try an eglu cube?

The Bad

There’s nothing really bad about this coop – I truly love it and think it would make a good home for your chickens. There ARE some things to think about though. The run is well constructed and will keep your chickens safe from predators, but the top will have to be covered in the rain, snow, and sleet and in heavy winds to keep your hens out of the elements. In the daytime, they’re unlikely to go into the coop themselves.  (Updated: Omlet sells a cover for the run, which works great. We’ve also used a tarp.)

However, because the Eglu Cube can be rolled, you can bring it under a barn or other structure. Another option is to tarp the run in really bad weather and then remove it when the weather is better. Another consideration are the locks for the double doors. The doors are secure – it’ll be hard for predators like raccoons to open it. But if you have small children or other curious parties (like nosey neighbors), you’ll want to consider adding an extra clasp as a double lock entry. Our 3 year old daughter learned quickly how to open the doors, and let our small flock run free several times!

Finally, we realized that we will have to modify one of the doors in the summer with a screened area – because our summers are so hot and humid (it can be well into the 90s with high humidity at night), the coop area will be too hot for them in peak summer. However, this is an easy adjustment, and doesn’t diminish the quality of the coop – any coop we used would need SOME sort of customization.

Final thoughts

The Eglu Cube is a great investment, and perfect for your small flock. We love it, and will not hesitate to buy another one for our chickens! (If you want to buy the Eglu Cube, go here and use the coupon code FRUGALCHICKEN – you’ll save $90 on this exact set up).

A common question I’m asked by new owners is “do raccoons eat chickens?”

Unfortunately, I’m usually contacted by someone after they find their chickens dead in their coop, and they can’t figure out what attacked their birds.

So, do raccoons eat chickens? The short answer is yes.

Although we love our chickens and view them as anything but food, the rest of the natural world doesn’t feel the same way. In fact, chickens are a good eat for any carnivorous predator.

So, given the opportunity, yes, raccoons will eat chickens, and not be too ashamed of it.

Now for full disclosure, we don’t have a lot of our masked friends in our area – we’re usually battling opossums, domestic dogs, the occasional coyote (they’re around, but don’t try to break into our coops, knock on wood), and hawks.

I’m sure we have more predators around than I know – there’s been times I’ve come out in the mornings to feed, only to find a rabbit or chicken missing, and no idea what happened.

No sign of a struggle – nothing. I’m fairly confident it’s not raccoons, however – and I tell you why below!

Do raccoons eat chickens? Here's what you need to know to keep your backyard flock safe!

How do you know if a raccoon attacked your chickens?

I review some common predators that, like raccoons, eat chickens here, so in this article, we’ll just focus on raccoons, which have a tell-tale sign of their presence.

Unlike coyotes, dogs, and hawks, who take their prey away from your backyard, raccoons like to share that they’ve been around.

When a raccoon decides to eat a free meal, it’ll leave pieces of chickens laying around your coop, front yard, and even your porch.

Yep – it’s a gruesome and upsetting site, but it’s also one that’s fairly conclusive. Skunks and opossums usually eat the chickens right where they’re attacked, and leave the bodies in the same place.

Raccoons will distribute the remains WHILE they eat chickens, leaving a trail that’s unpleasant to come across.

Identifying Raccoons

The first sign of a raccoon in your area (other than seeing one) is if you see footprints around. Raccoon tracks are pretty distinctive, with 5 toes on both front and back paws:

Do raccoons eat chickens? Here's what you need to know to keep your backyard flock safe!

You also might notice the critter’s poop, which looks like this:

Preventing Raccoons

Raccoons have nimble fingers and are quite intelligent – so your #1 priority is to make sure your coop is safely locked. Simple slide locks are easy for raccoons to figure out, so choose a lock that’s either out of their reach or would be difficult for a toddler to figure out.

In the same vein, make sure the door of the coop closes tight, all the way around – we’ve had coop doors that close, but still left a gap – predators can still get into the coop through those cracks.

Be particularly vigilant if you have young chickens that aren’t roosting yet – pullets & cockerels don’t roost until they’re a bit older. As young chickens, they still lay on the ground at night, and are a prime target for raccoons wanting to eat.

Keep feed out of the coop at night – keep it away from AROUND the coop also. Raccoons eat chickens when there’s something that begins attracting them in the first place – so eliminating that issue is your first defense.

If raccoons are a problem in your area, it’s also important to use hardware cloth – ¼-inch hardware cloth is best.

Raccoons like to put their fingers through larger holes – and they’ll pull your chickens THROUGH the holes. It’s a gruesome fate for your valued flock members.

What to do if Raccoons Eat Chickens On Your Farm

If raccoons eat chickens in your farm regularly, and it really becomes a problem for you (and none of the suggestions in this article work for you), consider calling a wildlife service (such as animal control or a wildlife rescue) to see if they can help relocate the animal.

State laws vary about disposing of predators yourself, so it’s always best to be cautious and do your research before making any decisions.