There’s common canning mistakes…and then there’s canning mistakes that can cost you your health.
Every year, I see the same articles floating around the internet and getting shared on Facebook. And I worry for the unsuspecting people who will follow this bad advice, and make all sorts of canning mistakes that might lead them to a hospital visit (and a big ol’ bill).
Canning vegetables should be a fun and easy process, and it is, when you follow established directions that are safe and have been studied.
In this article, we’ll debunk a lot of the canning myths I see floating around on the internet so you can feel confident canning your harvest.
Umm…actually….
One common response to debunked canning mistakes usually is something like “well, my grandmother did it and nobody died, so it must be okay.”
Yes, reported cases of poisonings from home canned goods are relatively rare. But that’s because a majority of people follow canning recipes outlined by research institutes such as the National Center for Home Food Preservation.
This center has studied many food preservation methods, which have helped to establish which home canning recipes and practices are safe – and which are just canning mistakes you want to avoid.
Here’s 7 canning mistakes you might see on Facebook. You should avoid these myths so you don’t get sick.
Mistake #1: Oven canning is safe
Oven canning, which involves placing filled jars in a hot oven then allowing the heat to seal the jars, is one common canning tip that’s totally a safety don’t.
The simple reason is the contents of your jars may not get hot enough to actually kill all the bacteria and mold spores in your food, which then have a likelihood of growing inside your jars.
While both water bath and pressure canning rely on water to conduct heat to kill bacteria, mold, etc. that might spoil food, the oven canning method involves only dry heat. Because dry heat does not raise temperatures as consistently as water, there’s no telling what the temperature inside the jar has reached.
Even if you leave your food in the oven for the same amount of time you would if you were water bath canning, the inside of your canning jar might not get as hot as it needs to be to properly kill all the bacteria crawling inside. It’s one of the most common mistakes we see!
Mistake #2: Flipping a hot jar upside down seals it well enough, and waterbath or pressure canning isn’t necessary.
A few articles on the internet offer the advice that that after filling a hot canning jar, it’s perfectly safe to flip it upside down to get the lid to seal. While your lid might seal, it’s potentially too weak to make a really sticky seal, and you might find in a few months that your jars are no longer sealed at all (and have a big green moldy mess).
Additionally, one of the most common mistakes with this method is that your food, which you just ladled into the jar, also probably didn’t reach a high enough temperature to kill off any nasties lurking around to spoil your food.
According to science, the biggest reason that water bath and pressure canning are safe is because they raise the internal temperature of the food to a high enough degree that a most of the bacteria and mold spores are killed.
If you rely on flipping the jar to create a seal, you’re making more than just a few mistakes by skipping an important step.
Mistake #3: Paraffin wax is an excellent sealer
Using paraffin to seal food is another common mistakes we see when it comes to canning. Using paraffin in canning to preserve food involves placing thin layers of wax over your jar until there’s about a half inch of wax that seals the opening.
Back in the day, canning with paraffin wax was considered safe, but the research shows that the bacteria and spores just aren’t sufficiently destroyed. There’s also no way to determine whether the jar is actually sealed well enough. Stick with new mason jar tops!
Mistake #4: Inventing your own recipes is okay
While I’m always tempted to create my own salsa recipes, the truth is that inventing your own canning recipes isn’t a good idea, and so it’s 4th on our list of common canning mistakes. The canning recipes you see in the Ball Blue Book Guide To Preserving and on the National Center for Home Food Preservation website have been rigorously tested for safety.
If you create your own canning recipe, the amount of acid needed to safely preserve food might be off (a pH of 4.6 or lower is advised), or the temperature might not get high enough to adequately destroy bacteria and mold spores present. If you want to make up your own canning recipes, you can always freeze it.
Mistake #5: If it’s canned at the store, then it’s ok to can it at home
This is one of the biggest common canning mistakes I see. Here’s why: Commercial manufacturers spend a lot of money researching canning and safe storage techniques. They also can heat their canning recipes to a higher temperature than we’re able to using our own equipment. While they have methods and data to safely preserve certain foods, we do not, and we can’t repeat these techniques at home.
Mistake #6 It’s not necessary to boil lids before canning
On the contrary, it’s very important to boil mason jar lids before using them to preserve fruits and veggies. While sometimes you’ll read that the lids will get sterilized during canning anyway, simmering the lids is meant to heat the rubbery part to ensure a proper seal. The last thing you want is to make mistakes that cause a poor or faulty seal to destroy all your hard work.
Mistake #7: Canning butter is safe
I frequently see recipes and articles that recommend preserving butter by pouring hot, melted butter into heated jars, then sealing the product by flipping it. In fact, it’s one of the most common mistakes I see shared on Facebook, and a hotly debated topic.
While it seems logical that dairy can be preserved in jars, at this time, there are no safe canning recipes to preserve butter out there. Butter is a low-acid product, meaning botulism spores have a better environment to grow.
Fats like butter can also protect bacteria from heat during canning, so for now, preserve your butter at home by freezing it. Kept at room temperature, your canned butter will quickly spoil.
A common question I get from chicken owners is how to stop a rooster attack or retrain a rooster if they have become aggressive.
Now, I’m not going to lie. This isn’t the easiest thing to do in the world.
When a rooster attacks, it’s called “flogging” (how’s that for a wonderfully descriptive, not-very-much-fun term).
Roosters CAN be retrained (we’ve had to do it a few times) but it takes some time and, dare I say it, gumption on your part. You need to be vigilant and consistent (while also being compassionate – he IS doing his job after all).
Here’s a video where I explain why roosters attack their people and the best way I’ve found to retrain them: Why Roosters Attack. Also, read on to learn more.
Why do roosters attack?
In a nutshell, it boils down to “they’re programmed to do it.”
What does this mean? Well, once upon a time, roosters didn’t have people and coops to protect them. They had their wiles and their limited ability to fly. Meaning, they didn’t have many defenses against hungry carnivores.
So to avoid being dinner for some predator, roosters learned they protected their ladies by attacking whatever invades their territory.
Similarly, they learned that if they wanted to be top dog (and reproduce the most), they needed to ward off potential rivals.
In other words, flogging amounts to a rooster’s version of a bar fight. Your floggin’ rooster is programmed to compete for the top of the flock.
He might get worse if he’s been the only rooster and suddenly there are other new faces added to his flock. You might also notice he turns into a jerk when it’s spring and the hens start laying again. In these cases, it might just be a temporary behavior.
And there’s also the possibility that he’s a young rooster just feeling his oats. When he gets knocked down a peg (figuratively speaking), he’ll realize he’s not at the top of the flock.
How to stop this negative behavior?
First, understand that rooster aggression is normal and it’s part of the pecking order as well. But it does need to be kept under control. I explain it best in this video how you need to convince Mr. Rooster that you’re the head of the flock. This isn’t a bad thing – animals like to be led. By leading them, you’re giving them a sense of security.
Wear some boots and take a long stick or broom and gently sweep the rooster away as you enter the coop area. You’re entering his domain, but he needs to understand there should be space between you and him, and that you control that space.
Never hit or hurt the rooster – he’s just doing his job. YOUR job is to just make sure he understands he has his space and you have yours. Your goal is to eliminate his aggressive behavior and being mean to him will not do that.
Additional tips
Don’t be afraid (you are MANY times his size after all) and don’t back down. Don’t show fear and definitely never turn your back, which could undo any work you’ve done with him previously. He’ll think you’re running away or take a prime opportunity to peck you while you’re not paying attention.
While it’s unnerving having a rooster come at you with dominance in mind, he’s not likely to do very much damage (compared to a dog, for example). So even if he makes contact, you won’t be harmed very much. Understanding this gives you the confidence to help him realize his place.
If your rooster has just started attacking or he’s young and testing out his place in the flock on you, you can try separating him from the flock for a few hours to see if that helps settle him. He might just need to be put in “the naughty chair” for a time-out.
You can also offer him treats as a bit of a friendly gesture. He may see you more as a friend than a foe. If you don’t want to encourage him to be near you, then you might want to skip the treats.
If he’s been chasing you or attacking for a while or definitely is old enough to know better, then separating him might not be the best solution or work long-term.
Regardless, if you have a stinker be sure to wear gloves and long pants (jeans are best) when you are in a training session. Remember that roosters have protective spurs.
Can you ALWAYS retrain a rooster?
Honestly, in some cases, it won’t work out. I’m not going to sugarcoat it or try to convince you that you should try again and again and again.
I do believe these cases are rare, however, and given enough time, most roosters will come around.
What if you don’t have the time or the rooster is really attacking your family? If you feel it’s not a good situation for you or the rooster, you can always rehome the bird. There’s no shame in making that decision, and you have to do what’s best for your unique situation.
We had one rooster on our farm that was just a real pain. He constantly fought with the other roosters, picked fights, and distracted the roosters from eating their food. He was just plain miserable to be around. If this is your situation, then you need to make the best decision for yourself and your flock.
Summary
By and large, however, we’ve had roosters who were the attacking kind but with the proper training, they stopped being such pains in the butt.
If you pay attention to the early signs of aggression and take the time to do a bit of training, you can usually stop them in their tracks and show them whose the boss. However, it’s possible to have a dominant rooster that simply won’t comply. In that case, it’s okay to try to rehome your roo. Don’t feel bad, it can happen to the best of us!
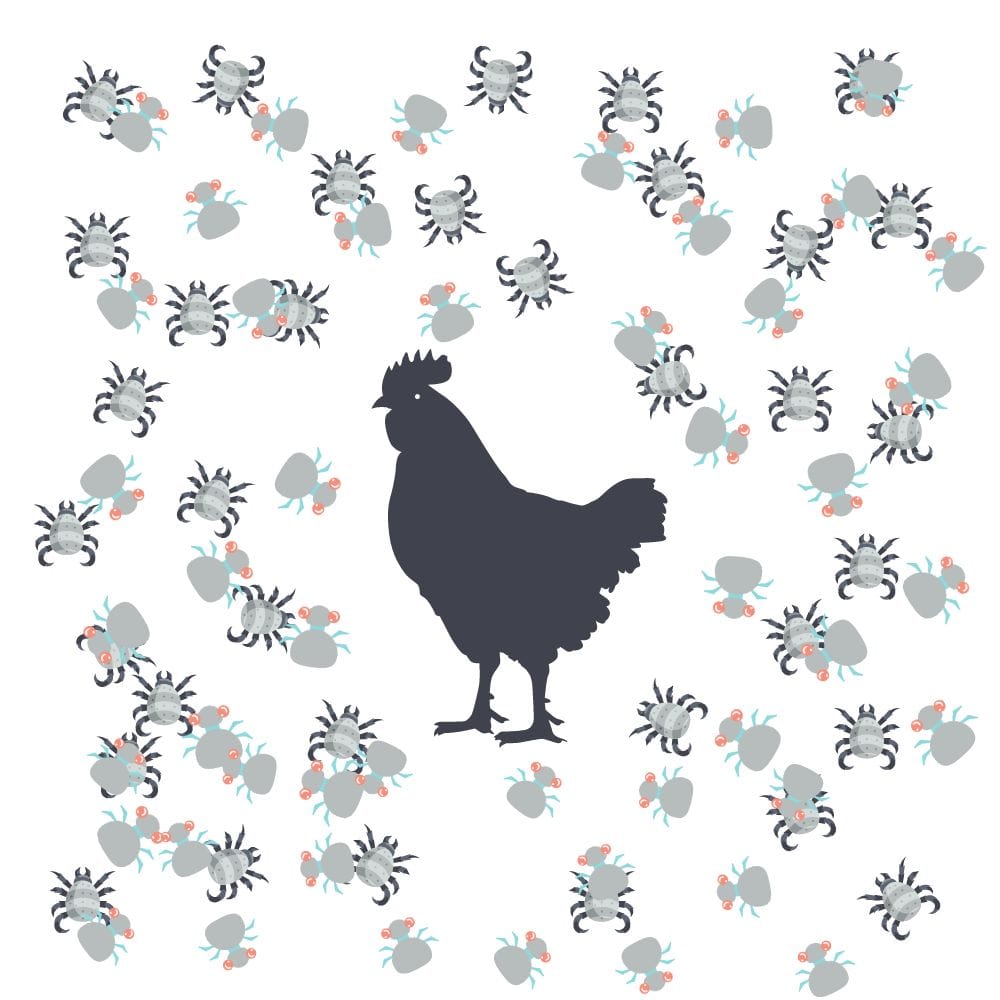
Chicken mites can literally suck the life out of your hens. They’re pests that can cause a lot of health issues. You need to eliminate them from your coop as fast as possible.
In this article, you’ll discover how to spot these tiny insects on your chicken AND in your coop. You’ll also find options to get rid of them, and when it’s time to call the vet. The topic might make you itch, but it’s important to be knowledgeable about this topic.
Red Mite (Dermanyssus gallinae) aka Roost Mite or Poultry Mite
Northern Fowl Mites (Ornithonyssus sylviarum)
Tropical fowl mite (Ornithonyssus bursa)
Knemidocoptes mutans (the mites that cause scaly leg mites)
Feather mites (25+ different species)
Depluming mite (Neocnemidocoptes gallinae)
Mites are external parasites and they cause many health issues. In this article, we’ll discuss all these mites together, with a separate section for scaly leg mites. Each mite breed above can cause the same health issues, and you can deal with them the same way.
Mites are tiny insects that crawl on your flock’s skin and feathers. They can also inhabit the scales on your chickens’ legs. They bite chickens and suck their blood (yes, like miniature vampires). They can also cause skin irritation, resulting in red, flaky skin.
In extreme cases, they can actually kill your chicken. How? Well, as the mites feed on your hen, she can lose iron. Over time, anemia can set in, and potentially cause death.
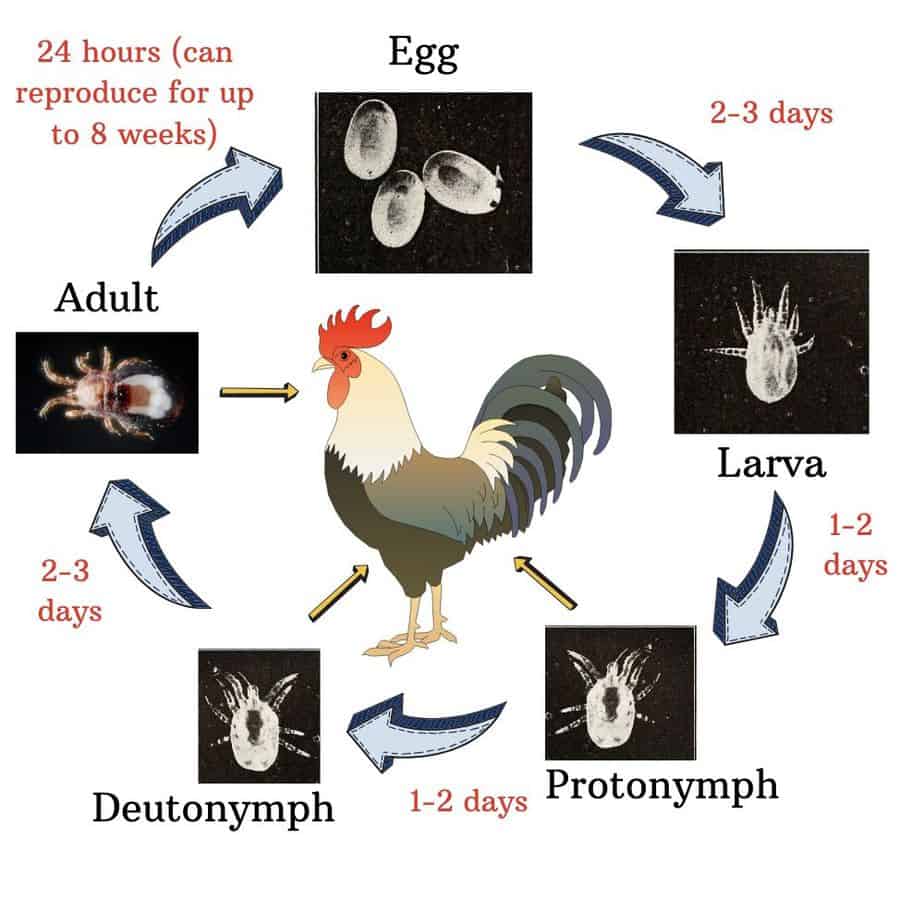
Given the right conditions, mites can complete a life cycle in as little as 7 days, potentially exploding their population in your coop.
Mites can also transmit the folowing between birds:
Salmonella Enteritidis(2)
Pasteurella Multocida
Coxiella Burnetii
Borrelia Anserina
Eastern, Western, and Venezuelan Equine Encephalitis viruses(1)
Fowl Poxvirus(1)
Avian Spirochaetosis
Erysipelothrix Rhusiopathiae(3)
At the very least, chicken mites might cause your hens to slow down their rate of egg-laying, or just stop laying altogether – not good stuff.
A single mite can live up to 10 months in your coop.
How Do Chickens Get Mites?
Mites are all around us. Once you start raising chickens, they’ll eventually try to inhabit your coop – especially if you don’t clean it regularly. Soon, they’ll start looking for a food source – your chickens.
Mites like to hide in corners and crevices. Since nesting boxes tend to have lots of great places for mites to hide, they’ll soon make their way there. When your hens visit their boxes to lay eggs, the mites will jump onto your chickens.
Mites can jump from chicken to chicken as well. Pretty soon, your whole flock could be infected!
A lot of people wonder whether their flock can die from a mite infestation. The short answer is “yes.” If left untreated, mites can cause many health issues. According to the Merck Veterinary Manual, chicken mites might cause anemia, leading to death(1). It’s possible mites can eat up to 5% of a chicken’s blood in one night.
How To Know If Your Chicken Has Mites
Signs your chickens might have mites include:
Mite poop around the base of feathers (especially the vent area)
Feather loss
Excessive preening
Unkempt appearance
Raised scales or loss of scales on your flock’s legs
Pale combs
Blood spots on eggshells
However, the only way to know for sure if your chickens have mites is:
When you see the pests themselves on your chickens
You identify their eggs
Mite feces
Mite Feces
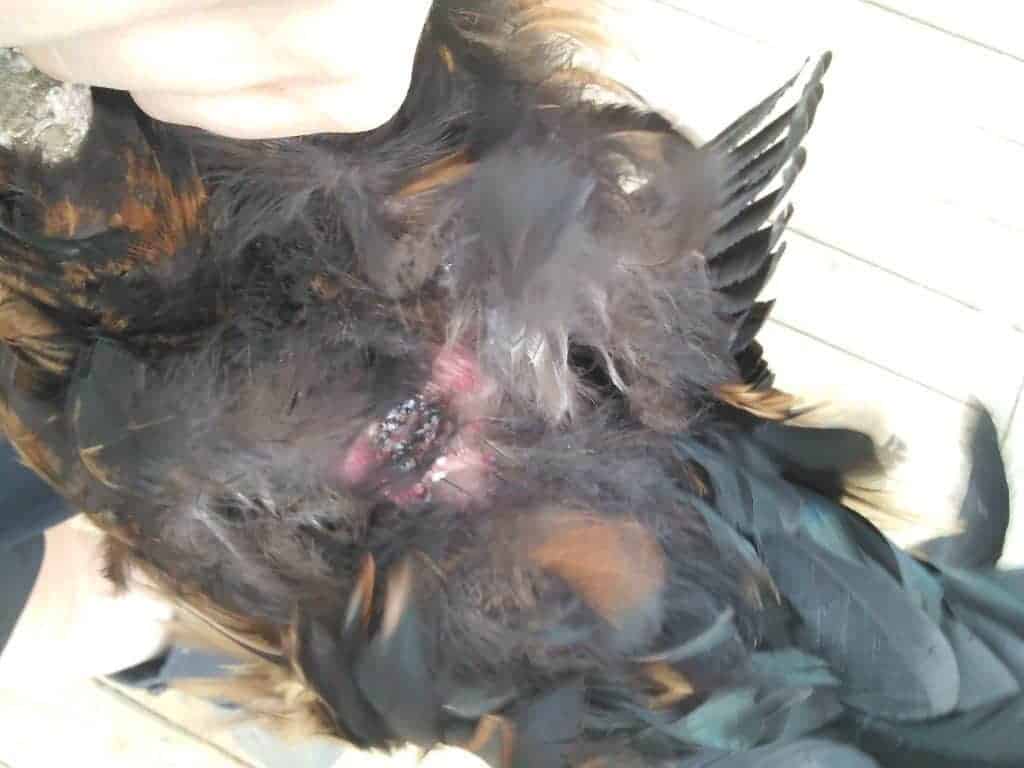
When checking your chickens, you might notice a greyish-black substance at the base of their feathers and/or on their skin. In my experience, you also might notice this greyish-black substance around your chickens’ vents (both hens AND roosters). This substance is likely mite poop, and it’s a pretty definite indicator your flock has mites.
Loss of Feathers
One sign of mites you’re likely to notice is feather loss (just remember that feather loss can indicate a LOT of things, including molting and very active roosters). Some areas to pay attention to are the:
Back
Vent
Tail feathers
You might see patches of open skin or even raw or red skin.
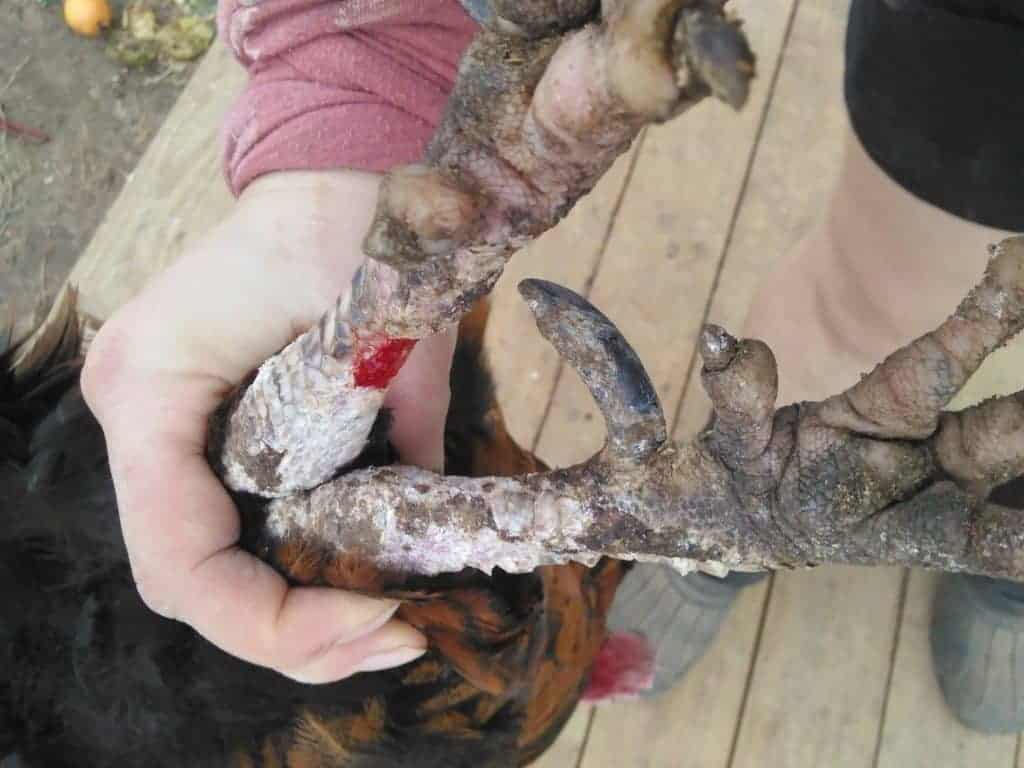
Raised Scales (Scaly Leg Mites)
The simplest way to explain what raised scales looks like is to share a picture:
The scales on their legs lift up as the waste from the mites starts to build up under the scales. Eventually, the chicken will start to lose their scales, which can lead to other secondary issues such as bacterial infections. The legs might even bleed.
Once the mites are eliminated, the scales usually grow back. (Don’t confuse this with bumblefoot, which is a bacterial infection that causes lumps on the bottom of your flock’s feet).
Pale Combs
Pale combs can indicate a lot of health issues, including mites. As your chicken loses blood to the mites, she’ll start to lose iron. Eventually, she might become anemic, since iron is important for circulating oxygen.
As she becomes sicker, her comb might turn from a bright, healthy red into a pale pink or peach color. In extreme cases, your chicken might die.
Blood spots on eggshells
When mites bite your chickens, they can sometimes leave an open wound. It might be very tiny, or, especially if your chicken picks at it, the wound can be pretty significant. If your chicken has these wounds around her vent, then you might start to notice blood on her eggshells.
While this doesn’t definitively prove your hen has a mite infestation, you should still double-check her for mites. You should also remember that your hens can have mites even if you don’t see any blood on their eggshells.
When To Contact The Vet
If your chicken:
Has dry, itchy skin
Feather loss
Raised scales
Unkempt appearance
Seems unwell or depressed
Has unusually low egg production
Is opening/closing her beak as if gasping for air
You see mites, their feces, and/or their eggs
Then you should seek the advice of your vet, especially if you’ve tried treating it on your own but have been unsuccessful.
How Do You Get Rid Of Mites on Chickens?
Now that we know what chicken mites are, why they’re a health issue, and when to contact your veterinarian, let’s talk about how to get rid of mites and keep them out.
Your basic options include:
Pharmaceutical Options (best to talk to your vet)
Natural options like herbs and diatomaceous earth
Extreme heat
Extreme cold
Pharmaceutical Options
It’s always best to speak to your veterinarian to determine the best pharmaceutical option. The chemical and pharmaceutical options can be toxic, expensive, and/or ineffective in the long term, however.(1)(5)
How To Kill Chicken Mites Naturally (And Prevent Them From Returning)
There are a few different options to kill mites naturally. Some work great for your chickens, others are better for your coop, and some (like herbs) serve dual purposes. These are just options, and you’ll have to decide for yourself which options are right for your coop.
For your chickens, your options include:
Herbs
Diatomaceous earth
Wood ash
For your coop:
Herbs
Diatomaceous earth
Heat/cold
Vinegar
Herbs & Herbal Blends
Humans have used herbs for generations to deter pests. In modern times, recent studies indicate that herbs show promise to repel pests. One government agency, the Environmental Protection Agency (EPA) even lists certain herbs as safe to repel pests (they call herbs “minimum risk ingredients”, meaning a minimum risk to the environment).
In our experience, herbal blends are far better than a single herb, which is why we don’t discuss single herbs in this article. Sometimes, readers try to use a single herb and don’t have the results they desire. Because of this, we now only recommend herbal blends we use ourselves.
We personally used to try using single herbs, but they never worked as well. So, we started mixing herbs together, with a much better outcome. This blend became our product MitesBGone.
We love MitesBGone because it’s an all-natural herbal product for dust baths. To use it, we just sprinkle the herbs in our flock’s nesting boxes and dust bath areas. You can use just the herbs, or mix them with diatomaceous earth. Chickens love exploring MitesBGone. One great advantage of herbs is that are a good part of prevention, not just treatment.
You can view more about this herbal blend here. The blend is 100% non-GMO and all-natural and makes it so easy to use herbs for mite control.
Diatomaceous Earth
Diatomaceous earth is the fossilized shells of diatoms, which are prehistoric aquatic algae. These fossilized diatoms are then crushed, making a powdery substance. DE is also comprised of silica, clay minerals, and iron oxide.
Diatomaceous earth can help treat mites because the particles have sharp edges, which slice the exoskeletons of mites. The mites then die.
In one study which was run by the University of California Riverside, birds were given a dust bath of sand and diatomaceous earth. These hens showed a huge reduction in the number ofchicken mites and lice after just seven days.
Many people avoid using DE because it can lead to respiratory issues for both chickens and humans (unlike herbs, which is why we use herbs). When inhaled, over time, there’s the potential that DE will damage both human and poultry respiratory systems.
If you decide to use DE, however, it’s important to use masks.
You can find diatomaceous earth in any feed store or on Amazon. You can find it on Amazon here.
Just remember that when it comes to DE, you always want to use food-grade diatomaceous earth. Construction grade isn’t usually pure and could be mixed with anything. Just check the label to be sure.
If you want to use herbs AND diatomaceous earth, you can try this product. The diatomaceous earth and herbs come pre-mixed.
How To Use Diatomaceous Earth
The easiest way to incorporate DE into your coop is by offering a dust box with a diatomaceous earth/sand or dirt mix. There’s really no formula for how much of either to offer. Personally, I use a 1:1 ratio. If you plan to offer your DE bath in a run, you will need to remove it when it rains, otherwise, you’ll be left with a gloppy mess.
Wood Ash
Another option is wood ash. There are fewer studies regarding wood ash, so personally, I would use it with herbs and/or diatomaceous earth. Otherwise, you might not have the results you want.
What is wood ash? It’s the residue from burning wood. Yes, you can use ash from your wood-burning stove. Just make sure you use wood that’s not treated with chemicals in any way.
Steer clear of ash that’s made from any other substance besides wood. It’s not the same thing, it won’t be as effective, and it might harm your chicken. Wood ash is between 25 and 45 percent calcium carbonate. Wood ash can work against chicken mites because it potentially smothers them.
How Often Should You Treat Chickens For Mites?
Mites can live up to 10 months in your coop, and it only takes 7 days for a mite to complete its life cycle. If you want, you can consistently use natural options (such as herbs or diatomaceous earth). It certainly won’t hurt. To consistently use herbs or diatomaceous earth, adding them to your flock’s dust bath is easiest.
If you and your vet determine a pharmaceutical course of treatment, then it’s best to discuss those details with your vet.
How To Apply Natural Options To Your Chickens
Applying products to your chickens can be a bit daunting at first. They’re live animals that tend to flap their wings and startle easily. Here are some ideas to make it a bit easier.
Apply treatments at night
It’s easiest to apply any treatments at night. Your chickens are naturally quieter, less likely to startle, and less likely to run (and if they do, lock your coop to keep them contained). Simply pick them up from their roost and use your herbs, diatomaceous earth, etc.
Hold them firmly, but gently
To dust your chicken, hold him or her firmly. First, pick your chicken up. Next, hold her so her wings lay flat against her body. She might squawk and sound unhappy, but she’s fine. Finally, apply your treatment to the area of concern.
Applying treatments to legs
If you need to apply treatments for scaly leg mites, then make sure the legs are exposed. You can do this in a few ways. You can wrap your chicken in a towel (like a burrito), making sure to leave the legs exposed. If your chicken is being very difficult, you can hold your chicken by the legs. She will be upside down, which will calm her. You can then apply the treatment as needed. I use this option only as a last resort.
The Best Ways to Clean Your Coop
If your flock has mites, you’ll want to treat their coop as well. I have a full step-by-step breakdown of how to clean a coop here.
The idea is you want to eliminate mites from all the nooks and crannies possible. It can be difficult to ensure the whole coop is clean, but it can be done. I would personally use more than one option from this list, such as power washing, then adding herbs to the coop bedding.
Some options include:
Heat/cold
Power Washing
Diatomaceous Earth
Herbs
Heat/Cold
If possible, you can heat treat your coop and/or nesting boxes. In studies, temperatures of 113 degrees or higher (45 degrees C) have been shown to kill mites. If removable, you can remove the nesting boxes and place them under a heat source to raise temperatures to 113+ degrees. Very hot water might also work. In some areas of the United States, summer temperatures can provide all the heat necessary.
Similarly, temperatures below -4 °F (-20 degrees C), have been shown to kill mites. If you live in a Northern climate, and your temperatures get far below -4 degrees F, then it’s unlikely any mites will last the winter (at least mites in the coop. Mites on your chickens might last longer because your chickens provide heat.)
Power Washing
Similar to using heat to rid your coop of mites, if you can get very hot water (over 113 degrees), you can try power washing the mites away. Just make sure to get into all the crevices.
Diatomaceous Earth
You can apply DE to your coop floors, including any crevices where mites can hide out. Adding it to the nesting boxes will also help those areas. It’s best to follow the directions on the packaging for the proper amount of DE. Just make sure your flock isn’t in the coop so they don’t inhale it. You should wear a mask as well.
Herbs
As I said above, I’ve had good results with power washing and using herbs. Both ideas are less caustic than diatomaceous earth and are easy to execute. The herbs we use come pre-mixed in MitesBGone Coop Herbs.
First, we powerwash the coop. Then add new bedding and MitesBGone Coop Herbs. I have a 10 foot by 12 foot coop, and use 1 cup in each corner, and then 2 cups sprinkled around the rest of the coop. Finally, I add ½ cup to each nesting box, after they’ve been cleaned.
Other Methods of Cleaning
Bleach
So, will bleach kill chicken mites? In short, yes, bleach will kill mites. It’s used to treat clothing and other fabrics to rid them of mites such as scabies. However, I don’t personally use it in my coop.
Bleach is a harsh chemical, and it’s hard to know how much to dilute it so your chickens stay safe. If you do want to use bleach, make sure it’s heavily diluted. Keep your chickens out of the coop for a few hours as well. Since peer-reviewed studies show that high/low temperatures and herbs are effective against mites, those are the methods I personally use.
Vinegar
There are no studies that show whether vinegar made from grapes will kill chicken mites specifically. However, vinegar is a commonly used all-natural household cleaner, and it’s certainly effective to get rid of poop and other things. It certainly won’t hurt your flock.
In one study, researchers used wood vinegar(6) to rid a coop of mites. It was successful. There aren’t very many studies, however. If you can find wood vinegar in your area, it’s certainly worth a shot.
Lime
Lime is essentially calcium carbonate (the same thing that comprises oyster shells). It might kill mites, and according to the USDA, it’s an old-timey method to kill scabies on sheep. It certainly won’t hurt your chickens.
Can Chicken Mites Live On Humans?
Before we end this article, let’s answer a very important question that you might be wondering about.
While chicken mites won’t necessarily infest your body as long as you bathe and wash your clothes regularly, you can still carry them around(4), so if you handle your hens to treat them, make sure to wash yourself and your clothes in hot water.
Also be sure to practice good biosecurity, and scrub your shoes in a bleach or citrus vinegar solution so you don’t re-infect your flock.
Final Thoughts
Treating your flock for chicken mites is necessary in order for them to have healthy, happy lives. And luckily, there’s a lot of options for all natural treatments – for your flock AND their coop. Hopefully, one or two ideas in this article will help you out! If you’ve successfully used any of the ideas above, let us know!
Chirico, J.; Eriksson, H.; Fossum, O.; Jansson, D. (2003). “The poultry red mite, Dermanyssus gallinae, a potential vector of Erysipelothrix rhusiopathiae causing erysipelas in hens”. Medical and Veterinary Entomology. 17 (2): 232–234. doi:10.1046/j.1365-2915.2003.00428.x. PMID 12823843.
Rosen, S.; Yeruham, I.; Braverman, Y. (2002). “Dermatitis in humans associated with the mites Pyemotes tritici, Dermanyssus gallinae, Ornithonyssus bacoti and Androlaelaps casalis in Israel”. Medical and Veterinary Entomology. 16 (4): 442–444. doi:10.1046/j.1365-2915.2002.00386.x. PMID12510897
Sparagano OAE, George DR, Harrington DWJ, Giangasparo A. Significance and control of the poultry red mite Dermanyssus gallinae. Annu Rev Entomol 2014; 59:447-466
Kohsyo Yamauchi, Noboru Manabe, Yoshiki Matsumoto and Koh-en Yamauchi. (2014). “Exterminating Effect of Wood Vinegar to Red Mites and its Safety to Chickens.” Japan Poultry Science Association. doi:10.2141/ jpsa.0130170
Photo of red mite: by Gilles San Martin from Namur, Belgium – Dermanyssus cfr gallinaeUploaded by Jacopo Werther, CC BY-SA 2.0, https://commons.wikimedia.org/w/index.php?curid=24610992
For this review, we were sent a free Omlet Universal Automatic Chicken Coop Door to test. All opinions are our own and represent our own experience with this product.
In this article, we’ll cover our review of the automatic coop door when it’s installed in an Omlet chicken coop. For this review, we used our Eglu Cube.
In a subsequent review, we’ll show how we installed the same automatic door in a coop we built ourselves.
Below are our first impressions, testing results and overall recommendations! Read on to find out about our experience.
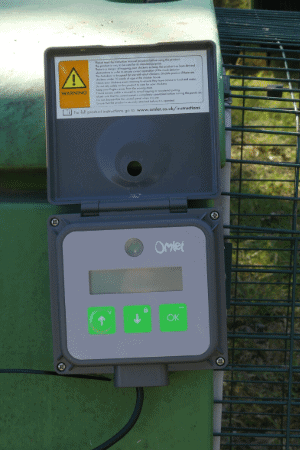
What it is
The Omlet Universal Automatic Coop Door is an all-in-one auto coop door, frame, motor, and programming panel. It can be used on the Eglu Cube or on your own chicken coop (you don’t need an Omlet coop to enjoy this product – it works with all coops).
Manufacturer’s image
It’s plastic, with a motor, and comes with all the necessary hardware to install it. The electric panel that allows you to program the door requires AA batteries.
According to the website “Omlet’s Universal Automatic Chicken Coop Door can be set to close at dusk and open at dawn. This setting will naturally follow the seasons.”
Although we did not test this feature, the door can be attached to hardware cloth and other wire so your chickens can easily access their run, if you want them to free range.
This product retails on the Omlet website for $189.99, with free shipping.
Where to buy Omlet’s Universal Automatic Chicken Coop Door
You can purchase this door on Omlet’s website here (and shipping is free – always a good thing!).
What the company claims
Quoted directly from the Omlet website:
Easy to install, no maintenance required
Operated by light sensor or timer
Powered by battery
Improves coop security and insulation
Compatible with the Eglu Cube
Reliable in all weather conditions
Built-in safety sensors
Our experience
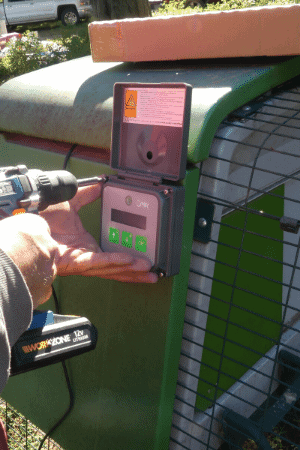
This is our third product we’ve tested from Omlet (we also tested the Eglu Go), and we were super excited to give the automatic coop doors a test drive! One thing you might notice is this section of our review is short – that’s because the Omlet Universal Automatic Coop Door was very easy to install!
We installed it in our Eglu Cube, which we reviewed a few years ago, and is still going strong (which says something for the craftsmanship of Omlet’s products!)
Taking apart our Eglu Cube to install the new coop door. The door comes with installation directions.
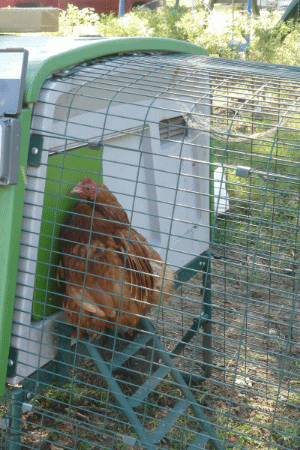
The Omlet Universal Automatic Chicken Coop Door came with instructions that were easy to follow – so installation only took a few minutes. The chickens were a bit confused the first night – we had to open the door again for our barred rock rooster, who was a bit late to the show, and the door closed before he could get inside.
The programming pad.
But the other chickens figured out quickly how to use it, and the door opened bright and early the next morning. The keypad that lets you program the door took a bit of reading the instructions and getting used to the different buttons, but once we figured it out, programming the door was a snap.
We also tested the manual feature, since our flock heads into the coop at different times at dusk. It worked well (even for me, who can’t figure out most new devices), and it’s nice to know we can open and close the door easily. (The Eglu Cube also has several other doors, so if we need to check on a flock mate, we don’t need to disarm the auto coop door).
The next day, we tested the “Light Setting” which allows you to program the door to open at dawn and close at dusk. The door did open and close at the right times! (For more information about this setting, please consult Omlet’s website here).
My cochin bantam hen was eager to test out the door (before we even installed the automatic door!)
Does Omlet’s Automatic Coop Door live up to its claims?
Yes! This door makes chicken keeping a breeze, and the door operates as expected. It was easy to install, and we appreciate all the safety features!
What we like
Door frame means easy installation with better security
The door comes with a frame – so even if you install it into a wooden coop, you won’t need to worry about framing it (without a frame, it can lead to security issues, and it’s one of our biggest qualms about past auto doors we reviewed.).
Better predator control
The door can’t easily be moved by predators. In some systems, predators like raccoonscan easily lift the door. We’ve also had doors that don’t close all the way due to dirt build up. That does not seem to be the case with the Omlet Automatic Coop Door.
Competitively priced
While we received this product for free to test, I would have bought it anyway. The price of $189.99 is very reasonable, and less expensive than other similar products on the market. It’s well worth the investment for some peace of mind!
What don’t we like
If I have to be nit picky – and this is a very nit picky thing – I would say it’s not super aesthetically pleasing. On our Eglu Cube, the operation panel sits on the outside of the coop, and the wires that connect from the door to the panel are hard to hide. However, realistically, this wouldn’t turn me off of this product because it’s easy to use and the chickens like it.
Is it useful for chicken owners?
Yes! Your flock will love this automatic coop door. We recommend Omlet’s Automatic Coop Door for flocks of all sizes and ages (just know that you’ll have to teach young chicks and ducklings to go into the coop before the door closes). The best part is that it automates opening and closing the coop, so you can sleep soundly at night and not worry about predators!
What to watch out for:
Had to take Eglu Cube apart
We tested this on an Eglu Cube, and to install it, we had to take the roof off of the coop and crawl inside the opening. So, if you have an Omlet coop, you’ll have an extra step. But it only took us a few minutes.
Haven’t tested it on geese or turkeys
We don’t have geese or turkeys on our farm, so we couldn’t test it with larger fowl. However, the door is very large, and we’ve seen our full-sized goat slip through tighter spaces, so I’m confident all classes of poultry can easily use the Omlet Automatic Coop Door.
Do night check for stragglers
Because the door automatically closes, you’ll have to check for stragglers. Another option is to have the door close well after dark (say, 30 minutes). In areas with a lot of predators, this isn’t ideal, however, so my recommendation is to just do a night check and herd in any latecomers.
Summary
The Omlet Universal Automatic Coop Door is a great addition to any coop, and your flock will love it!
Chicken nesting boxes are central to owning hens. It’s where the magic of laying eggs happens!
Choosing the RIGHT nesting boxes is pretty important – I’m frequently contacted by owners who think their hens aren’t laying eggs.
But often, the issue is these hens just aren’t fans of their nesting areas – so they’re laying elsewhere.
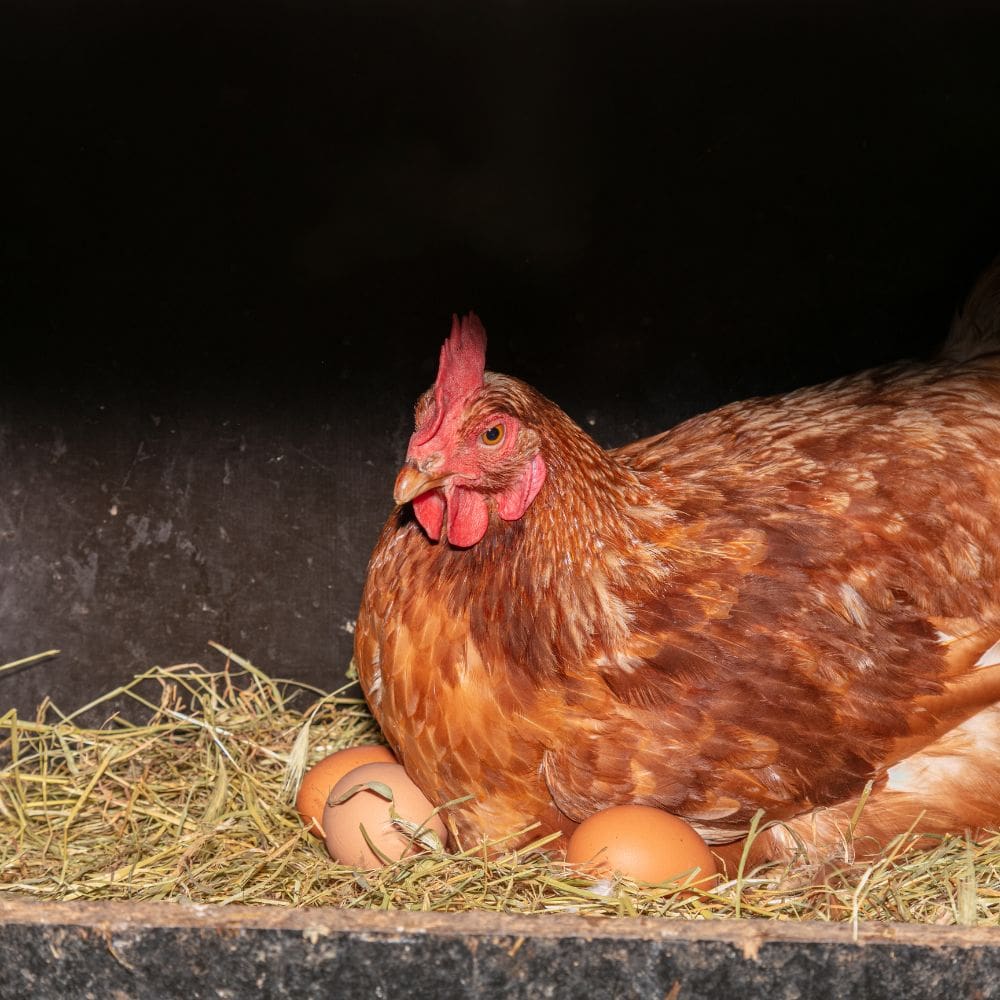
And we all know that one of the best parts of being a chicken mama is being a chicken grandmama! The excitement can’t be contained when you find the fluffy butts sitting on eggs because they’ve gone broody.
But, as I said above, hens don’t just lay anywhere. Why? Read on…
In this article, you’ll discover everything you need to know – whether you want to buy your “egg depositories” or plan to use DIY chicken nesting boxes plans to build your own.
What can I use as a chicken nesting box?
Pretty much anything can be a nesting box – a basket, a box, 5-gallon buckets, you name it. The most important thing is that a nesting box is:
Quiet
Clean
Dark
Safe
You can find many DIY nesting box plans online – just choose a style that suits your flock and coop.
Buying nesting boxes? These are the brands we recommend.
It’s most important that the nesting box is easy for your hens to get in and out of. Beyond that, they must feel safe or they won’t use the boxes. The look or material is less important than your hens feeling safe.
How many nesting boxes are necessary?
Flocks of different sizes have different needs. You don’t need a million nesting boxes if you only have a few hens! While there really is no hard and fast rule about how many nesting boxes you should have, a basic rule of thumb is 1 nesting box per 4-5 chickens.
Why so few? Chickens are social animals, and hens like to share their laying space. In fact, if you enter your chicken coop at just the right time, you might find 2 or even 3 hens cluttering up ONE nesting box!
So, if you’re asking yourself, “How many nesting boxes do I need for 20 chickens?” rest assured that 5 boxes are enough for 20 chickens.
They might only use two of those. Plus making one nesting box for each and every hen is overkill!
How many nesting boxes do you need for 6 chickens?
Remember that for every 4-5 chickens, 1 box is best. So for 6 chickens, 2 boxes are enough.
What is the best material for a chicken nesting box?
Wood, metal, and plastic are popular choices for nesting boxes. DIY versions can be made from scrap wood left from a previous project, or plywood would be awesome! You can also make economical plastic chicken nesting boxes out of 5-gallon buckets, milk crates, and even cat litter boxes!
Some people like the Roll Out nest boxes you see on Amazon. These are usually made of metal, which is easy to clean and sanitize.
Just remember that these contraptions take up space, and gravity plays a huge part in this kind of system. For it to work correctly, the roll-away nest box angle should be considered.
Whichever material you choose, just remember that it’s important your hens’ living area is frequently cleaned. Choose material that’s easy to sanitize (you’ll be happy you did).
What’s the best bedding for chicken nest boxes?
What do you put in a nesting box? Who knew you would have so many chioces for nesting material for your laying hen (or hens)? Well, you do. Let’s briefly go over several of your choices.
Pine Shavings
For bedding, we personally use pine shavings. They’re easy to clean, easy to find in farm stores, and economical. Easy cleaning is on the top of my priority list.
Cedar Shavings
Some people object to using cedar in their coops for their poultry, claiming the scent of cedar might harm chickens. While the jury is still out on this, pine shavings make a fine substitute. However, if you find you really have a lot of problems with mites, cedar shavings might be a safer bet – it’s far more likely your hens will be harmed by mites than by cedar.
Sawdust
Sawdust may not be as good as wood shavings, but it’s still a viable choice that works just about the same. The only hesitation is that some beginners may try to eat it.
Straw & Hay
Straw and hay are also fine but you will likely need to change the bedding more often. Some people claim straw and hay can harbor chicken mites. This might be true (but really, any bedding can if you don’t change it often enough).
Grass Clippings
Grass clippings and shredded leaves aren’t recommended. They’re not very absorbent and will get dirty a lot faster. Grass in particular creates a gross, moist environment fast. A moist environment can cause a bacteria problem.
Newspaper
Newspaper isn’t very absorbent either, and the ink will get on your hens and possibly the eggs. It’s not something I recommend.
Herbs
Some people add herbs so their hens have a nice-smelling space to help them relax and prompt laying. We are definitely “those” people. In fact, we believe in them so much that we have created several proprietary blends to choose from. They smell great, are inviting to the hens, add health benefits to your flock, and repel pests!
Pine Needles
Sounds painful but they are actually quite soft. In some areas you can access these for free if you are willing to load them up.
Nesting Pads
If you want to use a nesting box pad, there are lots of commercial options. Here are some brands I recommend:
Bedding Tips
Remember: This bedding will basically be the mattress for your hens. Before throwing in anything you find, keep in mind that your hens will be sitting on it – and if they’re comfortable, they’re more likely to use the nesting box.
Also, make sure the bedding is soft enough for the eggs to land on, and that they won’t get cracked if your hens roll them around.
The nesting box material should be easy for you to clean and sanitize – and prevent chicken mites.
Here at the farm, we add ¼ cup of our WormBGone nesting herbs 3-4 times a week to each nesting box to keep internal parasites away and MitesBGone to ward off chicken mites. We also make sure that we change the bedding mix once it gets soiled or wet.
The amount of material you use should correspond to the nesting box size. You want the nesting box to look full without seeming stuffed (and too stuffy for your hens to easily get in and out).
Do nesting boxes need to be elevated?
They can be sitting on the floor or raised. Keep in mind, however, that your hens are prey animals, and they’re easily startled during egg-laying time. Nesting boxes that are elevated will help your chickens feel safer and prompt egg laying better than those on the ground.
It also keeps the roosters from bothering them during a private moment. It’s also easier to keep poopy shavings away if you elevate the chicken nesting boxes.
How high should nesting boxes be off the ground?
18 inches to 2 feet is best so that all your hens can reach them. Chickens can’t fly very well – heavy breeds like Brahmas or specialized breeds like Silkies don’t fly much at all. So, you’ll want the boxes easily accessible, and any higher than 2 feet might be difficult for some breeds to reach.
If you plan to install the boxes higher (or if your coop came with them elevated), it would be great if you also install a perch or ladder to help the flightless members of your flock.
When should you open nesting boxes for chickens?
Once hens reach their laying stage at approximately 17 weeks, you can cut the ribbon and pop the champagne! At this stage they will already be accustomed to sleeping in the roosts they won’t get into the habit of sleeping where they should be laying.
How do you get chickens to lay eggs in a nesting box?
If your hens aren’t naturally using their nesting boxes, you should first try to figure out why. Are they not safe? Is the area too noisy? Are they dirty? Do your hen’s free range (which means they might choose a different location to lay)? Again, hens lay where they find it safe and comfortable.
Make the nesting box bedding fluffy and clean. You can also use nesting herbs to attract your hens, and if you get really stuck, you can put training eggs in the boxes. These are fake eggs you put in nesting boxes to let pullets know that that is where they should lay their eggs. While this seems silly, chickens really do take the hint!
If your hens insist on laying their eggs everywhere, you can block the “wrong” places. This makes them go on a hunt for another safe place.
Just remember that if your nesting boxes aren’t:
Quiet
Clean
Dark
You might have a hard time getting your hens to use it! You can try hanging curtains over the openings of the boxes to provide a bit more privacy.
How big do nesting boxes need to be?
Your chicken nesting box size is also important when talking about comfort. 14” x 14” x 16” boxes would be cozy enough for larger breeds like Brahmas, Ameraucanas, Araucanas, and other breeds. Consider how large your chicken is – you want the nesting boxes to be big enough for your hens, but not so big that they feel unsafe or exposed (remember, dark nesting boxes are best!).
How do you stop chickens from pooping in their nesting boxes?
It can be hard to stop them from pooping in their boxes. Chickens (like all birds) don’t have a bladder, so when they gotta go, they just go. Additionally, chickens poop and lay eggs from the same area (the vent), so when your hen is laying an egg, some poop might accidentally slip out.
That being said, your chickens are more likely to poop in their boxes when they’re NOT laying an egg – meaning if they’re using their boxes as a bed.
No matter how many nesting boxes per chicken you have, remember that the boxes aren’t their sleeping quarters. That’s what a roost bar is for.
Chickens would only poop in the nesting boxes when they treat them as their home (sleeping in them) because they do a lot of pooping at night. So it is essential for them to be trained to sleep in the roosts first before opening the boxes.
If you have chickens using their nesting boxes as a sleeping place, evict them! Shoo them or gently remove your hens when you find them getting too comfortable snoozing in those boxes. You can also have a “door” or flap of some kind to shut the nesting boxes at night to keep them out.
What if I have a broody hen?
If you have a broody hen you will have to decide whether or not you want her to continue brooding. Read this article to help you decide and know what to do.
If you decide to let her stay broody then she will just need use of the box for a long while.
How do you keep a nesting box clean?
You need to clean it regularly! Make it part of your egg collection routine to do some housekeeping. Remove soiled bedding material, feathers, and poop that you find. If it’s really gross, you’ll have to completely remove all the bedding and wipe down the laying area. You can use water, all-natural wipes, or other cleaning solutions to do the job.
Shavings are the easiest to clean while straw is the hardest! It is also the perfect place for pests to hide. Therefore, it will help out big time when you think about what material to put in chicken nesting boxes.
Summary
You have choices for your backyard flock! That’s good. The most important elements are to be sure your nesting boxes are inviting and clean. Hopefully we have given you some tips that will help ease your mind and guide your steps!
The best part of summer is being able to spend time outdoors playing in the sun, especially with our pets! However, there are some precautions to take to make sure our pets stay healthy. Just like us, our pets are at risk of getting sunburn from prolonged sun exposure. Some pets are even at risk of getting skin cancer secondary to too much sun exposure. There are some steps you can take to decrease the risk of your pet getting skin trauma from the sun, and we will discuss those things here.
Pets at High Risk
There are certain pets that have a higher risk of skin damage due to sun exposure. Pets that you should take extra precautions with include those with the following features:
Light-colored skin tone (pets that are white in color)
Pets with thin fur
Pets with no hair or fur at all
Pets with lightly pigmented noses, ears, and/or eyelids
There are also places on our pets’ bodies that are more at risk of being affected by the sun and potentially getting sunburned or skin cancer. These are the areas that typically are more lightly pigmented and/or that have no fur or hair covering them. These locations on our pets’ bodies include the following:
Brim of the nose
Ear pinnae (ear flaps)
Eyelids and area around the eyes
Groin area
Armpit area
Belly
You should pay close attention to these particular spots on your pet regularly, especially if your pet is one that likes to lie on their back and sunbathe.
Prevention Tips
It may seem difficult to decrease the risk of sunburn to your pet if they love to romp around outside or to bask in the sun, enjoying the warm weather. However, there are some things you can do to try to mitigate the effects of the sun’s rays.
Pet-friendly sunscreen
There is sunscreen made specifically for pets. It is important to use only pet-friendly sunscreen. Human-grade sunscreen may have certain ingredients in it that could be harmful to your pet if they were to ingest it. Since most pets groom or lick themselves, it is best to just avoid any topical products if you are not certain ingesting the product will not cause your pet harm. You should avoid any sunscreen that has the ingredients zinc oxide or para-aminobenzoic acid (PABA) in it.
Apply the sunscreen on the exposed areas of your pet. This will be the parts of their body, mentioned above, where there is no fur or hair. This includes their nose, parts of their face, their underbelly, or even their entire body if they are hairless. Follow the label instructions on the sunscreen bottle as to how often you should apply it. It is best to find waterproof sunscreen since your pet probably loves to play in water as well.
Light Clothing
You can also protect your pet’s skin from the sun by putting light-weight, breathable shirts or clothing on them. For many pets this is probably not the best option, but it is one to consider. Just make sure the protective clothing is breathable and will not make them hot.
Shade
Finally, the best thing you can do to prevent your pet from getting skin damage due to sun exposure is to play with them in the shade. Take short trips out into the direct sunlight, but try to keep the majority of their time spent outdoors in a cool, shaded area.
Always remember to keep fresh water available as well. It is not uncommon for pets to succumb to heat stroke by being out in the heat for too long. Making sure they take regular breaks and have water to drink is a must.
Additionally, try to limit your pet’s time outdoors in direct sunlight to just the mornings and late afternoons. These times are usually safer as the sun’s rays will not be as strong as they are during the middle of the day when it is usually hottest outside.
Signs of Sunburn
Pets with sunburn may have reddened skin that is warm or flaking. If the burn is minor, you can apply some aloe to the area. However, if it is very red, moist, or flaking a lot you should have your pet seen by your vet. They can determine if your pet needs a prescription topical ointment or even an antibiotic to help in the healing process.
Since sunburn can, in some cases, lead to skin cancer, if you notice any abnormal spots on your pet’s skin at any time of the year, schedule a visit with your veterinarian so they can see if it is something to worry about.