If you’re looking for an alternative feed for chickens that won’t break the bank and will help support your healthy flock, then you’re in luck – there’s an abundance of surprising alternatives!
While your hens should always have a high-quality layer feed, you might find yourself without a bag one day OR you might have table scraps you don’t want to toss. You also might want to make your own chicken feed.
Nutritious feed doesn’t need to come with a golden price tag, but it does need to satisfy the hunger cravings of your beloved flock and provide much-needed nutrients and vitamins.
Whether you want to craft your own chicken feed or just want to give your flock some treats, it’s always good to know what chickens eat! In this article, we’ll discuss the possible alternatives to your usual feed – and you might be surprised at our list of ingredients!
What Is The Best Food For Chickens?
The best chicken feed for laying hens is a high-quality 16% protein layer feed with a calcium supplement. For chicks (under 16 weeks), a high-quality 18% chick starter is best. The feed should have the required nutrition and vitamins for them to stay healthy and become consistent egg layers. Most commercial feeds make it easy. If you want to make your own layer feed, you can use my organic homemade chicken feed recipe here.
How To Feed Chickens Without Buying Feed
While I never really recommend this, there’s plenty you can feed chickens without actually having to buy feed. You can feed them table scraps (there’s a table below of what human food they can eat), grow food for them (we have a leafy green garden for our flock), or raise mealworms or black soldier fly larvae.
You can learn how to raise mealworms here and why black soldier fly larvae are healthy for chickens here.
If you have a “corn hookup” you can feed them dry corn as well. One of our neighbors is a farmer. One year, his crew spilled a LOT of corn on the ground. He didn’t want to clean it up, so he asked if we wanted it, LOL!
It’s best to feed a 16% protein layer feed, however – you want your chickens to be healthy and lay eggs consistently. Nine times out of ten, when a reader emails me because her hens have stopped laying, diet is the reason why.
What Can Chickens Eat?
Chickens can eat so many things – it’s probably easier to talk about what they CAN’T eat! Chickens especially seem to love protein – insects (alive or dead) are HUGE with backyard chickens. They also love seeds such as sunflower, wheat, or hemp seeds. Of course, fruits and vegetables are popular, too (especially corn)! As for leafy greens, it’s best to stick with lettuce, kale, and spinach.
Here’s a brief table of suggested treats for your chickens (not comprehensive):
| Fruit | Legumes | Vegetables | Seeds | Proteins | Dairy | Grains |
| Berries | Peanuts | Spinach | Sunflower | Mealworms | Milk | Wheat |
| Cantaloupe | Alfalfa Hay | Tomatoes | Flax | Black Soldier Fly Larvae | Greek Yogurt
(Plain) | Oats |
| Watermelon | Peas | Squash & Pumpkin | Pumpkin | Dried River Shrimp | Cheese | Rye |
| Bananas | Clover | Kale | Hemp | Eggs | Whey | Millet |
What Can You Feed Chickens If You Run Out Of Feed?
Alternative feed for chickens, if you’re out of feed, are whole grains like wheat, corn, flax, cooked rice (NOT UNCOOKED!), and raw or cooked oatmeal. Protein-rich foods like cheese, plain greek yogurt, and sunflower seeds are also good choices. Most table scraps you have on hand will also be suitable as an alternative. Bugs like black soldier fly larvae (which are remarkably easy to cultivate), worms, and crickets are options as well. Just be sure to steer clear of beans!
What Do Chickens Eat Naturally?
What chickens eat naturally (and that will cost you next to nothing) is food you can produce in your backyard, such as green plants, vegetables, fruits, and seeds.
Chickens will also naturally hunt for insects such as earthworms, slugs, grubs, black soldier fly larvae, and other creepy crawlies. This alternative feed for chickens is cost-effective, full of protein, and can be found in their natural habitat.
However, before attempting to use any of the above as dinner for your flock, you should be aware of what food can harm your flock if you’re considering an alternative feed for chickens.
Bad food such as salt, sugar, coffee, or liquor and any uncooked raw or dried beans, raw green potato skins (which can contain a poison called solanine). Onions also are a poor food to give to chickens.
What Scraps Not To Feed Chickens?
What foods are toxic to chickens? Well, plenty. For starters, chickens should never consume anything moldy or rotten because it can make them sick.
The chart below lists various foods and scraps that chickens shouldn’t eat:
| Vegetables | Fruit | Legumes | Grains | Other |
| Potato skins | Avocado skins & pits | Dried beans | Dry rice | Salt |
| Onions | Apple seeds | Uncooked beans | Chocolate | |
| Chards | Peach pits | Lots of sugar | ||
| Rhubarb leaves | Coffee |
What Is The Cheapest Way To Feed Chickens?
The cheapest alternative feed for chickens would be using table scraps that don’t include anything moldy or rotten. Other free chicken feed ideas are insects such as grubs, mealworms, or black soldier fly larvae (or crawfish, if they’re in your region).
Mixing your own non-GMO organic chicken feed is another option, especially if you can buy bulk ingredients at a lower cost. We have an article about making your own homemade chicken feed here.
Do Chickens Need Food And Water At Night?
Chickens typically only eat food and drink water when they are awake during the day. At night, chickens prefer to roost and get some sleep. However, there’s nothing wrong with leaving food and water in the coop overnight (especially water) if you don’t have a rodent problem.
You should always make sure the feed won’t attract predators. A chicken feeder that automatically closes at night is always a good option.
What Vitamins Are Good For Chickens?
Like people, chickens need all the vitamins they can get. Vitamin and mineral deficiencies can produce numerous health problems for chickens (including poor egg production) It’s important to feed them a balanced poultry diet enriched with vitamins A, D, E, K, B12, Biotin, Thiamine (B1), Riboflavin (B2), Niacin, Choline, Folic Acid, and Pantothenic Acid.
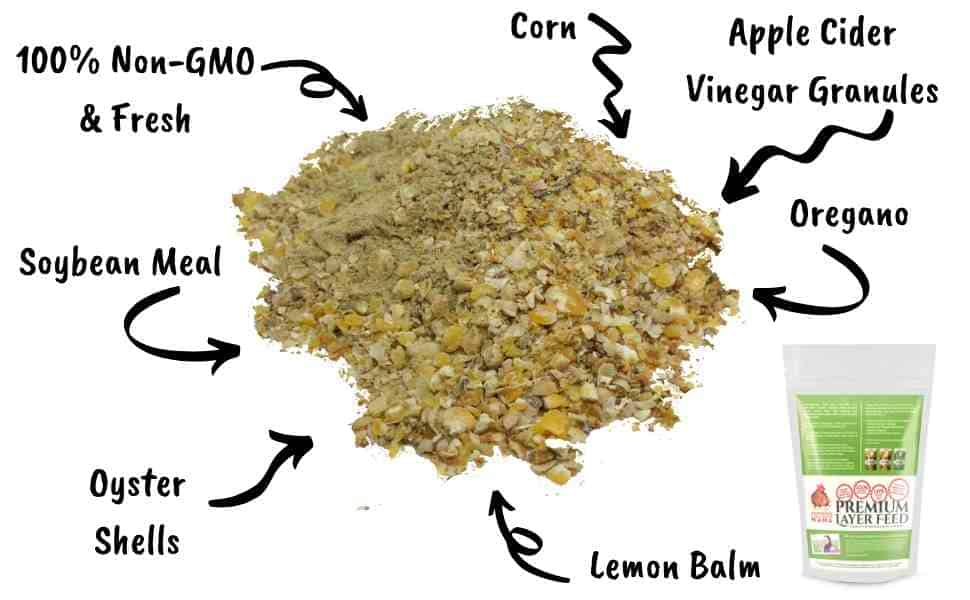
Also, minerals such as calcium, iron, magnesium, copper, iodine, zinc, cobalt, phosphorus, and, manganese are important. Most commercial chicken feeds have all the vitamins and minerals your hens need but they are often non-GMO. The one we produce is non-GMO and packed full of goodies, check it out here.
To ensure your flock has enough calcium to produce good eggshells, you can offer an additional supplement like oyster shells.
What Can I Grow For Chicken Feed?
You can grow garden cover crops such as alfalfa, clover, buckwheat, and annual rye. In your garden, you can grow tomatoes, leafy greens like kale or spinach, wheat (which can be sprouted into fodder), bell peppers, sunchokes (boil and mash to feed), corn, and herbs.
Just remember that you will need to feed your chickens year-round, so if you want to grow feed for your chickens, have a plan to preserve some. Other chicken feed ingredients you can grow are wheat and millet.
If you’re wondering what to feed chickens to lay eggs, it’s important to give your flock plenty of protein. So, if you really want to grow your own chicken feed, it’s a good idea to also raise mealworms or other insects so your hens have plenty of protein.
How Much Should I Feed My Chickens?
Ideally, you should feed your chickens about 1/4 pound of feed per chicken per day, or, 1.5 pounds of feed per chicken per week.
Environmental conditions, such as whether it’s very hot or very cold, can also affect how much you should feed your flock. In the winter, you’ll likely want to increase their rations so they can produce enough body heat.
If your flock isn’t laying eggs consistently, you’ll want to increase their diet, as well. Typically, chicken feed 50-pound bags are sold at stores to make it easier.
Are Oats Good For Chickens?
Yes! You’ll read varying opinions about this, but oats are perfectly fine to feed your flock. You can feed them dry or make them into a mash.
Quick oats and instant oats are fine as well – just make sure they’re plain and without any extra preservatives or ingredients. During very cold nights, many owners make their chickens oatmeal to give them extra energy at night. In the summer, you can mix oatmeal into frozen suet cakes.
Will Chickens Eat Roaches?
A great alternative feed for chickens is bugs – chickens love them! While there are many critters hens love to eat, cockroaches are one of them! If you raise cockroaches, then you’re in for a treat. Chickens love chasing them, and they’re full of protein.
Is Peanut Butter Good For Chickens?
While peanut butter (natural, no salt, no added ingredients) is okay for chickens to eat, it’s not the best for them. A high-quality layer feed is better. However, there’s nothing in peanut butter that will hurt them, as long as it’s 100% natural with no salt or added ingredients.
Honey is also healthy for chickens, so you can mix it with honey if you want!
Summary
There are a lot of alternative feed options for backyard chickens. However, it’s important to make sure your flock has the right amount of protein, vitamins, and minerals in their diet. Otherwise, you might not get as many eggs and they may have more health issues.
Hear herbs make it easy to raise healthy chickens? Confused about the best way to get started? Not even sure how to feed them? Let us show you 5 easy ways to use herbs so your flock is healthy!
In this article, we won’t get into which herbs to offer your flock (we cover that here). Instead, we’ll demonstrate 5 different ways to introduce herbs to your flock (using one of our products, Best Eggs Ever!), so your chickens can benefit from them.
Mix With Feed
The first way to introduce herbs to your flock is to mix them with layer feed. To do this, you have 2 options. You can simply sprinkle the herbs on top of the feed (this is called “top dressing”). Then, offer the feed/herb mix to your flock.
If you’re not sure how MUCH to add, it’s better to start with a tablespoon per chicken, and then increase the amount of herbs from there. Always make sure to refer to the manufacturer’s package, if you’ve bought herbs specifically for pet chickens.
If you have a lot of chickens, then this next tip might be easier. You can add up to 1 pound of herbs per 40-50 pound bag of layer feed. Just remember that herbs are a supplement, and not a complete feed. It’s always important that your flock eat mostly layer feed. Only 10% of their diet should be supplements and treats.
Soak In Water
Another very simple way to offer herbal benefits to your chickens is to soak the herbs in water. This works great for picky eaters who don’t yet understand that herbs are food. This is also easy to implement if you have a lot of chickens, and want to make sure all flock members get the herbs.
Simply soak ½ cup of herbs in 1 gallon of water. Let it soak overnight. It’s like making tea. (This is why it’s so important to have a reliable source for herbs, and skip the grocery store. You want to make sure there’s no pesticides or other nasties on your flock’s treat). The next day, remove the herbs. In addition to regular water, you can give your flock the herbal water.
You can still feed the leftover herbs to your flock. Just offer in a separate dish (don’t mix wet herbs with a 50 pound bag of feed – they’ll just mold).
Sprinkle In Nesting Boxes
Adding herbs to nesting boxes is easy. You might wonder WHY you should add them to nesting boxes, instead of just feed or water.
Herbs provide a lot of benefits – both inside your flock’s body and OUTSIDE of it. You can make their environment healthier places for your flock to hang out. Adding herbs to nesting boxes can help prevent biting insects such as mites, or deter flying insects like flies and mosquitoes.
While they’re resting and laying their eggs, your flock can breathe in the scent of the herbs. They’ll also likely taste test their treat, and you’ll hear lots of happy clucking.
Add to Coop Bedding
Adding herbs to your flock’s coop bedding is just as important as adding them to nesting boxes. You’ll deter pests, and add environmental interest to your flock’s home.
Chickens love to scratch through the bedding in their coop. They’re looking for goodies! Indulge their natural tendencies AND keep them healthy by incorporating herbs into their bedding.
Especially for chickens who don’t free range, herbs let them indulge in their natural need to forage.
Just sprinkle 1 – 1.5 cups of herbs in each corner of your coop. Place it on top of your flock’s bedding, and use a pitchfork to mix them in. If you use pine shavings in your coop, you can also use 1 cup of herbs per bag of shavings. For this article, we used Best Eggs Ever!, which you can buy here.
Add to Dust Bathing Areas
Most flocks have a preferred area in which to dust bathe. Yours might even have 2-3 spots. Dust bathing is a very important part of your flock’s day. It helps eliminate external pests. It’s also how your chickens groom themselves. Just sprinkle up to 1 cup of herbs on top of the dirt, diatomaceous earth, sand, etc. For this article, we used Best Eggs Ever!, which you can buy here.
Adding herbs to a dust bathing area has 2 benefits. First, it can help deter external parasites like mites – from your chickens’ bodies AND their dust bathing area. As they roll around and toss dust on themselves, your chickens will also toss the herbs on their bodies. As they preen, they’ll distribute both the dust and herbs over them.
Second, your hens will likely try to eat the herbs. So, they’ll get internal benefits from them. Dust bathing is social time for your chickens.
If you watch your chickens, you’ll notice they always dust bathe as a group, often with the rooster keeping watch over his hens. As they’re spending time together, your hens will notice the herbs. Since eating is such a big part of any chicken’s life, they’ll want to see what these specks of green, red, and yellow are all about.
And there you have it! It’s pretty easy to introduce herbs to your flock. If they aren’t sure at first about their new treat, just be persistent. While most chickens love herbs, some aren’t sure at first. After all, their environment has changed! Giving them time to adapt is very important. Very quickly, you’ll notice lots of happy clucks.
Next thing you know, they’ll come running when they see the bag! If you’d like to use Best Eggs Ever! In your coop, you can buy this product here.
Heard of a chicken brooder, but not sure what the fuss is all about. Getting chicks and not sure which chicken brooders are best?
Chicks! Little balls of down that are so adorable you just want to eat them up! Or maybe that’s the family cat, we’re talking about…So maybe eating them up is a terrible idea.
A good idea, however, is bringing them into the family. Soon, these day-old fuzzy butts will grow into amazing full-sized chickens: hens of the greatest laying potential and roosters whose protective skills are second to none!
The question, then, is how to ensure that these chicks do reach adulthood. What can we do to protect these little bundles of cute? Where can we keep them until they are ready to join the flock?
The answer to the above questions is quite simple: you need to get yourself a chick brooder. In this article, we will give you all the details so you can pick the perfect home for your newest pets!
What is a Chick Brooder?
A brooder is a safe environment where a group of baby chicks can stay warm and comfortable until they’re ready to join other chickens in the run. All told, a chick will spend about 8-10 weeks in a brooder. It is a relatively short, but incredibly important part of their lives.
Anything can serve as a brooder box, from a plastic bin to a small stock tank to a pre-fabricated brooder sold on Amazon (and several things in between). I personally just use a plastic tote bin because they’re cheap and easy to clean.
You can see my brooder setup in this video:
Why Have a Brooder?
In the wild, chicks have a very unique personal defense system that they do not have in the adoptive world of your family. That defense system is called a mother hen. The mother hen digs or builds a nest for her chicks and sits on them there, defending and protecting them from all dangers. Dangers range from predators to chilly weather.
When a person decides to take on chicks and raise them, that person volunteers for the role of mother. It’s obviously not a good idea for you to sit on a clutch of chicks for several weeks – we don’t have quite the warm, protective tail feathers that mother hens have (in addition to being far too heavy).
As a result, we need a safe place to keep our developing chicks. That is where the chicken brooder comes into play.
What Size Brooder Should I Have?
It goes without saying that those cute little chicks will grow. Because of this, you’ll want to consider two recommended sizes for a good brooder.
The smaller brooder should be about 12 inches tall and should be large enough so that each chick has about 6 inches of space when they’re day olds through 4 weeks old. This smaller brooder will become obsolete, however, at or around week 4 of their lives.
At this stage of their development, you’ll want to upgrade them to a 24-inch tall brooder that gives them 1 square foot each. This will keep them safe and in check until they complete their developmental phase.
It is possible, however, to forego the smaller brooder and just use the larger one the whole time. Your chicks will outgrow the smaller one, after all. If your resources are limited, then there is much to be said for that option.
Where Should I Keep My Brooder?
A brooder is a safe place for your chicks. You’ll need to keep it in a secure place that can hold heat and protect your hatchlings from any and all of those great dangers just lurking out in the wider world.
You could put it in a barn, a workshop, a garage, a basement, or even right in the house. The key is to keep it very safe from predators, such as cats, raccoons, opossums, and rats.
Because you will need to provide your chicks with heat, a reliable power source is key. You’ll also want your brooder to be easy to get to, as you’ll probably want to check on your chicks at least a couple of times per day.
I would also strongly recommend putting some kind of cover over your chicks – a mesh one for warmer weather or a piece of insulation in colder weather.
Chickens are birds, after all, and once their wing feathers start coming in, they just might succumb to the urge to test out those flight enablers. The other reason for covering your chicks is the curious whims of the family cat. Or dog. Or child. As much as we might love the other beasts in our menageries, they might not have the best interests of your chicks at heart.
How Many Chicks Should Be In A Brooder?
I personally only put between ten and fifteen full sized chicks into a brooder at a time. This helps to ensure that there is enough space for each one, at least 6 inches of space per chick. This, of course, will also be determined by how much space your brooder has.
Ten to fifteen chicks are easy to keep track of (for example, if one gets sick, it should be easy enough to identify that one.) It is also small enough to start getting to know the chicks’ personalities. If you’re like me and hope that these chickens become family, then it’s best to start familiarizing yourself with them sooner rather than later. Why not start right from the brooder?
If you’re going to have a clutch of bantams, up to 17 chicks is a good number. This is mostly just to help them stay warm, as being smaller chickens, they could use just a touch more heat. Otherwise, your chicks might squash each other.
At farm stores, you sometimes a large number of chickens, maybe 50 or so, in a big bin. Farm stores do that because the chicks aren’t going to be there for that long as they are not raising them, they are simply selling them. They are also inside a climate-controlled building without drafts and predators.
So why do I choose such a small number of chicks? Well, one reason is that I don’t want any baby chickens to get crushed. It’s also really important to make sure that they all have easy access to food and water. You don’t want them to be stressed by having to fight the crowd for food and water.
It can be too chaotic to keep track with too many little peepers running around. It makes it difficult to keep an eye on each chick’s health and growth, whether they are warm enough, and so on.
The drawback of such a low population in your brooder is that you may have to have more than one brooder if you have a large number of chicks. This also means additional feeders and waterers, heat sources, and care. You have to decide what your priorities are.
What Do Chicks Need In A Brooder?
For a brooder to be 100% effective, it will need a few key components. Let’s talk about the essentials.
Warmth
The first is warmth. Newborn chicks are covered in down, which is lovely and soft, but not that great at providing your precious little ones with the warmth they need to develop strong and hearty. In their first week of life, the ideal temperature is about 95 degrees F. You will want to adjust this as your chicks start to feather out, as feathers provide them with natural insulation against the cold.
The 95 degrees that was good in the first week might be too hot in the second week. If your chicks are too hot, they might start panting or moving far away from the heat source. Having a thermometer on hand will help you identify whether or not your heating source is too close to the clutch. When you test the temperature, be sure to be on the same level as your chicks. You want the readings to be as accurate to your birds’ experience as possible.
Water
Next comes water. Provide your clutch with a couple of automatic waterers. If you put them in the corners of the brooder, it will help to reduce how much waste your chicks will deposit into the water containers (same for the feed dishes too).
Most will spend their time in the warmest sections of the brooder for the first weeks of life – especially on colder days – and will then have to disperse to fill their other needs. The water should be changed daily. If your chicks are especially messy, then this could be upgraded to twice-a-day refilling.
Countless chicken lovers will tell you that waterers could use an anti-drowning preventative. Chicks are just getting their legs, so to speak, and as such, they might have a mishap or two with regard to how they drink.
Shallow as their drinking troughs are, there is still a risk of drowning. To prevent this, put a number of marbles into the trough. This will give your chicks full access to water, but it will prevent them from dunking their heads.
Feed
Of course, your chicks will need to eat! You will take into consideration some of the same tips we gave you about their water – keep it fresh and clean, and place their feeders in corners of the brooder to prevent the soiling of the food (as much as possible).
One really important thing is to choose a high quality, high-protein feed. Don’t skimp! Their lifelong health depends on it. Here is our favorite starter feed. Pay close attention to the ingredients.
Put out plenty of food so they can eat as much as they want to eat. You certainly don’t want to stunt their growth with a lack of nutrients (that will harm their future health too).
You can also check out our buyer’s guide on the best feeders here.
Chicken Brooder Bedding
The final thing your brooder will need is bedding. Chickens of all ages have the potential to be terribly messy. It’s important to keep the moisture level down to prevent the spread of dangerous bacteria, bedding helps with this.
It seems like the go-to for bedding across the USA is pine shavings. This is very similar to what horses get in their stalls, and it tends to be light, and fluffy and holds chick waste quite well.
In the first couple of weeks, it will need cleaning and changing every couple of days, but as your chicks get bigger, they will start producing greater quantities of waste. If pine shavings are unavailable in your local farm store, other options include straw, shredded paper towels (for the first week at most), or newspaper.
Of all of these options, pine bedding works best for absorbency and overall comfort. You’ll need between an inch and three inches of bedding for your chicks.
What Types Of Heaters Are There?
There are a few varieties of heaters to use in your brooder. The most common are heat lamps and heating pads.
A simple heating lamp can be clamped right onto the side of the brooder or dangle above it. These then produce powerful localized heat from a bulb that spread out quite well over a general area. This actually provides both hot zones and cooler zones within the brooder.
In the event that the weather shifts in your brooder’s shelter, your chicks will have temperature escapes. You can gauge the temperature by seeing if the chicks are huddled together (they are too cold), spread far away from the heat (they are too hot), or happily walking around or taking naps (ahh, the perfect temp).
Heat lamps produce tremendous heat. That much heat concentrated over wooden bedding is a fire hazard waiting to happen. I don’t personally use or recommend heat lamps because of the potential dangers. When setting up your heat source, be sure that it cannot fall – secure it thoroughly with clamps or a bungee.
Heat plates are a solid pad that is elevated off the ground and provides a surface area of warmth that is above the chicks. Their height is adjustable so that your chicks will not bump their heads on the pads. These pads more closely simulate the localized warmth of a hen sitting on her clutch, but they are far more expensive than heat lamps.
Is There a Do It Yourself Option for a Brooder?
Yes, and you can find many ideas with a simple internet search. Brooders are remarkably affordable or easy to make. They require some basic and easily accessible materials and can be quite durable, and usable season after season.
The simplest ones can be made from a large plastic tub or a large wooden box or coop.
When Should I Get a Brooder?
It is imperative to get your brooder before you bring your first clutch of chicks home. You will want to set it up and test it out for any problems that might arise before your chicks get into it.
Be sure to troubleshoot anything that might hinder your chicks’ development or cause them undue stress. You can also check that there is enough bedding, the heat lamps are secure and safe, and their water and feed are all setup.
When your chicks arrive you’ll want to be all set up and ready to orient them to their food and water by dipping the beak of each one. This will ensure that they know where their essentials are.
Summary
Sharing your home with a clutch of chicks is a truly amazing experience, and it all starts with having a good brooder for them. It’ll ensure they’re healthy and safe. You’ll also get lots of hands-on experience with your new pets!
Read more about raising chicks here.
“We all know that poultry grit is just another product that farm supply stores want to sell us, right?” “It’s not very important either to our chickens or our baby chicks, is it?” These are two very good questions, and I’ve got to share that in my experience, grit is VERY important.
Today, we’ll explore the idea of grit, and I will answer the question “Is chicken grit really necessary?”
What is Poultry Grit?
Grit is small stones (yes, rocks) that help a chicken digest their food. Chickens will naturally pick up rocks, since it’s an instinctual behavior. But if your chickens don’t free range, or if you just want to make sure they’re as healthy as possible, poultry grit is pretty important.
It’s different from oyster shells, which are from oysters (the same animal that makes pearls). Oyster shells will dissolve in your chickens digestive system, and are an important source of calcium.
Grit, however, will not dissolve. While oyster shells can help chickens grind down their food, they’re not as effective as grit.
Chicken Grit: Necessary or Not?
People aren’t sure to give grit to their chicks or whether the chicks actually need it, but chickens need grit to digest their food, and there’s really no reason to not offer it.
What Exactly Is Chick Grit?
Chick grit is the same stuff that you give adult chickens, but it’s smaller, finer, and easier for chicks to pick up with their tiny beak. It looks like tiny flakes of rocks. There’s really no health reason to not give it to them. If you want peace of mind, make chick grit available, you can.
If you buy them at your local farm store, double check the label, and make sure the poultry grit is specifically for chicks. Certainly, if you let your chicks free range outside, you definitely want to provide it because if they pick up seeds, bugs, grains, or whatever, they can digest it better than they would without the grit. Remember your flock’s digestive systems are new, so any food your chicks pick up if they play outside will be harder for them to digest.
Similarly, if you’re giving your chicks extra treats like vegetables, leafy greens, herbs, black soldier fly larvae, mealworms, or shrimp, all of which I give to my chicks because they love them, you should also give them chick grit. This helps ensure they can digest them properly.
If your chicks are just going to be in a brooder and the only thing you’re going to give them is chick starter, the chick grit isn’t 100% necessary because commercial chicks starters are formulated to be easily digestible. However, it’s still not a bad idea to give them the extra grit just for precaution’s sake.
In the wild, the chicks will go out and get the grit themselves, their mother will teach them to pick up little stones and they’ll naturally gravitate towards picking up these little stones. But in a domesticated setting like us raising chickens, it’s always a good idea just to have the chick grit available.
How to Feed Poultry Grit To Chicks
There’s two ways to feed poultry grit to chicks. You can mix it with their feed, or offer it in a bowl separately. Both have their advantages. Mixing it with the feed means the chicks automatically will think it’s food and eat it. It’s also convenient and you don’t need to think about it.
However, you might want to offer the grit separately to make sure your chicks eat enough real food AND to monitor their feed and grit intake. Both options are perfectly fine, and it’s up to you and what’s best for your situation.
Got questions about poultry grit? Got comments? Got suggestions? Leave a comment below. Want to know more about grit, and your choices? Read my recent article about poultry grit here.
February is usually a dreary month, but it’s also a great month to get started on your garden (I have!). I’m sure you’re wondering “What seedlings can you start in February?,” and you might even think I’m a little bit crazy (I probably am).
February is a rather ambitious time of year to start seedlings, since in most northern states, the freezing temperatures can make it rather difficult to support thriving young plants.
This article is an excerpt from my best selling gardening book, Organic By Choice. It has everything you need to grow a garden that delivers you a full harvest.
Click here to buy the paperback version and get the digital version for FREE.
On the other hand, in many southern states, the climate can be too unpredictable to determine if outdoor planting will actually be worth the effort.
With that being said, to answer the question “What seedlings can you start in February?,” there are particular plants that flourish well even during the icy months.
Before we get started with what seedlings you can start in February, there’s some general tips you should consider, since they’re the difference between success and a seedling flop:
- The approximate planting date you can set young plants to harden off. You need to pick a date after the last frost of the spring that you’ll actually start planting in your outdoor garden, then count backwards 10 weeks. This is the date you should start your seedlings.
- After placing each seedling, if you plan to use lights, set the lights about 2-3” above the tops of the plants, or pots (for seedlings that haven’t sprouted yet).
- You need to first ensure that you have a hoop house or cold frame available to transplant the seedlings in.
So, now let’s answer the question “What seedlings can you start in February?” Here’s some answers:
Onions
This robust crop can easily withstand freezes and frosts. Start them out in warm zones (between 5-7), and transplant them after a good 8-10 weeks.
Microgreens
Although microgreens are not exactly what you think of when you imagine seedlings growing in your greenhouse, they STILL are something you can grow in February.
Spinach, flax, and bean sprouts are examples. When starting your microgreens, they must be sprayed consistently, and harvested at the micro stage. These goodies are perfect for salads and sandwich toppings!

Leeks
These green treats resemble giant scallions, and are excellent for sub-freezing temperatures – they have proven to be cold-hardy down to approximately 5° Fahrenheit!
Broccoli
Broccoli seedlings do best the best when soil temperatures are between 60°-70°F, but can germinate as low as 40°F.
Start growing broccoli seedlings indoors about 6 weeks before the last spring frost. Set out the hardened-off seedlings when they are approximately 4 weeks old, and set the transplants 2-3 weeks before the last spring frost.
Cabbage
Cabbage prefers to only grow in cold temperatures (crazy, I know). Begin growing this leafy plant indoors approximately 6-8 weeks before the last spring frost.
Harden off the plants over a 7 day period, and transplant outdoors 2-3 weeks before the last spring frost.
Herbs
Herbs are rather simple to plant and tend to, and the nice thing about herbs is they’re pretty portable throughout most stages of growing (so if you need to pull them inside because of a surprise cold-snap, no worries!).
Start planting herbs about eight to ten weeks before the last frost of the season, then transplant them into pots. Should another unexpected frost occur, the pots can simply be brought inside.
The best herbs to start growing at this time are basil, oregano, thyme, chives, and parsley. We love basil (yay pesto!), so that’s big on my list this year!
Lettuce
Sprout lettuce seedlings in a large 4” pot. Lettuce grows rapidly, so the larger pot means that it’s easier to accommodate it as it grows.
Use a cold frame to protect your baby lettuce if you plan to put the seedlings out in March before the weather has turned warm.
Spinach
Spinach should be planted indoors in to prepare it for transplant in March.
Like with lettuce, spinach must be planted in a large 4” pot, however, this is more so due it the large size of its taproot rather than its rate of growth.
Because of its long taproot, spinach seedlings do not transplant easily (I honestly start spinach outside, directly sowing it into the soil to make things easy on myself, BUT you can start seedlings in February if you’re committed).
When you do transplant the seedlings, make sure you leave a lot of soil around the spinach roots.
Swiss Chard
This crop is quite cold-hardy and can be transplanted in March in a cold frame. Personally, I don’t like swiss chard so I grow it for Dahlia and the rabbits, who have a more appreciative taste for it.
Kale
Kale is an incredibly resilient plant and thrives in colder temperatures, and the funny thing about kale, is it tastes better if it’s been through a frost!
For a sweeter-tasting yield, start seedlings in February, and transplant to the garden in mid-March.
What are some other things you can do in February to get started for spring? Here’s what else we got going on:
- Pruning apple and pear trees.
- Pruning currants and gooseberries.
- Pruning raspberry bushes
I’d like to hear from you!
Did you wonder “What seedlings can you start in February?” Which will you start? Leave a comment below!