We’re going to delve into another topic related to the raising of baby chicks:  Spraddle Leg. It’s a condition more common than you might think. Yet, some people who raise chicks don’t know what it is or what to do to correct it.

If you don’t know what I’m talking about, keep reading! Or if you’ve seen this in your chicks, or you’re considering purchasing some, here’s a breakdown of the condition and its symptoms.

Main Takeaways:

  • Essentially, spraddle leg is when your newborn chick is doing the splits.
  • Spraddle leg is sometimes a congenital defect (they’re born that way).
  • It can also happen if chicks are raised on plastic or slippery surfaces.
  • This is why bedding and removing chicks from an incubator quickly is important.
  • You need to get the chick’s legs straight underneath it to correct Spraddle Leg.
  • A Band-aid or tape will help – tape the legs together, leaving a gap so the legs can stay straight.
  • Your chick will hate this and will cheep VERY loudly, but it will hate not being able to walk more.
  • If left untreated, your chick might not eat and drink as much, be in distress, and is more likely to die.
  • The condition is also referred to as splay or splayed legs.

What is Spraddle Leg?

It’s hatch day and you are excited! But things don’t always go without a hitch. Introducing: Spraddle Leg.

Spraddle Leg is a layman’s term that describes an issue when day-old chicks legs aren’t directly underneath it. They may be splayed in different directions, so the chick is unable to walk very well. 

From a previous blog you’ll recall how baby chicks automatically know how to do things once hatched. Walking is one of these items. Chicks are more independent than us mammals. Thus, they don’t need to wait several days, months, or years to start walking. Basically, it’s intuition to them. 

We’ve had more than one chick born with this condition at our farm. Recently, one of them self-corrected its walk within a day. Others need assistance with early intervention. If they don’t, then they’re likely unable to find water and food on their own.

Spraddle Leg Causes

Spraddle leg is sometimes a congenital defect (they’re born that way). But another common cause of Spraddle Leg is how they are raised. This is an area where you can practice prevention.

For instance, bedding them on plastic or newspaper on the brooder floor may cause their legs to splay. Due to the slick surfaces, the chicks aren’t able to get a grip to walk correctly. In turn, they adjust their gait to move around. This is the reason the right bedding is so important when raising chicks. Compare it to the way babies start to move. 

If they reach a slippery surface, they can’t create the necessary friction to motor on. The same thing for chicks – they need a firm surface to gain traction.

The solution is to use something like sawdust, pine shavings, or straw in the bedding to minimize the development of Spraddle Leg. I’ve even heard of some people using rubber shelf liner (although that would not really be disposable and a nightmare to clean). Not only should this be done when they get out of the incubator, but in it as well. They can start spraddling unless a paper towel or other gripping surface is placed underneath their feet. Some incubators already have a surface that prevents this.

The key is that they need to be able to get a good grip.

How To Fix Spraddle Leg

Granted, not all chicks develop Spraddle Leg. We’ve hatched thousands of chicks on the farm, and we probably had less than a dozen with the condition. Nevertheless, if you encounter a chick with Spraddle Leg there is a way to fix it. 

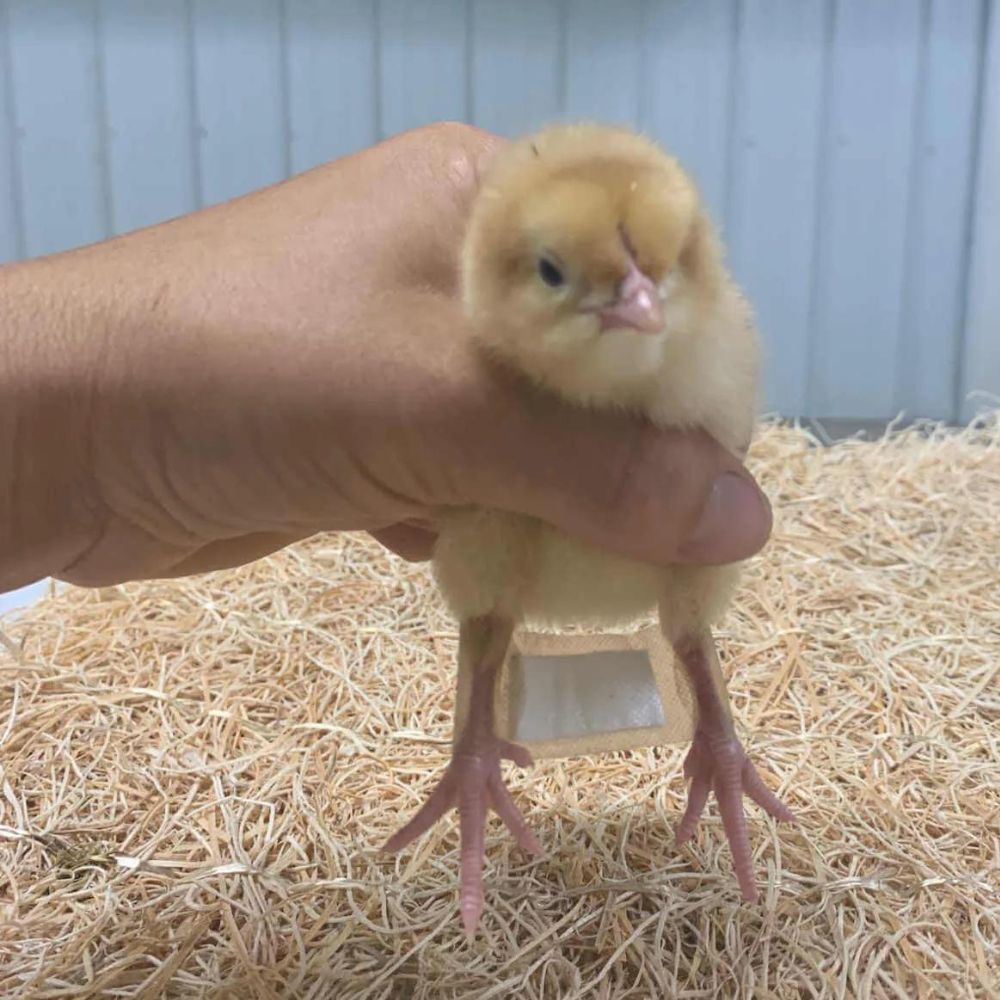
Bandaids aren’t just for little cuts, they can be used for many other things – like splay leg. Take a bandaid or medical tape and wrap or bind the chick’s legs together directly underneath the chick (legs will be straight up and down at a 90-degree angle). Keep it on their legs for as long as needed. 

Some chicken keepers use rubber bands (or a hair tie) around the chicken’s legs as a sort of brace to create stability. They can be successful too, it’s just a bit harder to get them in the correct position and adjusted just right.

By stabilizing the legs, you are enabling the bones, leg muscles, and tendons to gain strength and memory for the correct position. While it does tend to correct itself within 24 to 48 hours, you may need to bind the legs a few times for the correction to take. 

Again, this depends on the chick. As we mentioned, one of ours self-corrected within a day. Others have taken a week to set themselves right. 

Chick with bandaid holding legs together to fix spraddle leg
Photo from Meyer Hatchery Website

Don’t Give In To The Chirping

While its legs are bound, the chick is going to cry like you are killing it. You’re going to feel terrible when it does. However, you need to push through. If not, the chick will have splayed legs with the inability to walk. If they can’t walk, they will likely die.

This is because they have an inherent “flight” instinct that encourages them to run away from danger. It distresses them when their legs are immobile. 

While you can try and reassure them, all you need to do is be patient until you think the time is right to remove the bindings.

Seek Professional Help

Should you feel uncomfortable in diagnosing Spraddle Leg or adjusting bandages on a wriggling baby chick, then seek out a veterinarian to assist. They will attach the band-aid or medical tape.

However, there’s every chance the chick will remove the bindings after a short period of time. If this is the situation, then work as quickly as possible to get the bindings back on. Either on your own or through a vet.

Keep Your Head With Spraddle Leg

Hatching chickens can be a ton of fun, but there’s always a possibility that something might not go as planned. Remember, Spraddle Leg is not a long-lasting condition. Treated quickly, it can be resolved in 48 hours. Either by binding the chick’s legs or through self-correction by the chick itself. 

If you decide to bind their legs, keep calm. You are not hurting the chick. Rather, you’re helping to restore its built-in protection and ability to feed itself.

Building your own DIY automatic coop door is easy with a ChickenGuard Automatic Coop Door Opener!

(For this article, ChickenGuard provided us with a free Automatic Coop Door Opener. This article reflects my own personal opinions using this product).

With the hot summers and chilly winters (with lots of freezing rain) in Southeast Missouri, making sure my flock as easy access in and out of their coop is very important.

That’s why a few years ago, we installed an automatic coop door. It worked great….until the goat broke it one day.

Since then, the door has stayed silent, and my patient flock had to wait until I made it outside to let them loose for the day.

That is, until ChickenGuard asked if I’d review their Automatic Coop Door Opener.

chickenguard automatic coop door

They previously sent me an automatic opener and door kit (read that review here). 

Since we already had an automatic door that didn’t work, I was excited to test out the Automatic Coop Door Opener and see if we could rig it with our existing door and make it functional again.

Since the ChickenGuard Automatic Coop Door Opener works with any pre-existing door that can easily slide up and down, I had a good feeling it would solve our problems. 

And since it’s also programmable, my hens could enjoy the weather long before we woke up!

Here’s how we combined our existing door with the ChickenGuard Automatic Coop Door Opener – and how you can do it with your hen house!

Building Your Own Automatic Coop Door

For the ChickenGuard Automatic Coop Door Opener to work, you’ll need to make or purchase door that slides up and down. We already had one, but to make your own, you’ll need:

  • A sawzall or other tool to cut an access door into your coop
  • 1×2 boards to frame the access door (enough for 2 frames)
  • Wood to build your new door from (a 12-inch x 12-inch piece of wood works well. An easy solution is to use the piece leftover from cutting the access door).
  • Screws to secure the frame (the length will depend on your door, but make sure they won’t stick out and hurt your chickens)
  • An eye hook

For your door, you’ll want to make sure the color matches your coop (you can either make it the same color, or a complementary contrasting color).

Framing the door is important – on the outside, it’ll make your coop look more finished. 

automatic chicken coop door
Our DIY Coop Door framed on the outside looks good and helps keep predators out.

On the inside, it’ll prevent predators from easily pushing the door out of the way to enter your coop. 

The ChickenGuard will only do so much – it’ll open and close the door. To ensure your coop is 100% predator proof, framing the entire area is necessary.

You will need to leave enough space between the frames so the coop door can slide up and down. 

automatic chicken coop door
The 1/2 inch grove between the inner frame and outer frame lets the door easily slide up and down.

The gap size will depend on the piece of wood you use. The pre-existing door we had left about a ½ inch gap between the frames.

Installing the ChickenGuard Automatic Coop Door Opener

Once your coop access door is framed, adding the automatic door opener is a snap.

To the top of the coop door, drill in the eye hook – you’ll loop the string from the ChickenGuard Automatic Coop Door Opener through it. We simply tied ours to the eye hook. The motor in the ChickenGuard Automatic Coop Door Opener raises and lowers the door.

chicken guard coop door opener

The coop door will automatically rise and fall using the string. It seems simple, but it works VERY well. 

We’ve been using this product for months with no problems – and our flock is VERY happy.

Programming & Testing The ChickenGuard Automatic Coop Door Opener

Follow the directions in the ChickenGuard Automatic Coop Door Opener manual to program the product. It’s simple, and you only need to press a few buttons. 

In our previous review of the self-locking door kit, we had it installed in 10 minutes. We set ours to open at 7 AM, but we change the closing time based on the season.

To test whether your new automatic coop door works, simply press the buttons on the ChickenGuard Automatic Coop Door Opener – if your coop door slides up and down, it works! 

You can purchase the ChickenGuard Automatic Coop Door Opener on Amazon here.

If we were to install a 4th coop door (yes, we have quite a few!), I would purchase the ChickenGuard Automatic Coop Door Opener. It’s worth a little extra effort to create easy access for your chickens to get in and out of their home without relying on their humans.

How can I help my pet when they are terrified of the vet?

If your pet is terrified of going to the vet, you are not alone. There are plenty of pet owners who dread every time they have to drag their pet into the vet’s office as their pet pulls back, quivers, or even becomes more aggressive when they get inside the clinic doors.  On top of that you just feel guilty putting your pet through that. You probably intentionally miss necessary vet visits just to avoid having to put your pet and yourself through this agonizing process. 

Rest assured, there are some things you can try that may help make the process a bit smoother and easier on both you and your pet. We’ll talk about some things you can do on your own, as well as some things you can implement working in collaboration with your veterinarian and their clinic staff.

Desensitization Techniques

It is completely normal for pets to be scared of the vet clinic. They are very good and making associations and associate the vet clinic with bad things happening to them, such as being poked with a needle, having a stranger touch them, and even being sick. Additionally, fearful pets give off fearful pheromone smells, so that other pets who come into the clinic begin their visit there uncertain and unafraid, on high alert.

Desensitization is the process of getting your pet comfortable with something they don’t like by exposing them to it in frequent, low, non-harmful doses and by pairing a lot of good stuff with it. In this case, it involves getting your pet used to everything involved in going to the vet- from the car ride to the vet’s office, to the smells and sounds of the vet’s office, to the equipment that is used during the veterinary exam.

Therefore, the first thing you can do is take your pet on car rides regularly, at random times, and to places they enjoy. This may mean taking them to a dog park, a pet store, a friend’s house, or to a drive-through to get some treats. Mix it up and do it often so they don’t think every time they get into the car they must be going to the vet.

The second thing you can do is take your pet to the vet just to hang out, without even needing anything to be done to them. Some veterinary clinics offer what we refer to as “happy visits”. These consist of scheduled times when you can bring your pet into the clinic, just for them to get used to be there without getting poked and prodded. They won’t have anything done to them and the veterinary staff will just offer your pet treats and love to help them become more calm in the environment. They may just sit and eat treats in the lobby, or they may go into an exam room and continue to get treats. They key here is slow, gradual, and making it fun and exciting.

Pheromones & Calming Tips

For some pets, such as cats and dogs, there are pheromone collars and sprays available to help relieve anxiety your pet may be feeling. “Dog Appeasing Pheromone” comes in sprays and collars, while “Feliway” for cats (https://www.feliway.com/us) comes in sprays that you can use on collars, carriers, leashes, bandanas, or blankets for your pet to breath in and feel calmer.

For cats, you can also sprinkle some catnip on a towel and put in your cat’s carrier to help them feel more at ease, and even playful. 

Calming supplements, such as “Composure”, can also be helpful. They are little treats that contain anxiety-relieving ingredients, such as colostrum and theanine. You can give them to your pet to eat prior to coming into the vet and they are very safe to use. Some people have also found CBD oils that are specifically made for pets to help a little with vet-associated anxiety. Just make sure to read the label and give the appropriate dose to your individual pet. You may also want to call your vet’s office ahead of time to make sure it’s okay to give.

There is also a product called a “Thundershirt” that your pet may benefit from. It is made to fit snuggly around your pet, helping endorphins to be released into their bloodstream, calming their anxieties. It’s sort of like receiving a long, snug hug from someone. These Thundershirts can help your pet feel more calm and relaxed, easing some of the tensions of going into the clinic. 

If your pet is very visual and over-reactive to all the visual stimuli within the vet clinic, they may benefit from the use of a “Calming Cap”.  Calming caps are little hood-like caps you can put on your pet before you bring them in to the vet. They cover the eyes so your pet can’t see everything going on around them. It’s best to get them used to these ahead of time at home and have them wear it at other times also so they don’t only associate it with going to the vet clinic. Partnering it’s application with yummy treats is a good way to get your pet okay with having it put on.

Here is a link to more information on Calming caps and Thundershirts:

Treats, yummy yummy treats!

Don’t feed your pet before bringing them in to the vet so that they are hungry and hopefully food motivated when they get there. This can help them be more able to focus on food if the vet staff offers them food and treats, allowing them to not think about their anxieties.

Something else you can do is set aside a certain treat or food that your pet absolutely loves. Only give them this treat or food when it is time to go to the vet. This gets them to think of the vet as a good thing as they get their favorite food only when they get to go to the vet!

Medications or sedation

For some pets, no matter what you try on your own, nothing will help. And that’s okay. There are certain medications available that your veterinarian can prescribe for you to give prior to bringing your pet into the vet. These medications are safe and will wear off after a few hours. The main side effects are they may make your pet drowsy and sleep for most of the day. If they are prescribed for your cat, you may need to be cautious and keep your cat confined to a small room for the remainder of the day after your vet visit so they don’t try to go down the stairs or jump up on something, falling off.

You may also consider looking for a veterinarian who does house calls. Some pets who are terrified at the vet’s office actually do just fine if the vet is brought to them where they are at ease and comfortable, not feeling threatened. There are more and more vets of all kinds offering at-home services these days. Even if your vet’s office doesn’t have it advertised as a service, go ahead and ask your vet if they would consider doing a house call for your pet or if they know of any nearby vets who can.

You have a new clutch of chicks, congratulations! Space is limited, so where will they all go? Logic (and loads of chicken-care sources) dictates a brooder, but you’re left with massive questions the whole process! Everything from what is a brooder to how many chicks should be in a brooder (and all the stuff in between).

In a few easy steps, you can tackle this! Let’s get started.

What Does Chicken Brooding Mean?

Have you ever heard the term “broody hen?” When a hen goes broody, it means she is laying on her eggs and won’t get off no matter what you try. It’s the beginning of the incubation process, the process of growing chicks in the eggs, hatching them, and raising them.

If you incubated your own eggs, or bought chicks from a hatchery or farm store, then you are now charged with brooding these chicks yourself. Now you need to know exactly HOW to brood these chicks yourself.

What Kind of Brooder Should I Use?

There are several different types of brooders, and methods of brooding. Some people use stock tanks (like you see at a farm store), some people use homemade rectangular boxes, some people buy fancy brooding set ups. The kind you need to use is the type that fits your personality, your needs, and your resources. You can make it as simple as you want, or as complicated as you desire.

It also depends on where you need to keep the brooder box. Will it be in a draft free barn? Your garage? Your living room? Your basement? In every location, there may be different needs. The barn or garage might be pretty cold, or very hot. You may have a barn cat lurking around. Or you may have toddlers lurking in the living room. 😆

You have to take all these things into account as you research and choose the brooder that is best for you. At least now, you have some food for thought.

How Many Chicks Should Be In a Brooder?

The fewer chicks that are in a brooder, the less likely you are to encounter a situation where chicks are being suffocated or trampled.

Of course it depends on the size of your brooder and the number of feeders and waterers you have. But I personally only put between 10 and 15 full-sized chicks into a brooder. For bantams, I might consider up to 17 just to help them stay warm. But no more than that. 

At farm stores, you sometimes see there might be 50 chicks in a big bin. Farm stores do that because the chicks aren’t going to be there for that long as they are not raising them, they are simply selling them. They are also inside a climate controled building without drafts and predators.

So why do I choose such a small number of chicks? Well, one reason is that I don’t want any baby chickens to get crushed. It’s also really important to make sure that they all have easy access to food and water. You don’t want them to be stressed by having to fight the crowd for food and water.

It can be too chaotic to keep track with too many little peepers running around. It makes it difficult to keep an eye on each chicks health and growth, whether they are warm enough, and so on.

The drawback of such a low population in your brooder is that you may have to have more than one brooder if you have a large number of chicks. This also means additional feeders and waterers, heat sources, and care. You have to decide what your priorities are.

How to Keep Chicks Warm In a Brooder?

There are a few different options for keeping chicks warm.

Other Chicken Brooder Tips

In this article (and accompanying video), we talk about just this question – and you’ll get my (very) strong opinions about it!

One of my biggest concerns up front is piling. Piling can be a big issue (piling is where baby chicks huddle together at night – and some chicks are crushed.)

Drawbacks

One drawback to the smaller clutch size is that if you have a lot of chicks, you might need multiple brooders.

Summary 

So that is my opinion about how many chicks should be in a brooder. You might see other opinions elsewhere that give you other ideas, but this is what I personally do and believe.

We have tested this over the years with different amounts of chicks in a brooder and the numbers mentioned here are what I have found to be ideal. This way, you can be sure that everybody stays warm, everybody gets food, everybody gets water, and everybody has space and room to move. 

If you have too many chicks or chickens in one area, it can turn into a really stressful environment where the chicks feel overwhelmed and overstimulated and then they might shut down. 

Main Takeaways:

  • I only put 10 – 12 regular size chicks or 15-17 bantams in a brooder at a time.
  • If I have more, then I split the flock into two separate brooders
  • Piling is when chicks huddle together and accidentally squish or suffocate a flock mate.
  • It’s easily avoided by making sure chicks have enough room in their brooders.
  • Another reason to keep a low head count in brooders is so you can make sure everyone is eating/drinking

Learn Even More With This Video

More reading:

Best incubators for hatching eggs

Feeding baby chicks

While a lot of herbs are great for chickens, there’s a few that I feel are the best herbs for chickens to eat.

There’s also a couple on my list that are perfect for other uses, such as first aid and as natural cleaners (make sure you grab my free reference sheet).

In this episode of What The Cluck?! we look at my favorite herbs for chickens to eat, as well as how to actually incorporate these herbs into your daily life with your flock. 

You’ll learn:

  • Which are the best herbs for chickens to eat
  • Why I recommend avoiding cinnamon
  • My favorite way to clean a chicken coop

Where to Buy:

herbs for hens

Chicken Farms Try Oregano As Antibiotic Substitute

Boy In Kentucky Dies From Cinnamon Inhalation

what herbs can chickens eat content upgrade-min

Transcript:

So, first let’s talk about the whys, meaning why bother being concerned about the best herbs for chickens to eat, as well as using herbs in the first place, and there’s some good reasons, as well as scientific reasons, why herbs are a good idea.

When it comes to chickens and their eggs, withdrawal times is a big deal, more so than with dogs and cats, for example.

And this is for obvious reasons, we eat eggs and we eat chicken, and many modern medicines will come out in their eggs and meat, we know this for a fact, so unless you want a mouthful of antibiotics, which I don’t think any doctor out there would recommend unless you’re sick, then withdrawal times play a really important role when making decisions for your flock.

Herbs, on the other hand, don’t have withdrawal times, so the advantage in certain situations is pretty clear.

As an aside, if you end up raising goats for their milk, for example, you can avoid wasting milk if you’re able to treat them with herbal remedies since medicines can come out in their milk.

But getting back to chickens, you can also use herbs to promote better laying and to get your hens to lay in their nests, if they don’t already do that. I do get questions frequently from readers and listeners whose hens won’t lay in nests, and there herbs I do recommend for that.

So, lets get into the best herbs for chickens to eat and how to use them!


Hens love nesting herbs!

nesting box herbs

Yes, I want to SPOIL my hens with nesting herbs!


Oregano

So we’re going to start off with my favorite herb to use in my coop, and that’s oregano. Oregano is one of the best herbs for chickens to eat and there’s a couple reasons for that.

Oregano is well-known for its antibacterial properties, and it’s becoming the darling of the egg industry because studies are showing that it’s more potent than antibiotics for keeping chickens healthy.

And these are large farms with hundreds of thousands of chickens, so disease tends to run rampant at those places just because of living conditions and overpopulation.

But these farms in New York State found that when they fed oregano, that their death rates and illness rates declined quite extensively.

And I’ll put a link in the show notes where you can read an article from the New York Times about it.

So, the way I like to offer oregano is dried or fresh in bunches, and the nice thing about this is that the chickens can peck at it, and it keeps them busy and not forming negative behaviors in addition to keeping them healthy.

Another great thing to do with oregano is to use it in their nesting boxes, and you can do this by just putting fresh leaves into the boxes themselves.

The hens will love the scent and it will help deter pathogens. Another nice thing is it will help keep the eggs clean because your hens will have a clean place to nest, and the scent will give them a boost and stimulate egg laying.

At the end of the day, happy hens lay better and if they have healthy food in their systems, like oregano, their eggs will be healthier, so offering them a nesting box with oregano leaves will help them lay better eggs.

So, like I said, oregano is really one of the best herbs for chickens to eat.

herbs for hens lavender

Lavender

While lavender has some antibacterial properties, and it is one of the best herbs for chickens to eat, it’s better known and better used as a calming agent.

So, lavender is well known to be a way to calm people and animals, and that means chickens too.

I like to use lavender in nesting boxes to help create a peaceful environment for chickens to lay in.

While it doesn’t outright promote laying, meaning you can’t feed a hen lavender and out pops an egg, you can create an environment that promotes calmness that will help your hen feel secure enough to lay.

Laying eggs is one of the most vulnerable times for a hen because she needs to stay still, and since hens are a prey animal, in the wild, not moving could mean death.

So, a hen that’s stressed or worried is not likely to lay, or at the minimum, she won’t lay a good, healthy egg.

So offering an environment that lets her feel safe is a great way to encourage her to lay, and if she feels secure, she’ll lay better eggs, assuming you’re also feeding her an adequate diet.

You can incorporate it into their feed as well, either fresh or dry, and like I said, it is one of the best herbs for chickens to eat because it does have antibacterial properties, so your hens will derive some benefit from it that way too.

You can also add lavender to cleaners to give them a calming scent your hens will appreciate.

Now when it comes to using herbs in your chicken’s nesting boxes, be sure to change them frequently so they don’t mold or breed other pathogens, especially if you use fresh herbs. Switching them out every other day or so will work well.

The other thing about lavender is it repels insects, and I’ve found it useful against flies, so including it in your nesting box will help repel flies, which of course, spread disease.

Mint

Mint is extraordinarily useful for many things when it comes to your chickens and I always keep a ton of it around the homestead. I like to use peppermint for a lot of things, and so that’s what I mostly grow, and it’s one of best herbs for chickens to eat.

Mint is great to put in nesting boxes along with lavender to stimulate laying, and it will create a fresh, good smelling environment for your chickens.

But what I really like using mint for is as a repellent. On our farm, because we have so many animals, we have a lot of flies, and I can tell you that mint is great for repelling flies.

I have a natural fly repellent I made here on the farm, and it works great.

You can read the exact recipe to make it on the blog, but to recap, you boil the herbs, I like to use both mint and lavender since both repel flies, and allow them to steep in the boiling water, just as if you were making a tea.

You then mix it with witch hazel to formulate your fly repellent.

The witch hazel does have a bit of a scent, but because water is absorbed really quickly into things while witch hazel isn’t, it works better for ensuring the lavender and mint stick around longer.

Once you make the repellent, you’ll have herbs left over, and you can feed them to your chickens for an additional immune booster.

herbs for hens calendula

Calendula

So next on our list of the best herbs for chickens to eat is calendula, and there’s a good reason for that.

Calendula have long been known to repel insects in gardens, and they’re considered to be one of the best companion plants out there.

So, using them in your chicken coop, in nesting boxes, for example, will help repel bugs and keep them out of your nesting boxes.

Calendula is also edible for both people and chickens, and they’re said to make your chicken’s egg yolks more orange, so if you want, you can offer the petals to your chickens in their feed.

Grow herbs in herb boxes

Now, if you want to do something fun and entertaining, you can grow the best herbs for chickens to eat in a grow box, which is a raised bed, 4 to 6 inches high is a good height, that also has a top made of hardware cloth.

So, as the herbs grow, they reach the top of the hardware cloth.

Chickens can peck the herbs above the hardware cloth or a little below it, but they can’t get to the roots of the herbs, so once the tops of the plant is gone, it has the ability to grow back.

It’s a great way to offer herbs to your chickens in a way that’s also interesting to them.

You can either grow the herbs straight in the ground or make the grow box like a container garden for them.

Now, if you’re interested in giving your hens herbs and want a handy reference sheet, you can grab my free tip sheet on the blog at TheFrugalChicken.com/chickenherbs.


Hens Love Nesting Herbs!

nesting box herbs

YES, I WANT TO SPOIL MY HENS WITH NESTING HERBS!


Can chickens fly? Grab your boarding pass and discover more about chickens and whether or not they have this superpower.

Some chicken breeds do have flying superpowers, and some do not. Even within a specific breed, some individual chickens can fly, and some cannot.

In this article, we’ll take a deeper look at the question “Can chickens fly?”

Chicken in flight with blurred background

What is a Flightless Bird?

Flightless birds are comparatively rare – there are only about 60 species of flightless birds on Earth. One of the most iconic flightless birds, the ostrich, is the largest bird and can run at speeds upwards of 40 mph (64.37 kph). So perhaps the ostrich didn’t get the flying superpower, but its run certainly qualifies.

These massive runners live in Africa and use their 2-inch diameter eyes to spy out threats like lions, leopards, and packs of hyenas.

While it might not be clear when these incredible birds lost their ability to fly, there is evolutionary precedent for this. Ostriches are ratite, which is described in detail by Britannica:

ratite, any bird whose sternum (breastbone) is smooth, or raftlike, because it lacks a keel to which flight muscles could be anchored. All species of ratites are thus unable to fly.

Britannica.com

Right up there with the ostrich as the most iconic of flightless birds is the tuxedo-sporting critter — the penguin. Unlike ostriches, penguins are not ratites. They possess the keel on their sternum to which their wings attach. 

Whereas volant birds use their wings for flight, penguins have adapted to underwater explorations, and instead, use their wings as fins that allow them to effectively navigate in the waters where their food lives.

In a way, because of this adaptation, penguins might be considered volant birds that just happen to fly through a vastly different environment than most other volant birds. 

So where does this leave us with pet chickens?

Are Chickens Actually Flightless?

So, what does all this say about chickens? Your chickens have all of the right tools for flight. They (generally) have the feathers and the keel on their sternum which their wings attach to, and they certainly have the muscles for it. With all of these details, the question remains: Can chickens fly?

Yes, kind of. And it depends on the breed. 

All chickens have strong muscles, and flight is one of the few ways this species can keep safe from predators. Most breeds are capable of “burst flights,” which are quick and can carry chickens to safety within moments. 

At night, as you probably know, they like to fly up to their roosts, which gives them a good vantage point to see if any raccoons, dogs, opossums, owls, foxes, or coyotes are coming their way.

Why Have Domesticated Chickens Lost This Ability?

Chickens are most commonly bred for two things, eggs and meat. White meat is a muscle, and it’s white meat that our ancestors favored. Selective breeding for meat has maximized the size of our chickens’ chest muscles. 

In theory, this should make chickens fantastic fliers. In reality, however, this is counterproductive. To fly, birds need light bodies with muscles strong enough to carry their own weight. 

The ideal flier will have a lean – almost sinewy – body: one that is strong enough to propel itself off the ground and light enough to stay aloft. Sustained flight also requires endurance. Human-bred chickens are seldom bred for strength, leanness, and endurance. 

Unlike ostriches and penguins, modern flightless chickens are not tied to the Earth because they don’t have the muscles to fly, but because it’s been bred out of them. In other words, we have bred our birds to be too large to support much of flying ability. The average chicken can fly for about 10 feet, and about as high off the ground.

Being similar in flight skills to game birds, chickens were never the greatest fliers. They lack the skills for sustained flight, but they have been known to fly for as long as 13 seconds and a distance of 301.5 feet. It might be a short flight, but it likely is plenty enough to get the chickens away from danger. 


Which Chickens Can Fly?

Larger chicken breeds are far less likely to even hover, as the energy required for even minimal flight can be preventative. There are a number of breeds that are more inclined to fly. The most commonly known fliers are:

They have leaner bodies, and this is better suited for the short flights attainable by chickens. Our own Leghorns love flying into trees. 

At night, Araucanas occasionally roost up in the trees. Originally from Switzerland, the Spitzhaubens are a flighty bird that sometimes takes that adjective literally. Thanks to their smaller size, some bantam hens can achieve high heights for roosting purposes or when spooked. 

Which Chickens Can’t Fly?

There are some breeds that, no matter what, simply won’t get liftoff. Heavier breeds are just too dang heavy, and other breeds lack the necessary feathers.

Some breeds, such as Silkies, can’t fly at all – they simply don’t have flight feathers on their wings. To keep them safe, you have to give them a place to climb up to. Ours can only get about 12 inches up in the air, and that’s pretty much a big jump for a silkie.

Our Mille Fleur bantams and Cochin bantams can’t fly either – although they have wing feathers, their wings are too small. 

Other chickens, such as Orpingtons or Brahmas, have been bred to be so large, they are too heavy to fly.  

How Can I Stop My Chickens from Flying?

A few times a week, a person in my Facebook group asks how they can stop their flock from pooping all over the neighbor’s yard. There are some easy ways to keep your chickens from making unwanted visits.

Build a Fence

The easiest way to prevent your chickens from flying away is to block their escape route. You can build a sizable fence around your chicken coop. This will stop most birds from flying out of their homes. 

For the heaviest breeds, you will not need anything taller than a 4-foot fence. For the slightly less heavy breeds – the Mediterranean breeds, for example – you might need to build a 12-foot fence. 

Clip Wings

If you want to stop a bird from flying, one more way comes to mind. You can clip their wings (trim their feathers).

When done correctly, trimming feathers is painless. You must learn how to trim feathers properly so you don’t cause harm and bleeding. Once properly clipped, your chicken’s feathers can’t provide the lift needed for flight. It can prevent them from flying even short distances.

However, if you have free-range chickens, you might think twice before clipping their wings. Remember the flying superpower some possess, is their way of escaping predators.

Summary

Can chickens fly or do chickens have flying superpowers? Some do, and some don’t. And now you know why. Curiosity is a good thing, so keep on asking questions!

Want to give your chickens treats to keep them close to home? Try this Chicken Treat Sampler Bundle!