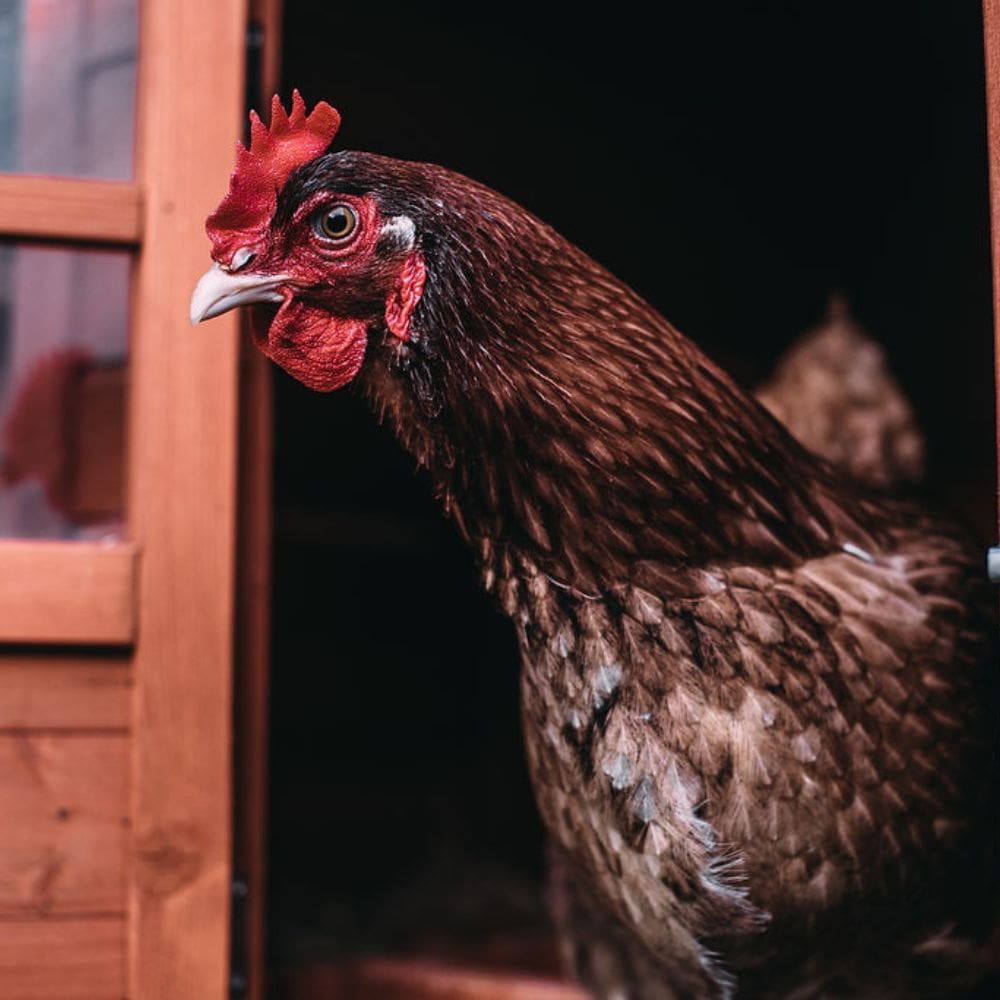
Chickens and incubators, chickens and turkeys, and nesting box drama are today’s questions on What The Cluck?!

It’s Tuesday, which means time to answer your questions about chickens!

(If you have more chicken questions, you might enjoy my book, Chickens: Naturally Raising A Sustainable Flock available on Amazon!)

Today, we look at 4 questions:

  • Can you keep chickens with turkeys?
  • When should I take chicks out the incubator if there are other eggs waiting to hatch?
  • The eggs I was incubating didn’t hatch. Inside were perfectly formed chicks that never made it out of the shell. Why?
  • I cleaned my chicken’s nesting boxes, and now they won’t nest. What gives?

LIKE THIS PODCAST? HERE’S ALL OF THEM!

Do you know when to take incubator chickens out without damaging the rest of your hatch? Here's answers to that and other poultry questions!

Links we discuss:

Vitamin A and late embryonic death in incubator chickens 

Vitamin D absorption and late embryonic death

Chickens: Naturally Raising A Sustainable Flock

Check out https://thefrugalchicken.com/chickenbook for my latest book!

Transcript

Hi there, and welcome to session 22 of What the Cluck?!, a podcast devoted to keeping chickens for fun and self-sufficiency. I’m Maat from FrugalChicken, and today is the day that I answer questions from you guys!

So, in today’s episode, we’re going to cover questions about whether you can keep chickens with turkeys, when you should remove baby chicks from an incubator, troubleshooting hatching problems, and why chickens won’t nest.

This will be a valuable episode that’s full of advice you can use today. Just as a reminder, you can get this episodes show notes at TheFrugalChicken.com/Podcast22, that’s podcast with the numbers 2 and 2.

So stay with me!

READ NEXT: HOW TO HATCH CHICKEN EGGS

Before we get started, I would love it if you submitted a question. You can email me at [email protected] or contact me over social media.

You can tweet me at thefrugalchicken.com/twitter or over Facebook at thefrugalchicken.com/facebook. Both of those links will take you to my social media profiles where you can contact me.

Can you keep chickens with turkeys?

While there’s no law out there that states you must separate turkeys and chickens, if you want to keep your chickens and turkeys in the same pen, there are somethings you should know before comingling them.

Now for full disclosure, right now, we are keeping our one remaining Royal Palm Turkey with our chickens because we have just the one tom, and over winter, I felt it was better for him to be with chickens for warmth and the social aspect.

The turkey doesn’t seem to quite grasp that standing out in freezing rain isn’t the best idea, and with temperatures in the 20s, I don’t want him in a pen by himself. It makes him more of a target for predators, socially isolates him, and I just feel he’s better off with our chickens.

The main reason you hear to not keep chickens and turkeys together is because chickens are carriers of something called Blackhead disease, which doesn’t really effect your chickens, but can be deadly to turkeys, quail, and other poultry.

What is blackhead disease?

Blackhead disease is an infection caused by a parasite, and it’s transmitted from infected birds to uninfected birds through manure.

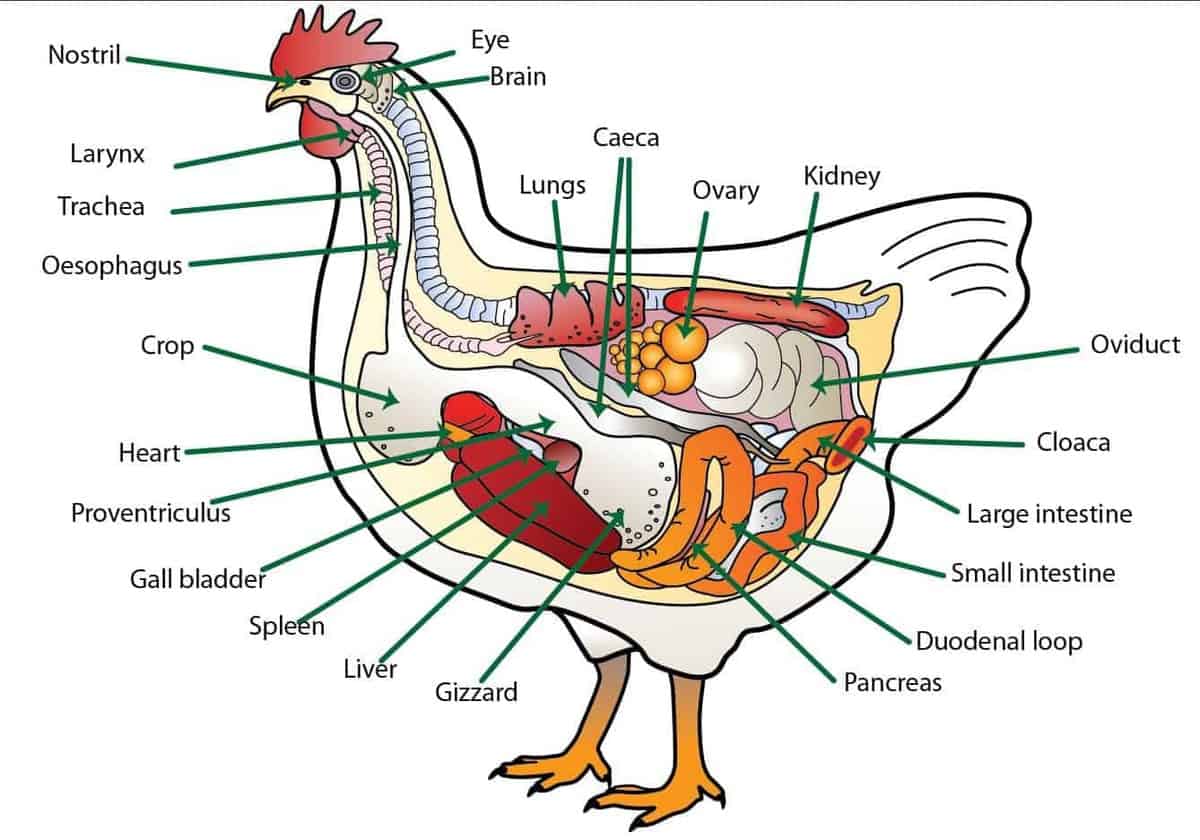
It mainly effects the liver and cecum, which is a pouch between the large and small intestines, and causes the tissues in those parts of the bird’s body to become necrotic and die.

That’s why you hear that you should never keep chickens and turkeys together. But the thing about this parasite is that it also can be transmitted by earthworms according to Mississippi State University, so if your turkey eats an earthworm that’s infected by the parasite, they can catch it anyway.

It’s just the chances of them catching it is increased when housed with chickens because your turkey is more likely to come in contact with infected chicken manure.

Other reasons to not keep chickens and turkeys together involve things like a pecking order.

Our turkeys historically have gotten along well with our chickens, but I can easily see it going the other way, where especially at meal times, the turkeys might take over, leaving little food for your chickens.

This could especially be an issue if you don’t have a diverse amount of feeders and waterers available. I’ve heard of situations where poults, which are young turkeys, start beating up chicks in order to gobble down their food.

So, that’s something to keep in mind if you want to keep chickens and turkeys together.

So, whether you should keep turkeys with chickens really comes down to your own personal choice, and whether you feel that blackhead disease is a risk or not and whether you can manage with potential pecking order disputes.

If you plan on getting a large amount of turkeys, 10 or so, building them a separate shelter might be the best decision.

Alright, next question!

When should I take chicks out the incubator if there are other eggs waiting to hatch?

So, the next question this week is when you should remove hatched chicks from the incubator when there are other eggs waiting to hatch.

READ NEXT: HOW TO GET CHICKS STARTED OFF RIGHT FROM DAY 1

To answer this question directly, the answer is you can leave them in there for up to 3 days, or remove them immediately. There’s benefits and negatives to both, so before deciding which is best, here’s some more background.

You can keep chicks in an incubator for up to 3 days after they’re hatched.

Chicks, before they’re born, absorb the yolk sack, and this is one of their final processes as they prepare to hatch. The yolk sack can provide enough nutrients for 3 days, which is why you’re able to order baby chicks through the mail.

Now, the problem with leaving chicks inside the incubator while other eggs are waiting to hatch is that they will undoubtedly cause the other eggs to roll around since baby chicks flop around a lot as they figure out how to walk and dry off.

At the same time, in the final stages of preparing to hatch, the level of humidity inside an incubator becomes an issue. You want to make sure the humidity inside an incubator stays at around 60% during the final three days of incubation so the chick doesn’t get what’s called “shrink wrapped” inside the egg.

This can prevent him from hatching, and is possibly the biggest reason for late embryonic death in chickens. By opening up the incubator to remove hatched chicks, you run the risk of dropping the humidity, and potentially causing problems with the remaining chicks waiting to be hatched.

Personally, I remove hatched chicks from the incubator after a reasonable amount of time. This is so I can help them dry off further by placing them under a heat lamp, help them establish good gut flora by offering probiotics in water, and to protect the remaining eggs in the incubator.

 At a minimum, hatchlings should remain in the incubator until they’re able to stand and have dried off some. I don’t wait until they’re completely dry before removing them and placing them under a heat lamp.

I use a small Styrofoam incubator, so when I remove the chicks, I slip my arm in the incubator and pull the chick out. I don’t completely remove the top of the incubator to preserve the humidity in it as best I can.

So, let’s move on to our third question.

The eggs I was incubating didn’t hatch. Inside were perfectly formed chicks that never made it out of the shell. Why?

This one is another incubator question. The eggs I was incubating didn’t hatch. Inside were perfectly formed chicks that never made it out of the shell. Why?

Well, there’s a few reasons this can happen. One possibility, like we talked about in the previous question, is they were shrink wrapped, and therefore unable to break through the shell. Another possibility is that they weren’t oriented correctly and were unable to pip the exterior shell or interior membrane.

I had one chick last year that was disoriented in the shell. Her head was pinned down somehow so she was unable to zip through the shell. She had gotten far enough to break open the shell for oxygen by pushing, but as for a typical pipping of the shell then zipping it apart, that never happened.

The chick simply kept pushing. I knew she was poorly presented because after about 24 hours, I went into the incubator to help her and saw how she was positioned.

We also had one last year that didn’t realize she could move her head. It’s hard to explain but she was stuck in her shell for 24 hours, and really, if they haven’t completed zipped out within 24 hours after starting, that’s when I get involved.

So, I think this particular chick just got disoriented. But she’s another one I had to help, and it took her 5 or so hours before she realized she could pick her head up.

She kept it close to her belly like it was malformed, although it wasn’t because it later straightened out. She didn’t realize she was out of her shell, or it had to do with being poorly presented.

So, being poorly presented and unable to pip is another reason chicks sometimes don’t hatch.

Now, another reason is if the humidity in the incubator is too high. If a chick pips to get oxygen, and the humidity is too high, then the chick can effectively drown because it’s unable to get enough oxygen.

We live in the south, and there are some days in the summer where it’s so humid, that it’s literally hard to breathe, sometimes I feel like I’m gasping for air. So that’s another reason why it’s important to make sure the humidity in your incubator is correct.

A fourth reason is if the hen that laid the egg is vitamin D3 deficient. Vitamin D3 is necessary for your hens to properly absorb calcium and phosphorous.

READ MORE: TROUBLESHOOTING LAYING PROBLEMS: 10+ TIPS

There’s a link between poor vitamin D3 absorption and late embryonic death. If your hens are getting out every day and are in the sun, then this is likely not an issue with them.

Poor vitamin D absorption is more likely to happen with hens that are cooped all the time and never see the sun.

It can also happen with poorly stored feed. Myotixins caused by fungi in their feed can reportedly make it difficult for chickens to absorb vitamin D.

Another problem might be vitamin A absorption. According to the Merck Veterinary manual, there’s a link between a diet deficient in vitamin A and late embryonic death.

Other reasons could be contamination of the egg while the chicks are developing. At the end of the day, it’s hard to know exactly why chicks don’t hatch during the final days of incubation, but hopefully this answer gives you some insight into which factors you can control and which you can’t.

So, let’s move on to our final question.

I cleaned my chicken’s nesting boxes, and now they won’t nest. What gives?

So, there’s a few reasons why your hens might refuse to use a nesting box after cleaning it. Some hens can be particular, and if the nesting box suddenly smells funny, or if you’ve used a strong cleaner, they might not want to use it until the box is back to normal.

Moving around their environment can be stressful for some chickens because you’ve “violated their safe space,” so to speak.

When chickens nest, they’re at their most vulnerable because they’re still for a while. In the wild, this is one way predators can pick chickens off and get an easy meal, which is why chickens like to lay eggs in dark, quiet places.

Entering their safe space can cause them to abandon the nest until they decide it’s safe again.

Now, if you clean the nest one day and you get no eggs at all the nest day, your chickens might just be having an off day. It takes 26 hours for an egg to develop in a hen, meaning, depending on the breed and individual chicken, you might only get 4 or 5 eggs a week.

It’s possible your hens are just having an off day on laying. They should be fine in a day or two and begin using your nesting boxes again.

That’s it for our questions this week. As a reminder, if you want to submit a question, then be sure to email me at [email protected] or shoot me a message over social media.

Now, if you’re interested in learning more about the topics we discussed today, I actually have a book available on Amazon which can help you get started.

It’s a 50 page ebook all about how to naturally raise a sustainable flock of chickens. You can check it out at TheFrugalChicken.com/chickenbook.

Thanks for listening to this episode of What The Cluck?!, and I’ll see you next time!

I’d like to hear from you!

Do you have a chicken question? Leave a comment below!

Knowing how to treat sour crop might mean the difference between life and death for your chickens.

Although preventing sour crop is absolutely better than having to treat it, there are times when you’ll just need to know how to treat sour crop.

But, let’s start at the beginning.

A chicken up close as it's coming out of a coop

What is your chicken’s crop?

The crop is a vital organ in your hen’s body, part of the digestion system, that acts as a receptacle for whatever the chicken eats during the day. 

It’s like a pocket or pouch that stretches as your hen eats. As she goes along snacking, the crop will expand as your hen eats more and more.

In the crop, food is moistened and begins softening before it’s passed down to the small stomach and gizzard (where food is further broken down).

If you pick up your chicken at the end of the day and feel a lump on the right side of her body, you’re likely feeling her crop full of food waiting to be broken down and digested.

Knowing how to treat sour crop can be the difference between life and death for your chickens. Here's what you need to know today.

The crop can be used as an indicator of your hen’s health; if she has a crop that’s full at night, and then empty in the morning, you’ll have a good idea that the chickens’ digestive system is working well.

On the other hand, if her crop has been empty for a few days, and you can’t feel anything there, that might be an indication she is not eating. This lack of appetite might be a sign she is sick without displaying any other symptoms (chickens are masters at hiding illnesses until it’s too late to treat them).

A crop that is full in the morning might also be an indicator of illness. This includes illnesses such as sour crop (what we are talking about) or an impacted crop. Or possibly a pendulous crop.

If it’s doing its job right, the crop will be empty in the morning, and should not give off any weird or foul smells (you can smell it through your hen’s mouth.)

If you smell something funky, then you might be dealing with sour crop!

What’s a gizzard?

A crop is not a gizzard and a gizzard is not a crop. So, what is a gizzard (while we are talking about chicken digestion)? Once the food goes down the esophagus, it goes down to the crop (which you can think of as a holding tank or storage pouch), then through the proventriculus (where enzymes are added) and then to the gizzard (I’m giving you a fast-track lesson here).

The gizzard is the organ that utilizes grit (you’ve heard of grit, right?) to grind down the food into a digestible form (paste, if you will).

The chickens’ digestive system is, like all living things, very complex and amazing. The gizzard, as gross as it sounds, is a prime example of this.

What is sour crop?

Sour crop occurs when your hen’s crop becomes infected with the fungus Candida albicans, according to the University of California, Davis.

The fungus invades the lining of the crop and begins to breed, causing an upset in the natural environment of the organ.

Although it can affect healthy adult birds, problems usually arise in immuno-compromised animals or young pullets and roos.

Your chicken can pick up this fungus from anywhere in its environment, although they’re more likely to have a problem if they eat rotten food, moldy feed, manure, etc.

Offering your hens a quality ration that’s fresh will help prevent sour crop.

Many times, Candida albicans is transmitted to chickens through feces, since chickens already have small amounts in their intestines.

Making sure their living area is clean from feces (hard I know, but do your best) is paramount to lessening their exposure to the fungus.

As the hen becomes infected with the fungus, the lining of her crop thickens, and the infection can interfere with her crop’s ability to empty its contents into her stomach.

This can lead to an impacted crop, but that’s another subject for another article. You can learn some about it here: Stop Pendulous Crop In Backyard Chickens In Its Tracks!

Symptoms of sour crop

Sour crop symptoms include lethargy, a horrendous stench coming from your chicken, or weight loss. If you notice the crop is not doing its job, then sour crop might be the culprit.

The most definitive symptom is a sour milk-type smell, which tells you the fungus has gone into overdrive. Other things might occur too, including reduced egg production due to malnutrition.

Once you suspect one of your chickens might be affected, then check her in the morning. If her crop is still full, then you might be dealing with sour crop.

How to treat sour crop

Bear in mind that I am not a licensed vet, and this information is for educational purposes only. Please consult a qualified poultry veterinarian if you think your chicken might be sick.

Your best sour crop treatment is prevention. Do this by making sure your chickens eat only fresh, healthy food and that your flock’s living area is clean.

Chickens tend to be difficult to successfully treat once they get sick enough, so preventing illness is much better than treating it after the fact (believe me on this!)

However, even if you do your best to prevent illnesses, your chickens might develop sour crop anyway.

So, what’s best for treating sour crop chickens?

If a hen does come up with sour crop, clean her living area well with a natural coop cleaner (never bleach) to remove the fungus as best as you can.

Candida albicans does not get spread from chicken to chicken, so they won’t catch it from each other.

According to the Merck Veterinary Manual, sour crop generally occurs because their coop is not clean (going back to the idea that Candida albicans is in their poop).

So cleaning, while it won’t cure your hen, will help prevent any other chickens from getting ill.

Conventional medicine

If you want to treat your chicken using conventional medicine, then you’ll want to contact your vet. 

The Merck Veterinary manual explains how to treat sour crop with nystatin or fluconazole. Both are antifungal medications your vet can prescribe and instruct you about how to administer.

Although you should always take your vet’s advice, because you’re dealing with a fungal infection, I would steer clear of any antibiotics, which can allow yeast to go into overdrive (if you’ve ever had a yeast infection while taking antibiotics, you’ll know what I mean). They also kill good bacteria, which is never good.

Naturally treating sour crop

If you want to treat sour crop naturally, then you have some options.

If her crop is still full, you can start with “burping” your chicken to remove the impacted food and reduce the chances that it will ferment there and cause even more problems.

Holding your chicken under your arm so her head is at an angle towards the ground, massage her crop gently until the food is regurgitated (if you’re not sure how to do this or if you’re afraid, then consider taking your chicken to a vet who can do it for you).

Be advised, though, if you attempt to burp your chicken, there is a chance she will aspirate (breathe in) some of the vomit, which can lead to death. Take caution.

Massaging the crop when your chicken is upright can still be beneficial, as it can help break down the food and might help it pass into the stomach.

You also can try providing apple cider vinegar in a ratio of 1 tablespoon per gallon of water. The apple cider vinegar will introduce beneficial bacteria into her digestive system, which would hopefully combat the fungus.

Preventing sour crop

Making sure your hens steer clear of rotten or moldy food as well as the compost pile will help prevent sour crop.

Another important thing is simply providing fresh, clean water at all times. Regularly disinfect the waterer to avoid fungus and bacteria buildup and growth (whether it’s a hanging waterer or a large tub or any other dish).

You should also consider offering apple cider vinegar. The natural beneficial bacteria will help establish and continue healthy gut flora and might help your hen fight off any potential Candida albicans infections.

Many chicken keepers feed natural things, like pumpkin seeds, garlic, oregano, and other herbs to keep their flock healthy and happy. The healthier they are, the less likely illnesses will occur. A chicken’s digestive tract always does better with the proper nutrition.

Summary

Well folks, there you have it. Now you are “in the know” about a sour crop. Now you can play Jeopardy with a little more confidence.

The most important thing to do is pay attention to your flock. Take notice of their activity level, look for unusual things, and act right away if you notice anything odd. Catching things early is the best scenario.

References

University of California, Davis. “Cropping Up,” Chickens, September/October 2015, page 74. (Article about how to treat sour crop).

Merck Veterinary Manual. “Mycotic Diseases of Pet Birds.” Accessed January 8, 2016.

Learning how to raise baby chicks is pretty easy, but there are somethings you need to be attentive to.

There are some hard and fast rules, and in this podcast we discuss them all. By the end of it, you’ll feel ready to bring chicks home and start them off successfully.

I love chick season, and each year I try to add another breed to my ever-expanding flock (although at this point, we’re getting so many eggs, I don’t know what to do with them all!)

(If you’re interested in learning how to naturally raise a sustainable flock of chickens, I can help. Check out my latest e-book, Chickens: Naturally Raising A Sustainable Flock available now on Amazon!)

I have some pretty strong opinions about what baby chicks should eat, as well as how many should be in a brooder, but it’s not arbitrary – they’re best practices based on my own experience and research.

You’ll learn:

  • How many chicks should really be kept in a brooder
  • What feed is best (and how to decide which is best for your flock)
  • Why I hate red heat lamps
  • What you should put in their water as soon as you get them home (it will reduce your death rates)


READ NEXT: HOW TO HATCH CHICKEN EGGS

Feeding Your Hens Right! ad

Transcript

Hi there, and welcome to session 21 of What the Cluck?!, a podcast devoted to keeping chickens for fun and self-sufficiency. I’m Maat from FrugalChicken, and in this episode we’ll talk about the how to raise baby chicks, including the basics of what you need to know.

So, we’re going to cover feed options, brooders, necessary equipment, temperature, and lots of other stuff to get your chicks started on the right foot.

This will be a valuable episode that’s full of advice you can use today. Just as a reminder, you can get this episodes show notes at TheFrugalChicken.com/Podcast21, that’s podcast with the numbers 2 and 1.

So stay with me!

When it comes to how to raise baby chicks there are some things you need to make sure you have on hand as well as somethings you need to do in order to raise them to laying hens and roosters.

Let’s start first with feed, since this is the biggest question I get.

Chick starter

When it comes to chick starter, I think this is actually pretty easy. You want to make sure your chickens get an 18% protein feed, and that amount of protein is necessary for them to grow correctly.

I don’t really recommend going lower or higher than that, there’s enough evidence out there to suggest that 18% protein is really the ideal amount.

You can go with a homemade over a commercial feed, but if you’re new to chicks or aren’t sure what you’re doing, then I would stick with a commercial chick starter ration. It’s easy, and doesn’t require extra research, and you know it’s correctly formulated.

If you’re worries about GMOs and everything, then there’s non-GMO options out there, as well. Of course, there’s also organic options.

With homemade feeds, some people feed a mixture that can include a lot of different things like corn meal, wheat, barley, peas, etc.

But the bottom line with a homemade feed is you will need to have some way to grind it, like a grain mill for example, and those can get pretty expensive, in order to get the feed to the right size for your chicks.

So, to save time and reduce potential issues with nutrition, I really recommend, for now, going with a commercial chick starter.

READ NEXT: WHAT SHOULD CHICKENS EAT

It’s only for 12 weeks, and after that, you can go with a homemade grower and layer ration.

When it comes to chick starter, you can either go with an non-medicated or medicated feed, and the difference is a medicated chick starter has medication in there to help chicks build up an immunity to parasites that are naturally found in soil.

It doesn’t cure anything, it just helps them build up a resistance. It’s completely up to you whether to feed an non-medicated or a medicated feed.

Personally, I feed a medicated chick starter, and the reason is that there’s so much already going against chicks when they’re young, that I like giving them every chance to build up a resistance to parasites.

I then switch to a homemade organic ration when they’re 12 weeks old. But that’s just my personal preference, and you can do whatever you feel is best for your flock.

Regardless of what chick starter you go with, you want to keep feed in front of them 24 hours a day until fully feathered, which is at about 12 weeks. The exception to this rule is Cornish crosses.

When it comes to how to raise baby chicks like Cornish Crosses, they should not have feed offered to them 24 hours a day after 3 weeks of age because they grow so quickly and it can cause problems with them gaining weight too quickly, which can lead to things like heart attacks. Offer during the day, and remove at night.

You can also offer your chicks herbs, finely ground herbs, such as oregano and sage. I would add these in only lightly, but both are proven to boost the immune systems of chickens and lower the pathogen load in their digestive system.

If you do offer these herbs, then also offer your baby chicks some finely ground grit to help them digest them. For the most part, chicks don’t need grit if their only diet is water and chick starter, since commercial chick starter is formulated to be digested easily.

But if you plan to offer anything other than chick starter, then you should provide them grit as well. If you do offer them leafy greens or treats, that’s perfectly fine as long as it’s not too much or too big for them to swallow.

Another option, if you don’t want to feed them directly to your baby chicks, is to crush them, then put them in water and let them steep for a few hours before giving them to your chicks.

READ NEXT: WHAT TO FEED CHICKENS FOR GREAT TASTING EGGS!

Probiotics

Now, something that I strongly recommend to people who are learning how to raise baby chicks are probiotics that you can easily dissolve in their water.

I used to balk at these, largely because they’re not regulated, so you have no real idea of what your buying, but also because most companies that produce these, I’ve found could not give me a reasonable explanation why they included the bacteria they did, and that irked me.

Why sell a product if you don’t know why it’s formulated the way it is, right?

But after some research, I found a company that I like, so I started giving chicks a probiotic and found that it actually reduced my death rates.

ACV

Something else to offer your baby chicks is apple cider vinegar in their water. This is another great way to get probiotics into their systems, and of course, if you’re offering apple cider vinegar, it should be raw vinegar with the mother included.

If you don’t know what the mother is, is the collection of beneficial bacteria that gathers in homemade apple cider vinegar. The beneficial bacteria in ACV has been proven to also reduce the pathogen load in chickens.

Heat source

Now the next thing you’ll need to learn how to raise baby chicks is a heat source, and in many ways, this is just as important as deciding what to feed them.

Need it to be about 90 degrees in brooder, and decrease 5 degrees each week until it’s about 75 degrees or so in the brooder.

The thing about temperature is It’s extremely important, but if it varies a bit, 5 degrees for example, it’s not the end of the world, just try to keep it as close to the ideal temperature as possible.

When chicks are cold, they don’t eat or drink, they try to get warm, so if your brooder isn’t warm enough, you run into problems of death related to starvation and dehydration. So temperature is pretty crucial to your chick’s survival.

Obviously, too cold is bad, but too hot is bad also, and I’ve had more chicks die from overheating and getting squashed by other baby chicks than I have with chicks dying from getting being too cold.

Stay away from red bulbs. Go with a 75 watt bulb, they don’t get as hot.

Brooders

Next on our discussion of how to raise baby chicks are brooders. When it comes to brooders, the amount of chicks that can be in the brooder depends on the size of the brooder itself.

I personally use Tubberware bins as brooders, and in a standard size one, I only like to put 10 or so baby chicks in each one.

Yes, that means I need more feeders, waterers, and heat lamps, but in my experience, putting more in the brooder leads to issues of unsanitary conditions and trampling.

So, chicks are really messy, and love to kick shavings and bedding into their waterers, and the more chicks in the brooder, the more likely the waterer is going to get clogged up pretty quickly.

In addition, chicks will poop in the water, and the more chicks, the more disgusting the water gets quicker.

When I’ve put too many baby chicks in a brooder before, in the past, there’s also issues of the chicks getting dirty from other baby chicks pooping on them, and it gets difficult to remove dried poop, you have to wash them with a damp rag, which leads to issues of possibly getting too cold.

There’s also issues of chicks getting wet if they get pushed into a waterer, which can cause them to get dirty and cold, so that’s why I really recommend limiting the number of chicks in a brooder to a reasonable amount.

Trampling, and chicks dying from suffocating, is also an issue in brooders with a lot of chicks.

And I know when you go to the feed store and see the chicks in the large stainless steel tubs, the kind of tubs made to provide water for cows and large livestock, there’s a lot of chicks in there, but those chicks get sold pretty quick, so they’re not spending a huge amount of time there, and you don’t see whatever mess they clean up before the store opens.

So, I personally try to limit the size of the brooder as well as the amount of chicks in the brooder itself.

When it comes to brooders, they’ll be in there for a while, and chicks grow quickly, so if there’s fewer chicks in the brooder, as they grow, they will still have enough room.

Depending on your brooder and the size of your chicks, you also might need to put them in a bigger brooder as they grow, especially if it’s still cold out and they can’t safely go outside.

Bedding for brooder

When it comes to bedding in your brooder, you have a few options, and they’re all equally good. When learning how to raise baby chicks you can really, actually, use anything as bedding as long as it’s safe for your chicks and you can clean the brooder out easily.

I like to go with large flake shavings, and the large flake is really important because they can accidentally eat the sawdust shavings, and I’ve also used straw, which they seem to like. They get really excited about it, and I think it’s because there’s microscopic bugs on there that they can see but we can’t.

Other options are paper towels, which do a good job of soaking up manure and are easy to clean.

I would steer away from newspapers since they don’t absorb wetness as well, and I promise you that your baby chicks will spill their water at some point, and you don’t want them getting wet like we discussed. The newsprint also is not good for them.

READ NEXT: 5 CHICKENS TO RAISE FOR COLORED EGGS

Proper feed and water equipment

So next we’ll talk about the proper feed and water equipment. For this, you can buy either plastic or stainless steel cleaners, and I like these because they’re easy to clean.

I personally prefer the long feeders rather than the mason jar feeders because all the chicks can get to it and they’re easier to clean.

I like to use 1 of those long feeders per 15 chicks, and other people might recommend different, but this is just what I recommend. In my experience, having more feeders is better than too few to make sure everyone gets enough food.

With waterers, I prefer the mason jar waterers because they’re easier to clean. If you don’t know what these are, they’re bases that you can just screw a mason jar into as your waterer. When the mason jar gets dirty, you can just unscrew it, and clean with a natural cleaner.

Overall, I just find them easier to sanitize and they’re cheaper.

If you have a lot of baby chicks, a hundred or so, then the mason jar feeders will likely be too small, but there are bigger size options available. You can find the waterer I recommend at TheFrugalChicken.com/waterer.

Now, you can hang the waterers, or you can leave them on the ground. If you hang them, the advantage is that it’s harder for chicks to get shavings and dirt and stuff in there to clog it up, but just remember you need to leave it low enough for the chicks to get to.

When it comes to equipment, the biggest thing is to make sure you have enough of them for the amount of chicks you’re feeding. One of the biggest issues I’ve seen with chicks dying is because they weren’t able to get enough food because other birds were getting there before them.

When it doubt, just offer more places for them to eat.

So, that’s this week’s podcast, and I hope it gives you some idea of how to successfully get started with chicks.

Now, if you’re interested in learning how to raise baby chicks and want some extra help, I actually have a book available on Amazon which can help you get started.

It’s a 50 page ebook all about how to naturally raise a sustainable flock of chickens. You can check it out at TheFrugalChicken.com/chickenbook.

Thanks for listening to this episode of What The Cluck?! about how to raise baby chicks, and I’ll see you next time!


Today, I invite my friend Jenn from Little House On The 100 to tell you all about how to start hunting.

This is part of a series on how to grow a year’s worth of meat in your backyard. Since I’m no hunting expert, but Jenn is, I’m super excited to be able to share this article with you.

You can read my first article in this series, “You CAN Raise Meat Chickens (And Actually Go Through With It)” here.

You can also score a free checklist “15 Tips To Raise 1 Year Of Meat On 2 Acres (Or Less) here.

So, without further ado, here’s how to start hunting today!

Six Steps To Start Hunting

So you think you want to try your hand at hunting wild game? Unfortunately, it’s not as easy as it used to be as far as laws are concerned.

When my grandpa was little it was not a big deal to walk around your property and shoot animals for meat, but now there are a lot more laws that need to be followed in order for you to be legal while hunting.

Six Steps to Help You Start Hunting

Find out if you are required to have a hunter’s safety certificate in order to purchase a license in your state

Kentucky requires all people 12 and older to take a hunter’s safety class before they can hunt on their own legally.

I recommend calling your local conservation office and getting this information. We may not always like the laws that the states require, but we need to follow them and remain legal while hunting.

READ NEXT: RAISING RABBITS ON THE HOMESTEAD FOR BEGINNERS

Pick up a hunting guide at your local Wal-Mart or local sporting goods store

Most states have a booklet you can get for free at your local Wal-Mart that let you know the rules for hunting each type of wild game. It lets you know the season dates and what is required to hunt them legally.

For instance, some wild game can be hunted from raised blinds and some cannot. There are bow seasons, rifle seasons, and muzzleloader seasons for whitetail.

Squirrel and turkey seasons usually fall during or around the same time as the whitetail season and require different weapons at certain times.

Turkeys are hunted with shotguns while squirrels usually require a .22 rifle. This booklet will have all that information for you.

Decide what weapon you are going to use

If you want to bow hunt, you need to purchase a bow and get it set up. Most sporting goods stores can do this for you.

If you want to gun hunt, you need to purchase a rifle or shotgun and get the ammunition for it. You need to practice, practice, practice with your weapon if you want to start hunting.

No one wants to wound an animal and not be able to find it.

Practicing will help to eliminate that, although, it is more likely than not that you will wound an animal someday and not find. Unfortunately, it is part of hunting.

READ NEXT: RAISING QUAIL IS FOR EVERY HOMESTEAD

Invest in, and wear, the proper clothing

If you live in a colder climate, I highly recommend investing money into some decent hunting clothes.

It will be no fun whatsoever to sit out in the cold and freeze. I avoided this for a long time because of my frugal nature, but after investing in some decent clothing I am so happy I did.

It made hunting much more enjoyable when I wasn’t shivering in my stand.

Get permission to hunt on land and get your spots set up

You need to have land to hunt on. If you do not own any of your own, I recommend contacting a local farmer to see if it would be possible to hunt on their property.

There are usually hunting leases available in most states, but they tend to be quite expensive. Please always ask permission to hunt somewhere. Trespassing is illegal and gives hunters a bad name.

We want hunting to be look upon favorably so doing it respectfully will help.


Watch YouTube videos on how to process your wild game

There is a ton of information on the web to help you to gut, skin, and process your wild game.

Finding a mentor who will help you to learn how to do this hands-on is the best case scenario, but for those who cannot, I recommend YouTube videos.

I am a huge fan of learning how to hunt and teaching future generations to hunt.

Hunting is a skill that all homesteaders need to learn. Not all of us can raise cattle and pigs, but we can usually find land to hunt on to provide meat for our families.

I encourage you to look into hunting as a future skill to master.

If you have any questions you can email me at [email protected] You and also find my blog at http://www.littlehouseonthe100.com/

Happy Homesteading and Hunting,

~Jenn

READ NEXT: 5 STELLAR BREEDS FOR YOUR BACKYARD FLOCK

I’d like to hear from you!

Do you think you’d like to start hunting to provide part of your diet? Leave a comment below!

This session, I answer your questions about chickens in winter, broody hens, and covered runs.

So, this podcast on What The Cluck?! is a bit different – I’m answering your questions about chickens.

(If you’re interested in raising hens for eggs and meat, I can help! Check out my new book, Chickens: Naturally Raising A Sustainable Flock on Amazon!)

For the past couple months, I’ve been wanting to make What The Cluck?! a more frequent podcast, and I’m ashamed that I hadn’t thought of making a second weekly episode about answering your questions. 

I’m soooo glad to announce that this will be a weekly thing, along with the Friday topic discussions, so please DO send me your questions.

READ NEXT: HOW TO BUILD A CHICKEN COOP (WITHOUT BREAKING THE BANK)

You can email them to me at [email protected] or contact me on one of my other social media channels.

I can’t wait to hear them.

So, this week, I answer questions about chickens staying warm in winter, broody hens, and covered runs.

You’ll learn:

  • When you really need to be concerned about chickens in cold weather
  • Why you shouldn’t move a broody hen (even if the other chickens are squawking about wanting to use her nesting spot)
  • Why you shouldn’t skimp on covering your flock’s run

Links we discuss

TheFrugalChicken.com/TheBetterEgg

TheFrugalChicken.com/Twitter

LIKE THIS PODCAST? LISTEN TO THEM ALL HERE!

Feeding Your Hens Right! ad

Transcript

Hi there, and welcome to session 20 of What the Cluck?!, a podcast devoted to keeping chickens for fun and self-sufficiency. I’m Maat from FrugalChicken.

Now, we’re doing something a little different than our normal format.

For a while now, I’ve been wanting to move What The Cluck?! into a more frequent format, so once a week now, I’m going to start taking questions from you guys about chickens.

I’m a little embarrassed that I didn’t think of this sooner, but better late than never.

So, today I’m answering 3 questions about chickens.

And as a reminder, you can get this podcasts show notes at TheFrugalChicken.com/Podcast20, that’s podcast two zero.

The first one is about how chickens stay warm in winter, the second is about whether to move a broody hen, and the third is about whether chicken runs, not coops but their runs, should have roofs.

Now, if you want to submit a question, you can reach out to me over Twitter, you can find me at TheFrugalChicken.com/Twitter, or you can email me at [email protected] to submit a question.

And I do look forward to receiving them.

So, let’s get into today’s episodes.

READ NEXT: 7 WAYS TO USE CHICKENS IN YOUR GARDEN

The first question is:

How do chickens stay warm in the winter if it is freezing outside? My chicken book says they will be ok, but is there something else I need to do?

No, they will likely be fine.

The exception is if you live where it’s very cold, for example, negative 20 or 30 degrees, then you might need to supplement with a heat source.

It’s always best to avoid this if possible because red infrared lamps just get too hot and might cause a fire.

If you like, you can use shavings or extra straw in their coop to give them a warm place to stand, but generally speaking, in most areas of the United States, chickens will do perfectly fine in the winter.

So how do they stay warm?

Chickens stay warm by fluffing their feathers, it’s their natural way of keeping their body temperature regulated. So, it keeps them warm in the winter and cool in the summer.

Remember that during the day, chickens will move around, they’ll walk around as they forage for food, so they’re able to keep warm that way too.

At night, they keep their feet warm by resting their bodies on them as they roost.

Another reason to avoid a heat source in the coop, is if the coop is too warm, then when they step outside, they experience a drastic temperature change, which isn’t good.

So, if you do want to provide a heat source, heating the coop to about 35 degrees or so will suffice, but like I said, in most areas of the US, this isn’t necessary.

Should you have laying chickens in a different area then where you hatching chickens with broody gals?

So, to answer this question, no, not necessarily.

While it’s a nice idea, I don’t think it’s really required. Broody hens can be very assertive when they want to be, so if you’re concerned that other hens will interfere with her or cause problems, the broody hen can probably take care of herself.

My hens like to share the same nesting boxes, as I think most people’s hens do, and when one hen wants to use the box, the others can’t really stop her.

So, a broody hen will make it known, in my opinion. That the nesting box is hers. (Here’s how to incubate chicken eggs.)

READ NEXT: HOW TO HATCH CHICKEN EGGS

The other chickens might lay eggs in the box while the broody hen is in it, but this is not likely to disturb the broody one.

By moving her or walling her off in some way, you’re creating extra work for yourself, and it’s really not necessary.

You will have to provide extra food and water for her, which you wouldn’t have to do otherwise.

The layers will find another place to hang out, and do their business.

The other thing is that hens are social animals, and moving broody chickens or otherwise barring her from interacting with her flock might cause more stress than necessary.

Should we put a roof over their run so it stays dry?

While this isn’t completely necessary, in my opinion, yes. There’s a few reasons for this.

In their run, obviously, chickens poop, and eventually, unless you move them in a tractor for example, they will quickly turn a grassy run into dirt.

When it rains, their poop and everything mixes with the dirt, making a muddy soup of disgusting stuff. It smells, it’s unhygienic, etc.

Even if you use something like straw or shavings in their run, when it rains, it produces muck.

Another issue is although chickens can easily handle getting wet in most weather, in the winter, if they get wet, that can lead to some pretty big issues.

Freezing rain, especially, more than snow, is a big issue in winter because the chickens get wet, and it’s really cold, and it’s just not good.

A tarp or some sort of roof over their run will help keep them dry and better able to withstand the cold.

Now another issue, and this can come in any season, is if their coop is wet, meaning the ground is full of poopy mud, then remember that your chickens will try to eat off it.

So, chickens aren’t really that discerning, so if there’s something good to eat on the ground, they will go for it. If their food gets on the ground, regardless of ground conditions, they’re still going to go after it.

Then you run into issues of your chickens eating manure they just eliminated, and putting bad bacteria back into their bodies and you get the point. So, some sort of cover will help avoid that issue.

When it comes to a roof, really anything will do, we’ve used tin, tarps, awnings, anything that will keep the area dry and that can withstand high winds or snow covering it will work.

You’ll need to make sure there’s enough support, for example, with awnings and tarps, water can easily collect, causing the entire roof to cave in. So, just be prepared to address that as an issue.

READ NEXT: 8 WAYS TO SAVE MEGA BUCKS ON CHICKEN FEED

So that’s it for today’s episode. Again, I would love it if you submitted a question to me.

As a reminder, you can tweet me at TheFrugalChicken.com/Twitter or email me at [email protected].

You can also reach out to me through any of my other social media channels, of course.

Now, if you’re interested in learning about the one thing you should feed your chickens for better eggs, then you can grab my free ebook The Better Egg at TheFrugalChicken.com/TheBetterEgg.

Thanks for listening to this episode of What The Cluck?! and I’ll see you next time!

If you’ve always wanted to raise meat chickens, but aren’t sure you can actually go through with it, then this week’s podcast is for you.

In this session of What The Cluck?! we talk all about how we raise meat chickens on our homestead and harvest sustainable meat.

(Want to raise a sustainable flock? I can help! Check out my new book, Chickens: Naturally Raising A Sustainable Flock on Amazon!)

Once you have a certain mindset, and using some tips in the podcast you’ll learn how to do it, you can easily start to raise meat chickens on your farm.

raising meat chickens for a year's worth of meat

You’ll learn:

  • The breeds I recommend if you’re scared to raise meat birds
  • How to handle the emotions (with practical advice)
  • The ONE TOOL you should always have on hand (and why it’s terrible to be without it)
  • Why I recommend raising roosters instead of hens for meat (and it’s not necessarily what you think)

READ NEXT: MAKE YOUR OWN ORGANIC CHICKEN FEED

Links we discuss:

10 Tips For Raising Meat Birds Cheat Sheet

LIKE THIS PODCAST? LISTEN TO THE REST HERE!

Chickens- Naturally Raising A Sustainable Flock AD-min

Transcript:

Hi there, and welcome to session 18 of What the Cluck?!, a podcast devoted to keeping chickens for fun and self-sufficiency.

I’m Maat from FrugalChicken, and in this episode we’ll talk about how to raise meat chickens, and getting started raising a flock you can later harvest for food.

So, we’ll cover different chickens and their advantages, when it comes to breeds, there’s a couple things to take into consideration, and we’ll get to that, how to approach the emotions about raising meat chickens, and what you’ll need to be successful.

We’ll also talk a bit about the whys, meaning why raise meat chickens at all, and some of the more difficult aspects of raising meat chickens.

This will be a valuable episode that’s full of advice you can use today. Just as a reminder, you can get this episodes show notes at TheFrugalChicken.com/Podcast18, that’s podcast one eight.

So stay with me!

So first, let’s talk about the why. So why raise meat chickens in the first place? And this certainly isn’t for everyone.

While there’s nothing wrong with keeping chickens as pets, if you plan to raise them for self-sufficiency, then deciding to raise chickens for meat will be a bridge you need to decide if you’ll cross at some point.

I can’t tell you why you should raise chickens for meat, because it’s truly an individual decision, but I’ll tell you why I do. I like knowing where my food comes from, and I like knowing they had a good life before they became food.

All the chickens on our farm have access to sun, good quality food, the ability to dust bathe, hang out with each other, and just be chickens before they’re harvested.

For me, knowing the quality of their life was the best it could be is more meaningful than just going to the grocery store to buy whatever is there because it avoids the inconvenience of having to face death in the face.

With some of the issues going on with food in this country, namely that the meat industry is no longer required to label country of origin and the meat industry is allowed to ship US bred and raised chickens out of the country for processing, I just don’t want to buy or eat meat from the grocery store if I can help it.

READ NEXT: RAISING RABBITS ON THE HOMESTEAD FOR BEGINNERS

Now, for some meat, like beef, I can’t help it, but for chickens, I can because I can raise them myself.

Now, you might find you want to raise meat chickens for different reasons, and that’s perfectly fine. As you start your journey, you’ll have to decide what those reasons are for yourself.

Now, let’s move onto breeds. So, when it comes to chickens to raise for meat, you have some options, namely whether you want to go with a hybrid or a heritage breed. There’s advantages and disadvantages to each.

Hybrids typically are bred to grow larger in a shorter period of time, and these chickens require less feed to get to harvest weight. There’s obvious financial advantages to these hybrids, but some people don’t like them for reasons we’ll discuss in a minute.

Your other option is to go with a heritage breed, meaning a purebred bird of an established breed recognized by the American Poultry Association.

These chickens are usually hardier and there’s a nice ring to saying you raise heritage breeds for meat. There’s a lot of options, and we’ll talk about a few and why they’re good for meat.

The disadvantages to heritage breeds is they’re developed as dual purpose breeds, meaning for eggs and meat, so they are usually smaller, and take a lot longer to reach harvest weight.

While hybrid chickens are ready anywhere from 10 weeks to 20 weeks, in my experience, to have a sizeable heritage breed chicken to harvest can take up to a year.

They also have a bit different taste than heavier hybrids, which some people prefer. Compared to some hybrid chickens, they’re also healthier and lead better lives during the time you have them, so some people just prefer to raise them because of that.

Of course, there’s nothing wrong with raising either hybrids or heritage breeds. I’ve raised both, and you’ll have good, serviceable meat either way. It’s simply about preference.

Now, my pro tip when it comes to meat chickens is with the exception of Cornish Crosses, try to raise only roosters. And I have a particular reason for this. First off, roosters get bigger than hens, so for the same amount of food, you’ll get a pound or two more meat.

The other reason is I think roosters are easier to part with. When it comes to hens, there’s always that little voice in the back of your head saying “but she can lay eggs…” so when it comes to harvest time, it makes it a little harder, I think.

But when you have 50 roosters all fighting each other, and it’s time to harvest, things get a little less emotional. You only need so many roosters, and more than that bare minimum becomes a huge management issue as they start to get older and territorial. Just trust me on this.

If you’re concerned about getting attached or looking to give the chickens other jobs to avoid killing them, then raise roosters. You’ll get a better bang for your buck and their attitudes will make it easier to use them for what you initially intended.

Another option is to simply keep your meat chickens away from your layers, if possible. Have two separate coops, and that can give you a nice mental separation between the one’s you’ll keep and the ones you’ll say good bye to eventually.

For me, the easiest way to raise meat chickens from a psychological stand point is really to raise Cornish crosses. Once they start to reach a certain weight, you begin to see the quality of their lives declining, and it makes it easier.

So now, let’s talk about breeds. So when it comes to breeds of chickens to raise for meat, there’s a few options.

READ NEXT: HOMESTEADING RESOURCES

The chickens you see in the grocery store are Cornish Crosses, and these chickens are a hybrid between Cornish birds, which are broad breasted, and give the Cornish crosses of today their characteristic large breasts, and chickens like Plymouth Rocks that are larger.

Now, Cornish crosses have a bad reputation as freak chickens, and part of that reputation is because they’re bred to grow so quickly that they tend to have a lot of health issues as a breed.

Personally, if you raise them right, don’t allow them to over eat, and let them exercise, you’ll have less issues than someone who doesn’t control their environment well.

Personally, I’ve never really had an issue except in extreme weather.

One reason I like to raise Cornish crosses for meat is because, to be honest, they’re easier to harvest. And this is my advice to someone who’s starting out with meat chickens and is afraid to get attached.

Cornish crosses have a hard time surviving past a certain age. We’ve had some get to be a year, but it’s really not a good idea to let them live that long.

Ours didn’t have a hard time walking, but they were so heavy they were targets for our other birds, and frankly, they just sort of waddled around.

I think they lived that long because I didn’t overfeed them and made them exercise, but in the end, they still have a shorter lifespan than most other chickens.

But that being said, our Cornish crosses grew to be at least 25 pounds, and although they were the sweetest chickens, they did need help with things like walking up steps and I had to keep an eye on them when they were outside free ranging so they didn’t get picked up by a predator, since they can’t really run to defend themselves.

When it comes to Cornish crosses, and you see what they turn into if they live longer than they’re bred for, it’s easier to understand that their lives naturally end at a certain time, and you’re not really cutting their lives short by butchering them at 10 weeks.

The bottom line is you’re giving them a good life, which will come to its natural and expected end.

Allowing them to live longer will mean they’ll die anyway, probably from something worse than humanely being butchered, such as a heart attack or getting caught by a predator, and you will have lost all your hard work.

The other issue with Cornish crosses and allowing them to live longer than intended is they start to get very big, like we said, and this can lead to issues trying to maneuver around all the fat and meat to butcher them, remove the entrails, etc.

READ NEXT: 9 TIPS TO AFFORD A HOMESTEAD

Again, there’s nothing wrong with raising Cornish cross chickens, I do myself, but these are the insider quirks you should know before choosing a breed of meat bird to raise this spring.

So really, my pro tip with Cornish Crosses is when you get attached, remember why you bought them and that you’re better off harvesting them.

Another option, if you don’t want to go with Cornish crosses, and not everyone does, is going with chickens like Red Rangers, or some other cross that hatcheries develop.

These are hybrids that are meant to grow to a harvestable weight faster than heritage breeds but slower than Cornish crosses.

They’re meant to get to a good weight, about 8 or so pounds usually, and they don’t have the same health issues that Cornish crosses have the reputation for. Namely, they don’t have issues with outgrowing the weight their legs can handle, as well as fluid around the heart, etcetera.

Red rangers, in particular, are meant to be harvested around 10 weeks, although in my experience you’re better off waiting longer.

And in the end, that’s not a bad thing, because at least in my area, you don’t want to harvest chickens in the summer because of flies and such.

So if you buy them in the late spring when it’s warm, let them grow all summer, then harvest in November or December, it’s a good time frame.

These chickens, because they don’t have the health issues Cornish Crosses do, are preferable because they’re quote unquote less likely to die, but when it comes time to harvest them, things can get a little more emotional, largely because they are so healthy.

So, that’s just one thing to remember when it comes to hybrids like Red Rangers. They’re a very good option, and one I’ll probably return to this spring as an experiment, but you have to remember why you got them and not lose your nerve at the last minute.

Now, for heritage breeds, let’s look at your options. Pretty much any heritage breed will work, since they’re historically bred to be for both eggs and for the table.

On our farm, we’ve raised heritage breeds like Buff Orpingtons, Rhode Island Reds, Plymouth Rocks, and Delawares. Out of these, the Delawares and the Plymouth Rocks have grown the best.

The Rhode Island Reds grew well, but it’s been hit or miss whether they grow to a good size. Some did and some didn’t, and some got to be around maybe 3 or 4 pounds eating the same amount as other breeds.

The Buff Orpingtons grew to a good size, but weighed less than the Delawares.

So, if I were to pick a heritage breed to raise, it probably would be the Delawares because of their size, and also because they have, in my opinion, whiter skin, which if you’re a person who’s concerned about your food’s aesthetics then it makes a difference.

Cornish crosses, for example, can have yellowish skin, which can be off putting. I’ve found Delwares, or at least the ones I raised, didn’t have that.

Now, another option for a heritage breed, if you want to try something different, are Silkies. Silkies are from china, and part of the cuisine from that part of the world, and you can find silkie chickens for sale at Asian supermarkets.

Silkies have black skin, so they’re not for me, I grew up in America, and I find the color of the skin off putting, but meat is meat, and Silkies are considered a delicacy.

They’re smaller chickens, so you can expect a much lower harvest weight, but they eat less. It will take longer than a Cornish cross, for example, before your Silkies are at a harvestable weight. The other thing about silkies is they are very friendly chickens, and it’s very easy to get attached.

Now that we’ve talked about breeds, let’s talk about some of the tools you’ll need. Raising meat chickens is no different than other chickens for the most part.

You’re best off buying them as chicks, so you’ll need feeders that are easy to clean, waterers, and some sort of brooder and coop.

As for coops, anything will suffice as long as it keeps them dry and out of the elements. You’ll need to provide them with feed, either homemade or commercial, and just remember you are what you eat.

So if you don’t want to eat GMOs then you shouldn’t feed them to your chickens.

You should feed them a regular ration, again, either commercial or homemade, rather than letting them forage. You’ll get better tasting meat, because weird flavors from whatever they happen to pick up won’t get into them, and they’ll grow better.

Chickens left to forage, in my experience, might reach harvest weight or they might be smaller because they’re running around and looking for food and getting who knows how many calories a day.

You’re better off, and I think you’ll have a better experience and get more meat, feeding them some sort of meal daily.

Now, as for butchering equipment, the most important thing, and I cannot stress this enough, is to have a good quality, sharp knife.

Above all else, this is what you need, because without it, you cannot humanely slaughter and you’ll have a hell of a time cutting up and deboning your chicken later.

Any non-serrated knife will do as long as it’s very sharp. I recommend purchasing a sharpener because as you go along in your butchering journey, your knives will get dull, and it will get dull quickly.

I sharpen mine before every cut in order to make sure it’s as sharp as possible.

This goes for whether you’re actually slaughtering or cutting up meat. You always want a super sharp knife when boning or cutting up meat to reduce damage to your food and to make it easier.

So that’s it for today’s episode. When it comes to meat chickens, I encourage you to raise them responsibly, and to not be afraid to raise them.

It’s rewarding being able to harvest your own meat, and although it can be a little sad at first, it’s better knowing they had a good life, a much better life, than the meat you’re buying at the grocery store.

Raising them is no harder than raising chickens for their eggs, and I think you’ll find it just as rewarding.

Now, if you’re interested in learning to raise chickens for self-sufficiency, you can grab my free tip sheet on the blog at TheFrugalChicken.com/MeatChickenChecklist.

Thanks for listening to this episode of What The Cluck?! and I’ll see you next time!