It’s May, but for different areas of the country, that means different crops you can start!

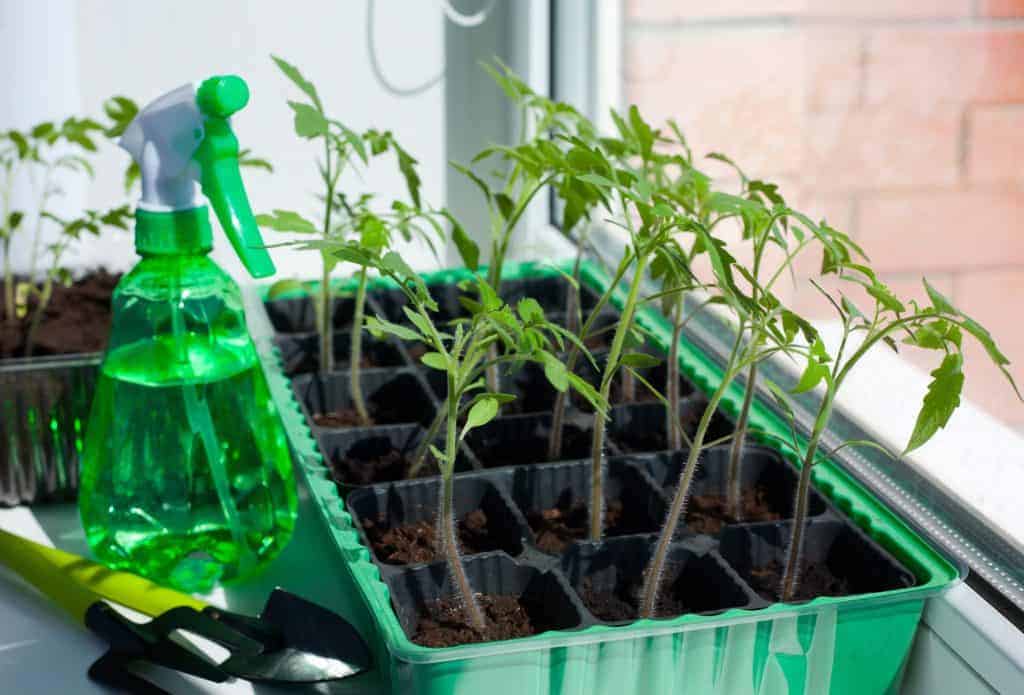
Here in Zone 7, we’re well under way, and have already harvested our cool weather crops, and my tomato plants have had a sudden growth spurt.

My friends in Zones 3 and 4, however, are just getting started (and I have friends who are still under frozen tundra!)

In this article, we’ll discuss what to grow in USDA Zones 3-10, which covers most of the contiguous United States.

Zones 9 and 10

This is where you can find some early heat, so you won’t be able to plant a lot of seeds in this region. This is why you will have to focus on starting with some transplants.

You can use lima beans, cantaloupe, cucumber, eggplant, jicama, okra, peppers, sweet potatoes, pumpkin, winter and summer squash as well as watermelon and tomatillo. Edible cactuses are another option.

If you live in a desert area or if water is scarce, choose varieties that are drought resistant. Eggplants, for example, thrive in arid desert environments.

Make sure you water generously in the mornings or evening dusk (very morning will help your plants withstand the mid-day heat.

Zones 7 and 8

For these zones, you will be ok with planting lima beans, snap beans as well as sweet corn, cucumber, eggplants, okra, peppers, sweet potatoes, winter and summer squash as well as watermelons.

If you want watermelons, you may want to grow them early in the month, especially if you’re direct sowing with seeds. Cantaloupe is another option, be sure to allow it to trellis to keep it off the ground and away from critters.

If you have a cooler area of your property, you can still sneak in some radishes and baby lettuce in Zone 7, but kale and broccoli will bolt, as will lettuce if it’s not harvested at an early stage.

Zones 5 and 6

Here you may also want to opt for some specific seeds. These include watermelons, tomatoes, summer and winter squash, pumpkins, sweet potatoes, peppers, okra, lettuce, eggplants, sweet corn, cucumbers, cantaloupes as well as lima and snap beans!

What you have to note about these two zones is that they don’t’ have to deal with such a challenging weather as other regions do. This is why you can opt for a variety of crops. Thankfully, these can be planted throughout May, with little to no problems.

Zones 3 and 4

For these zones, you will see that you can easily plant a wide array of seeds, and the temperature is on your side. You can still start watermelon and cantaloupe inside a greenhouse.

Kale, radish, head and leaf lettuce, peas, chard, carrots, Brussels sprouts, broccoli, beets can all be started outdoors – if frost threatens the tender starts, be sure to cover with a cold frame.

When the ground is workable, you can plant your potatoes.

You can start hardening off your tomatoes, summer and winter squash, pumpkins, cantaloupe, cucumbers, but if frost threatens, leave them indoors. A frost will kill them, wasting your work.

This is quite an incredible investment and one that will almost certainly pay off very well in the end.

The idea here is to invest in crops that deliver a very good quality and which are easy to nurture and take care of. Most of them can be grown throughout May, although chard and leaf lettuce are better grown at the earliest parts of May to prevent bolting.

I’d like to hear from you!

Which of these vegetables and fruits are you growing? Leave a comment below!

If you yearn for fresh veggies picked at the height of freshness, but aren’t sure how to garden in small spaces, then by the end of this article, you will have plenty of ideas to get you started.

For many years, I lived in a small apartment near Washington DC, but on my tiny balcony, I still managed to eek out some cherry tomatoes, cucumbers, and strawberries.

Even if you have a small yard or no yard, you can still start a garden in strategic ways, and you can supplement your family’s diet while enjoying the pleasure of getting your hands in the dirt and watching the seeds you plant grow and thrive.

Decide on a location

Before you decide what to grow, you first need to consider light.

Your location needs to have plenty of sun; most vegetables need at least 6 hours of sun in order to grow and set fruit. If they don’t get that much, you will either have no vegetables or they will be stunted.

Does your porch or patio have room for a window box? You can install several planters, and choose attractive varieties such as pumpkins or butternut squash so your surroundings are beautiful as well as functional.

Your location should also be out of direct wind, and in an area where your plants will be protected.

Also think about how you will water your plants; if you have just a porch, you won’t be able to use a hose, for example.

If you yearn for fresh veggies picked at the height of freshness, but aren't sure how to garden in small spaces, then by the end of this article, you will have plenty of ideas to get you started!

Planters

When it comes to planters, you have lots of options. I had great luck growing cherry tomatoes in hanging planters. You can use ones that only cost $1 or ones that cost hundreds, but are self-watering, like this one.

Another option is a gardening table like this one, or a planter that aids in square foot gardening. Just be sure your planters drain well, and are spacious enough for your plants.

Don’t break the bank gearing up for gardening in your small space. Try galvanized buckets, food-safe five-gallon paint pails, or inexpensive window boxes.

How to decide what to grow

Even your window can support a window box that yields a plethora of herbs like mint, sorrel, basil, and thyme. You might also consider growing tea herbs like chamomile and rosemary. Oregano and parsley can be used in many ways to flavor a variety of meats or bulk up a salad.

Most of these herbs can be clustered together in a few window boxes to make the most use out of the least amount of space.

Cherry tomatoes, dwarf apple trees, and many other fruits and veggies thrive in appropriately sized containers.

Herbs, salad greens, and many varieties of peppers can be grown in kitchens, on window sills, or in the containers. Strawberries and cucumbers fare well in vertical gardens, and so does squash like zucchini or yellow squash.

When seedlings arrive at your local nursery, you can purchase some to kickstart your garden. Another more economical approach, is to ask friends and family for cuttings and sprouts or opt for low-cost, high-yield seeds or seedlings.

Remember, also, that many fruiting plants, like squash, require pollination to set fruit. If bees aren’t visiting your garden, you will need to hand-pollinate. You can do this easily with a Q-tip, gently sweeping pollen from a male flower and visiting female flowers on the plant, just as a bee would do.

Hydroponic gardening

Another option to maximize small spaces is hydroponic gardening. This is a different type of container gardening that involves no soil. To make starting easier, you can purchase a hydroponic kit that eliminates a lot of the guess work.

The frugal foodie in your family will love all the meals that can be prepared with the produce from your tiny gardens. One you have a system, you’ll find it’s quite easy to grow in smaller spaces.

I’d like to hear from you!

Do you garden in a small space? Got any advice? Leave a comment below!

Although we live in a fast-paced, plastic-infused world, I know a lot of you want to slow down and live a simpler life.

My grandparents lived through the Great Depression, and in this article, I’m going to share some Depression-era strategies handed down from that generation.

We all know that the Great Depression brought major changes to the US, and it forced the closure of many businesses, left millions of people without jobs, and created crippling poverty worldwide.

People were forced to learn to live on tight budgets and in smaller spaces. While it was a harrowing time for Americans, the struggle wasn’t in vain. In fact, it left behind a legacy of triumph in the face of stark adversity and fostered a spirit of survival in many people.

I think these tips are a gateway to a simpler life that honors well-made items, and reduces waste. Here are a few of the lessons learned during the Depression that will still hold families in good stead today.

Make It Do or Do Without

Learn how to get the biggest bang for your buck by using everything you pay for. How often do you toss a product because it’s hard to get to the bottom of the jar, tube or container? A variety of rubber spatulas and a pair of scissors will ensure you use up every last bit of product you paid for. How about covering torn or stained furniture instead of replacing it? Or mending clothes or handing them down? Make what you have last as long as possible before throwing it away or replacing it.

See What Isn’t There


The Depression Era saw women learn to make dresses from flour sacks and it saw companies meet this need by making flour sacks sturdier and printing them with patterns and colors that became pretty, serviceable clothing and undergarments. This action allowed families to clothe their children and it showed them the compassion of big enterprise to meet the needs of the people they did business with.

Grow A Garden

Growing your own produce is still a smart way to cut costs. Since feeding a family is a major part of everyone’s budget, trimming costs in that areas is just a smart move.

Depending on the climate you live in, you even may be able to grow food year-round. You don’t need acres of land or a working farm. Try container gardening, vertical gardening or hydroponic gardening if you live in urban or confined areas.

Buy Used And Save The Difference

Secondhand stores, pawn shops, and consignment shops abound in the US! You can buy everything from clothes, special occasion apparel and furniture from secondhand and consignment shops.

A working lawn mower cuts grass in the same manner whether you purchase it for hundreds of dollars at a big box home improvement store or for pennies on the dollar at a local thrift store.

The same is true for kid’s bikes, video game consoles and household appliances. You get the same functionality without breaking the bank.

Learn To Share

Splitting the cost of living expenses and big dollar purchases that have single uses is an economical treat to your pocket. A riding mower purchased and shared between neighbors makes much better sense than one you purchase but only use occasionally.

An apartment in an upscale area with a roommate can yield not only cost savings, but often, a safer, more appealing living space.

While the Great Depression forced an economic reality many were unready for, people who were already living frugally tended to fare better. Those who weren’t living below their means learned to do so quickly.

Keeping your expenses to a minimum, learning to live within your budget, and implementing the above tips can help you establish lifelong spending habits that will hold you in good stead no matter what your financial situation brings.

Feature photo credit: By Unknown or not provided (U.S. National Archives and Records Administration) [Public domain], via Wikimedia Commons

I’d like to hear from you!

Which of these tips will you implement immediately? Leave a comment below!

I had to take a break from recording anything thanks to chronic strep throat, but I’m back with a new episode of Real Homesteader Stories!

In this episode, I reveal the ditch that’s supposed to save us from the flooding in the MidWest (you can guess about how well that went). I also give you a sneak peek at the broody hen who’s hatching quite a few eggs, and you’ll learn how to tell whether your ducklings are male or female without vent sexing!

We started raising mealworms for our chickens because it’s such a great way to save some cash!

For most people in the world, mealworms are pests because they love to get into flour, cereals, pet food, grains, mill feed, and other dried goods, thus ruining them.

For backyard chicken owners like us, however, they’re kind of like white gold since you can save quite a few bucks on your feed while providing an entertaining meal for your flock. They provide extra protein for your flock, and you can’t go wrong with that.

Wooden spoon full of dried mealworms

It’s pretty easy to do, and in this article, I’m going to tell you about raising mealworms for chickens. Back in the day, this is how our ancestors increased the protein intake of their heritage chicken breeds.

While it might seem a little creepy-crawly to a lot of my readers, it’s an easy, low-cost way to raise a high-protein food for our hens. Plus, they LOVE them.

It’s true, my Brahmas, Silkies, and Ameraucana hens all love them! And while we know a healthy diet can increase the life span of backyard chickens, there’s also something to be said for bringing your flock joy.

How to Raise Mealworms For Your Chickens

You can dry mealworms, and store them for quite a while, and while alive, they’re easy to rear, and reproduce in huge numbers since the female darkling beetle (mealworms are the larvae of the darkling beetle) lays more than a hundred eggs at a time!

Housing for Raising Mealworms

Growing mealworms for chickens at home just takes a few steps. You do have to face the music: you WILL have to deal with creepy crawlies. Besides that, you do have to pay attention to the timing so you grab mealworms before they turn into beetles.

You’ll want to start to raise at least 500 mealworms to get the volume of insects you’ll need to supplement your flock’s diet. Remember, you will have to raise mealworms to maturity and let them reproduce before harvesting them for your flock.

  • The first thing you’ll need is housing for your mealworms. Ideally, you will have several “homes” going so the insects aren’t crowded. Most people use a set of plastic Tupperware drawers (something like this). They’re solid, easy to clean, easy to see the insects in their various stages of life, and have space for air. If you like, you can also drill more holes (I would use a thin drill bit, such as a ⅛-inch bit).
  • You will also need a substrate in the drawers; oatmeal is a popular option (and what we use) because the insects can feed on it, it doesn’t mold very fast, and it’s inexpensive.
  • After putting your mealworms inside their new home where you’ll raise them, you’ll want to either keep them in a warm, dark place or, if you can’t (let’s say the only place to keep them is on the front porch), place a piece of cardboard on top of each individual drawer (just lightly) to provide darkness.
  • Keeping them warm can also help the larvae pupate faster.

I’ve also found that keeping them close to your chicken run or building a coop with a specific area for mealworm production makes things a LOT easier. (Read this article for other coop features I think are important and check out my free chicken coop plans here.)

Feeding Your Mealworms

The insects you’ll raise (both mealworms and the adult darkling beetles) eat food you can source right in your own kitchen, including dry oats, cornmeal, chopped carrots, apples, or potatoes.

If you are using oatmeal as their bedding, you can just add a few bits of each fruit/vegetable. Make sure to check often to see if they need more food, and to remove mostly-eaten or moldy food.

Start with more than you think they need, watch to see how much they eat, and adjust from there.

Chicken pecking at ground

Mealworm Life Cycle

Egg

The egg is the first stage of life for a mealworm, and it takes around 1 to 4 weeks to hatch and for the larva to develop. It is a tiny, white bean-shaped egg, about the size of a fragment of dust.

Larva

This is the second stage and lasts about 8 to 10 weeks. In this stage, the insect is a mealworm, and it’s these critters that you will feed to your chickens.

For the proportion that you will keep so they can grow into adults, they will form a tough exoskeleton, and as it grows, they will molt and shed the hard shell. Molts will happen about 10 to 20 times during this stage.

Pupa

This is the stage before it turns into an adult darkling beetle. At this stage, it will turn into a white pupa. It has legs and wings, but they are not functional, and the only movement it makes is to wiggle. The pupa stage lasts one to three weeks, then transforms into an adult.

Adult

This is the final stage of the life cycle. At first, the beetle will be white with a soft exoskeleton. As the exoskeleton hardens, it turns black.

Although the beetle has wings, it doesn’t fly, and after 1 to 2 weeks your new darkling beetle will begin to mate and reproduce. The female beetles burrow into the soil a few days after mating, and lay eggs.  

Where You Can Buy Mealworms

Now that you know more about the lifecycle of the mealworm/darkling beetle than you ever wanted to know, let’s talk about where you can get starter stock to start raising mealworms for chickens.

You can order mealworms on Amazon to kickstart your farm like these here.

Allow some of the mealworms to grow into adults so that they reproduce and lay eggs, creating a cycle of free food for your backyard chickens!

How Many Mealworms to Feed a Chicken


So the next question you probably have is how to feed mealworms to your flock (or at least how much to feed). There’s no set answer to this; just play it by ear. It will depend on what chicken feed you use. If you use a high-quality feed like this, you won’t need to start with as many mealworms.

A good start is a ½ a cup per chicken and increase or decrease as needed. You can read more details about what chickens eat here.

At some point, you might be able to completely eliminate a commercial ration for your chickens (including your laying hens), as long as you feed other foodstuffs (e.g., fresh produce, legumes for fat) as well. You might even find your flock lays better eggs! If you decide to eliminate your regular feed, be extra careful to ensure they are getting the proper nutrition they need.

Don’t want to start raising mealworms yourself?

Find dried mealworms in my store!

Raise Mealworms for Your Chickens is easy with this guide!

Yes, I want mealworms for my spoiled hens! Click HERE!

BONUS: Raising Mealworms for Profit

If you happen to find yourself with more mealworms than your backyard chickens can eat and have neighbors who also have chickens, you can use your personal mealworm farm for profit. Some strategic chicken keepers even breed mealworms to sell for a bit of cash.

Since they don’t cost very much to raise, and the adult beetles lay a LOT of eggs, you might very well find yourself with a viable business on your hands! (No promises though).

More Articles on What to Feed Your Chickens:


Summer is quickly approaching – which means eating outdoors, summer vacations, and light meals.

Today, I’ve invited Alix and Hugo from A Hedgehog in The Kitchen back to the blog to share a healthy wholewheat cauliflower pizza that you can make in your own kitchen!

Here’s how to make this pizza that’s yummy (your kids will ask for seconds!)

This wholewheat cauliflower pizza is one of our favorite types of food : healthy comfort food. The gooey sheep’s cheese and emmental cheese, oven-baked cauliflower and red onions make this meal so tasty and welcoming after a long day.

One of our favorite activities to do together is cooking. We love creating a fun new recipe, shopping for the ingredients at our local farmer’s market and coming home and turning everything into a yummy meal.

We absolutely adore pizza! Homemade pizza is such a great meal because you gather your ingredients and just pop everything in the oven. It is quick, easy and makes your entire home smell so good! Our love of pizza has inspired some of our very best healthy, wholesome, real food recipes.

We typically replace white flour with wholewheat flour because it’s healthier, easier to digest and gives the food a nice, nutty flavor. To make the crust of this wholewheat cauliflower pizza, you need just 5 simple ingredients and you’re good to go : water, salt, sugar, dried yeast and olive oil. You’ll love having this healthy, wholewheat, homemade pizza dough recipe on hand to make all of your favorite homemade pizzas. We use it when we make our Wholewheat Ratatouille Pizza 

For the toppings, you will need cauliflower (homegrown is best if you’re lucky enough to have it growing in your garden!), vegetarian “chorizo”, red onion, sheep’s cheese, grated emmental cheese, salt, pepper and chili pepper.

These are some of our favorite vegetarian pizza toppings. You could also use real chorizo or other sliced meat instead of a vegetarian substitute. Here in France, we love cooking with sheep’s cheese and emmental cheese but you could definitely use your favorite local cheeses for this wholewheat cauliflower pizza recipe too!

Cauliflower is one of our favorite ingredients because it’s delicious, versatile and so good for you! Do you love cooking with it too ?

These are 5 ways that cauliflower is amazing : it it anti-inflammatory, it can help fight cancer, it is a natural detox food, it is easy to digest and helps your digestive tract work smoothly and it’s packed with antioxidants (hello, long-lasting youth!). All great reasons to use it in your homecooking as much as possible.

We cooked this pizza for a romantic date night in but you could absolutely double the quantities and make a pizza for a family of 4.

We love knowing that not only is this wholewheat cauliflower pizza really good but it’s packed with nutrients and a ton of health benefits. Enjoy!

WHOLEWHEAT CAULIFLOWER PIZZA RECIPE

For 2 people / preparation time : 2 hours / Cook time: 15 minutes 

2.25 cups (300g) of wholewheat flour
5oz (10 tbsp) of lukewarm water
1 tsp of salt
1 tsp of sugar
1.5 tsp of dried yeast
1oz (2 tbsp) of olive oil

1/2 cauliflower cut into florets 
7 slices of veggie chorizo (or real chorizo or other sliced meat)
1/2 red onion (sliced)
1 cup of sheep’s cheese
1/2 cup of grated cheese (emmental or your favorite cheese)
Salt,  black pepper and chili pepper to taste

Prepare the leaven
Pour ¼ cup of flour, yeast, sugar and 2oz of lukewarm water into a bowl and combine the ingredients together. 

Leave the mixture to rest for 10-15 minutes. The mixture is ready when it forms a brown dough with bubbles.

Prepare the pizza dough
Mix flour and salt using your stand mixer.
Pour the leaven into the bowl and continue to mix slowly.
Pour in the olive oil and continue to mix.
Pour the rest of the water in little by little and continue to mix slowly for 10 minutes.
The dough must be smooth and springy.
If the dough is too dry, add more water. If the dough is too wet, add more flour. Whether adding water or flour, make sure to add it little by little.
Cover the bowl with the dough inside and leave to rest in a warm place for at least one hour. (You can create a warm environment in your oven by heating your oven on low heat (80°F/30°C) for approximately 5 minutes, then turning it off and leaving the bowl to sit inside.)
The dough will double in size.
Preheat your oven on maximum heat. Our oven heats up to 570°F (300°C). If yours doesn’t go up as high, that it fine but you may need to cook the pizza for longer.
Remove the dough from the bowl and place on an oiled sheet of baking paper or a silicone baking mat (such as a Silpat).
Roll out the dough with a rolling pin.

For the pizza toppings
Mix the sheep’s cheese with 2 pinches of salt, a pinch of black pepper and a pinch of chili pepper. 
Spread the sheep’s cheese over the dough. 
Add the slices of vegetarian chorizo. 
Add the slices of onion. 
Add the cauliflower.
Add the grated cheese. 

Bake in the oven for 10 minutes. 
Serve with salad and vinaigrette.

If you enjoyed this recipe, please sign up to have our real food recipes with a French twist sent to you by email. As an added bonus, we are currently offering a virtual tour of our Paris. When you sign up for our recipe emails, you will also receive 1 email per day for 5 days with photos of our favorite spots in Paris + a related recipe for each day. Sign up here

You can also grab a free spice guide here with 6 spices we love and their health benefits!

About Alix & Hugo :

Alix and Hugo develop their healthy, wholesome recipes with a French flair in their Parisian home. They share their creations on their food blog, A Hedgehog in the Kitchen. Sign up to receive recipes in your inbox here. Stay in touch on Facebook | Instagram | Pinterest | Twitter