How well do you know your chicken’s eggs?

Knowing chicken egg anatomy is very useful for more than one reason. In fact, it can tell you a number of things about your hen’s health – for example, whether your hen is stressed or even sick.

So it’s important to know about the different parts so you have a baseline, and if you plan to HATCH eggs, knowing them gets even more important!

This is where chicken egg anatomy comes in the handiest – each part of the egg contributes to whether the embryo will hatch or not.

Anatomy of a chicken egg diagram

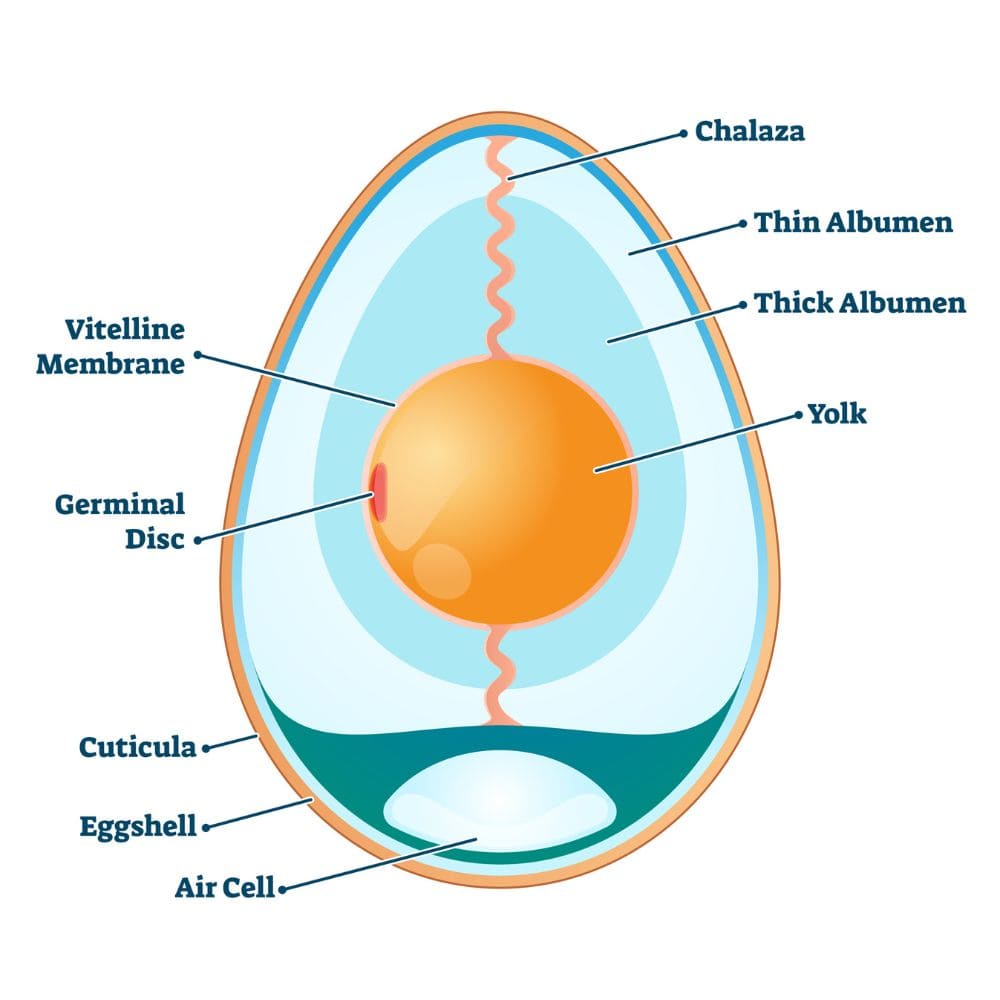
Chicken Egg Anatomy Explained

The average Joe knows an egg by the white, the yolk, and the shell. Pretty simple. However, there’s a lot more to those wonderful eggs. Let’s take a look deep inside the egg we know mostly on a surface level.

Air Cell

The air cell is located in the large end of the egg, and it’s what it sounds like – a place where the air is stored.

When you hatch eggs, the air cell and its size become very important. As the egg ages, the air cell becomes larger. This is why older eggs float in water.

Albumen

When we talk about “egg whites,” we’re referring to the albumen. It contains proteins, niacin, riboflavin, magnesium, potassium, and sodium.

The albumen actually has four layers of thick and thin proteins. It’s truly amazing.

A cloudy albumen means the egg is fresh. As the egg ages, the carbon dioxide escapes, leaving the albumen more transparent than their fresh counterparts.

Blastodisc

This is the round white bullseye-looking spot you see in the yolk, and it’s where the embryo begins to develop when the egg is fertilized and under hatching conditions (meaning, the egg is at the right temperature with the proper humidity for hatching.)

Want to know more about how a rooster fertilizes an egg, read this interesting and entertaining article about it.

Bloom

The bloom of an egg is a natural coating that covers the eggshell and protects the interior of the egg from bacterial invasion. As we all know, bacteria can cause health issues. The bloom also reduces moisture loss from the egg, which is important for the hatching process.  

If you plan to hatch your eggs, you definitely don’t want to wash them, because it will eliminate the bloom.

Chalazae

Pronounced kah-layz-ah, the chalazae are the rope-like strands you see connecting egg whites to the yolk. The more obvious the chalazae are, the fresher the egg.

In nature, it’s an important part of the hatching process because it stabilizes the yolk (which feeds the baby chick embryo as it grows) in the egg.

Shell Membrane, Inner & Outer

The inner and outer membranes provide more protection for the contents of the egg. The air sac is located between these two membranes on the large side of an egg.

Shell

The shell protects the albumen and yolk, and eventually the growing embryo. It’s mostly made up of calcium carbonate, which is why feeding your chickens a calcium supplement is so important. The shell is also made up of thousands of tiny pores to allow gas exchange.

Vitelline Membrane

This membrane protects the yolk and keeps it from breaking. It weakens as the egg gets older, which is why yolks of fresh eggs stand up tall, while yolks in older eggs appear flatter.

Yolk

The egg yolk is a protein, vitamin-rich portion of the egg, and where the embryo begins developing in a fertilized egg. It’s also where 100% of the fat in eggs is contained. Beyond that, it also contains minerals.

In fact, egg yolks contain many essential vitamins such as vitamin D, vitamin A, thiamine, riboflavin, phosphorus, and iron.

Just before chicks are born, they absorb the yolk, which nourishes them for up to 3 days.

Yolk also contains cholesterol and they often get a bad rap for this. But it’s not all bad cholesterol, so keep that in mind.

Summary

There you have it! Now you know a lot more detail about the beloved chicken egg. Hopefully, this knowledge will help you beyond watching Jeopardy with your Grandmother. With any luck, it will aid you in hatching more successfully at the very least.

Curious about egg abnormalities like wrinkled shells, rubber eggs, and lash eggs? Read this article on abnormal eggs.

Today’s backyard chicken question is from a reader who asked me about how to build a chicken run, the size it should be, and whether she should allow her chickens to free range, and for how long.

Specifically, the question I was asked is:

“I’m getting chicks in march! Yay! Ima do bantams and I found a coop but it doesn’t have a fence, do I need to build one or do I buy one cheaper ???? Also I think if I build one I could do it safer for the chicks. When do I let them go to there coop and run around and stay in the coop?”


Healthy Hens Love Nesting Herbs!

nesting box herbs

YES, I WANT NESTING HERBS!


So, in a short video, I’ve answered all those questions! I give my super secret money saving hack to build a chicken run without spending your 401K on fence posts, as well as the one place you definitely DON’T want to be cheap about.

I also give a few tips about safer free ranging.

Here’s my answer:

https://www.facebook.com/thefrugalchicken/videos/2027570907522176/

Ok, so I’ll admit. I eat way too much chips and salsa.

It’s one of my absolute favorite snacks and it’s one of my favorite things about summer because there are tons of fresh fruits and vegetables around for me to make my favorite types of salsa! There are so many amazing salsa recipes out there, so today I wanted to share 5 of my favorite salsa recipes that you can use for your next summer barbecue!

Fruit salsa with cinnamon chips

So making my own cinnamon chips is a personal favorite. I LOVE them. And they taste amazing with any fruit salsa recipe! This recipe is simple and easy and will be an immediate hit with your kids.

Ingredients:

For the cinnamon chips:

3 white flour tortillas

½ cup sugar

1 ½ t cinnamon (more to taste)

For fruit salsa

1 cup strawberries (chopped)

½ cup raspberries (cut in halves)

½ cup blueberries (cut in half)

1 kiwi chopped

1 tablespoon of lemon juice (more to taste)

1 lime slice (to squeeze over salsa, lime juice would also work)

1 cup of fresh pineapple (or 1 can)

1 teaspoon brown sugar (optional)

1 cup grapes (cut in half)

To make the cinnamon chips:

Get 3 white flour tortillas and brush with melted butter. Cut tortilla into 8 chip shaped pieces. Mix cinnamon and sugar together in a small bowl and dip tortilla slices in the cinnamon sugar mixtures. Bake in the oven at 350 for 5-7 minutes or until tortilla slices are crispy

To make the salsa:

Chop all of the ingredients to the desired size. Combine fruit, lemon juice, and brown sugar together in a bowl and mix together. Squeeze lime slice over the top of salsa and gently mix together again. This salsa tastes best when you refrigerate the salsa for about 20 minutes before serving.

https://www.instagram.com/p/Bih8wpXBRzF/?tagged=cinnamonchips

Salsa Fresca

This recipe is so yummy! I love this recipe for summer because I can use all fresh ingredients that I buy at the farmers market

Ingredients:

2 med tomatoes (1 ½ cup once chopped) (I prefer to use roma tomatoes but you can use any type

1 jalapeno (seeded)

2 T lime juice (if you don’t like lime you could substitute it with olive oil)

½ cup cilantro (finely chopped)

1 red onion (⅔ cup chopped)

1 garlic clove (diced)

Salt and pepper to taste

Cut all of the ingredients to the desired size. Don’t think too hard about this, I just roughly cut everything to about the size I want. For this recipe I mix the cut onion and jalapeno in lime juice and let it sit for 5-10 minutes. The onion and jalapeno soak up the lime juice and it tastes so good! Then I mix all of the ingredients (including the leftover lime juice) in a bowl and refrigerate for 20 minutes.

Regular Tomato Salsa

Tomato salsa is classic and a must have for any summer barbecue. This recipe is quick and easy to make. One thing I love about salsa recipes is that you can adjust them based on how you like your salsa! If your family doesn’t like onions, just take them out of the recipe! You really can create a custom salsa that you and your family will love!

Ingredients:

1 28 oz can whole tomatoes (with juice for thinner salsa, without for thicker salsa)

1/4 cup fresh cilantro , chopped (add more if you love the cilantro taste, I LOVE cilantro, but my family doesn’t so I don’t put as much in)

1/4 cup onion (chopped) I prefer red onions, but you can use any kind

1 clove garlic (minced)

1 1/2 jalapeño , chopped (add less for milder salsa, more for spicier) (if you want really mild salsa skip the jalapeno and just put in the bell pepper)

½ bell pepper chopped

1/2 teaspoon cumin

1/4 teaspoon salt (more to taste)

Lime (half), to squeeze into salsa or you can also use a tablespoon of lime juice if you don’t have fresh limes

I cut all of the ingredients and then I put all of the ingredients for this salsa in my manual food processor (like this one) and turn the handle until it reaches the consistency that I like. I like my salsa to be a little bit thicker and chunkier, so I only turn the handle about 5 times. You can also use a food processor or a blender to mix your ingredients, just be careful not to blend it too much! Refrigerate before serving for the best taste!

Pineapple Salsa

Ok, so if you can’t tell I’m a huge fan of fruit salsa. This recipe tastes great with fresh pineapple (but you can use canned as well if you don’t have any fresh pineapple around)

Ingredients:

1 cup of fresh pineapple (chop to desired size, I prefer mine smaller)

1 cup red bell pepper (or you can do ½ red pepper ½ green) finely chopped

1 can of black beans (you’ll want to drain and rinse them, I cut them in half but you don’t have to)

¼ cup red onion (finely chopped

1 jalapeno finely chopped

3 tablespoons of orange juice (or lime or lemon juice whichever you prefer-I like lime)

1 can (8 oz) of corn kernels (you could use fresh as well, just cook corn like you’re make corn on the cob and then cut kernels off the cob)

½ t cumin

3 tablespoon of cilantro leaves(chop, into small pieces)

⅛-¼ teaspoon of salt and pepper (add to taste-I typically add ¼ of pepper and less salt)

2 roma tomatoes chopped into small pieces

Simply cut all of the ingredients to desired size and mix them together in a medium bowl. Let sit in fridge for 20-30 minutes and then serve!

Mango Salsa

Mango salsa is a personal favorite (who am I kidding though, really all salsa is my favorite). This recipe is great because it’s really simple and it tastes amazing!

Ingredients:

3 ripe mangos (chopped, I prefer smaller pieces, but you can cut to desired size)

1 red bell pepper (finely chopped)

½ cup red onion (finely chopped)

1/3 cup fresh cilantro leaves (You can use more or less depending on how much you like cilantro (don’t use stems! It’s gross! Roughly cut leaves into as small of pieces as you can)

1 teaspoon of lemon juice (optional)

½ cup of chopped cucumber (you could also use zucchini)

1 jalapeño finely chopped

1 large lime, to juice (or 2 tablespoons of lime juice)

⅛  teaspoon salt (add more to taste)

½ cup cherry tomatoes (cut into ¼ or smaller, optional)

I cut all of the ingredients to desired size and mix them together in a small bowl. It will taste best if you allow it to sit in the fridge for 20 minutes before you serve it! What I love about this recipe is that it tastes great on top of grilled fish or it is really yummy with chips too!

Easy Pico De Gallo

I love this stuff. It’s so easy to make and I use to add yummy flavor to a ton of my meals.

1 can Best Choice canned tomatoes with green chilis

1/2 vidalia onion, diced

Enough cilantro to satisfy you, diced (I use scissors to cut my herbs and garlic, and sometimes frozen meat. Makes things easier)

Mix everything together, and eat with tortilla chips.

You can also put this in the crock pot with chicken for a good chicken dish. The broth from the chicken mixes with the pico, making it more complex. I add a little butter to that mixture to give it more body and make it richer. You can also add it to chicken/beef tortillas. It brightens up pretty any meal. Enjoy!

What is your favorite kind of salsa? Share it with me in the comments below!

Can chickens eat algae? Yes. Yes, they can.

You might already that kelp is something healthy to feed your hens, but what about spirulina?

And did you know that soaking wheat can actually improve your flock’s iron absorption?

We’ve dealt with iron deficiency in a couple hens on our farm, and it’s not fun. 

And I’ve learned over the years that it can easily happen if you’re not watching what your flock is eating—and whether other chickens are preventing a hen from eating (which is why it’s so important to put more than one feeder in your coop).

Iron deficiency can lead to anemia, which can lead to death, so you definitely don’t want to overlook it!

In this episode of What The Cluck?!we geek out a bit on iron-rich supplements for your hens that might help them recover if they’re suffering from low iron or that can help prevent a deficiency.

And after this episode, I think you’ll look at wheat berries a little differently, too.

You’ll learn:

  • What you can feed your chickens to make sure they don’t become iron deficient
  • What iron deficiency means for your hens’ health
  • Why wheat might play an important role in helping hens suffering from low iron
  • Why I’m going to start giving my flock spirulina

Links we discuss:

Where to buy kelp

Where to buy spirulina

Where to buy wheat berries

I’d like to hear from you!

Do you think you’ll try feeding your hens kelp or spirulina? Leave a comment below!

Hey y’all! Here’s this week’s sneaky peek photos of life on our farm!

These images also appear on my Instagram account where I share MANY more photos and stories from the farm!

If you aren’t yet following me there, you can right here.

Enjoy the photos & be sure to share some of yours with me!

https://www.instagram.com/p/BlJx32sltgx/?taken-by=pamperedchickenmama

https://www.instagram.com/p/BlMWWFsF_I7/?taken-by=pamperedchickenmama

https://www.instagram.com/p/BlPJPkalWv9/?taken-by=pamperedchickenmama

https://www.instagram.com/p/BlUBXlhlpee/?taken-by=pamperedchickenmama

https://www.instagram.com/p/BlZOVd_FLG7/?taken-by=pamperedchickenmama

https://www.instagram.com/p/Blb1HHmFc8x/?taken-by=pamperedchickenmama

I developed this homemade fermented ketchup recipe to satisfy my love for ketchup.

It’s true, I love ketchup, and I’m sure you do too.

That’s probably why you’re here, right?

What I don’t love is all the corn syrup and other artificial stuff in that popular, processed ketchup you see at the store.

I also love fermenting as a way to be healthier, and try to ferment as much as possible.

So, it seems natural that I paired homemade ketchup with a fermented ketchup recipe.

And the best part?

This homemade fermented ketchup recipe is a GREAT way to introduce fermented foods to your children.

Have you every met a child that DIDN’T like ketchup?

My homemade fermented ketchup is an easy recipe – you can make it in less than an hour – and so flavorful you’ll love it.

Now here’s the thing about this homemade fermented ketchup recipe.

It doesn’t taste like the homogenized, boring store bought stuff. Nope!

That’s probably the biggest advantage of making homemade fermented ketchup – at the end of the recipe, you’ll have a condiment with layers of deep, robust flavors. 

If you love ketchup, then this homemade fermented ketchup recipe is for you. If you have 5 minutes, you have time to make homemade ketchup. It's an easy way to introduce fermented foods to children! From FrugalChicken
It’s really quite amazing, and one bite will be slightly spicy, while the next might be peppery. 

Although the texture is a close relative, the flavors are deeper, and each bite is slightly different, making a boring condiment into a gourmet treat.

My homemade fermented ketchup is heartier, with a fuller texture that really accompanies a hamburger, rather than slopping it just to add moisture.

And the fermenting? Just deepens the flavors while creating a healthy, probiotic food for your childrens’ tummies.

Making my own homemade fermented ketchup recipe has let me swap out processed foods with a healthier alternative while still remaining in my family’s good graces.

Once you start eating homemade fermented ketchup, you won’t want to go back.

I haven’t!

You can use it in cooking just like regular ketchup.

Here’s how you make it!

If you love ketchup, then this homemade fermented ketchup recipe is for you. If you have 5 minutes, you have time to make homemade ketchup. It's an easy way to introduce fermented foods to children! From FrugalChicken

How to Make Homemade Fermented Ketchup

To make my homemade fermented ketchup recipe you will need these ingredients:

12 oz tomato paste

¼ cup whey or fermented vegetable juice

1/8 tsp red pepper

¼ tsp black pepper

½ tsp all spice

1 tbsp Himalayan salt

2 garlic cloves minced & juices released

1 tbsp organic honey

Basic directions:

My homemade fermented ketchup recipe makes about 1 pint of ketchup, and it can easily be doubled.

Grab a wide-mouthed mason jar and mix the tomato paste, honey, and garlic cloves until the ingredients are thoroughly combined.

Next, whisk in the whey or fermented vegetable juice, Himalayan salt, allspice, red pepper, and the black pepper until all of the ingredients are evenly mixed together.

Your homemade ketchup should be smooth and an even consistency.

Hurrah! At this point, you’ve officially made homemade ketchup!

That was easy, like I promised!

Now on to fermenting!

To ferment your homemade ketchup, you’ll need an airlock and lid to seal the mason jar.

I’m particular about using these tools because creating the right environment for your beneficial bacteria to grow is incredibly important. 

The airlock lets air leave, but not enter. If you’re a little unsure about fermenting, you’ll love my guide to fermented vegetables.

After you’ve sealed the mason jar, let your homemade ketchup recipe ferment in a warm area away from sunlight. I let mine sit in a cupboard out of direct sun.

Let it ferment for 2-3 days or until it’s fermented to your personal taste.

When the ketchup is fermented, change out the top with a regular mason jar top, and store in your fridge. It will last for months, but it’s so tasty, I think you’ll find yourself eating it much sooner.

Voila! You’ve just made your own homemade fermented ketchup. 

Kitchen notes:

A note about starter cultures

My homemade fermented ketchup recipe differs from other ketchup recipes because you will use a starter culture, like whey or fermented vegetable juice, to kick start the fermenting process. 

While you can use a pre-packaged starter culture, I have a lot of whey (from cheese making) and fermented vegetable juice floating around my home, so that’s what I use.

Whey is mild and you won’t taste it. You CANNOT use whey from a health food store, it’s not the same thing, and at any rate, it’s so processed, it will never be able to ferment anything.

If you use whey, use the stuff from making cheese.

Fermented vegetable juice is also a good way to kick start your fermented ketchup.

Although whey and fermented vegetable juice are not the same thing, they both serve the same purpose of introducing beneficial bacteria into your homemade fermented ketchup recipe and will allow the beneficial bacteria to grow.

A note about kefir

While some homemade fermented ketchup recipes out there recommend using milk kefir as a starter, I don’t think it’s a good idea.

Milk kefir is a thickened form of milk, and after the milk has transformed into kefir, it resembles fizzy sour cream.

I don’t think you’ll be happy with the results, and whey or fermented vegetable juice are better options.

A note about salt 

When it comes to fermented foods, use only Himalayan salt in your fermenting jar. 

Himalayan salt is full of wonderful minerals, and you can be sure your giving your beneficial bacteria the best environment to proliferate.

Stay away from iodized salt (regular table salt) because it will throw off your beneficial bacteria. Table salt has ruined many a fermented ketchup.

A note about honey

Yes, I have a rule about honey too. I love this homemade fermented ketchup recipe so much that I want it to be something you can enjoy for years to come!

So that’s why I have some of these rules about the ingredients.

I only recommend organic honey in this homemade fermented ketchup recipe.

Regular honey from the grocery store is usually sourced internationally, from China for example, and not only has had all the pollen removed from it, but is likely little more than glorified corn syrup.

Studies on honey obtained from grocery stores showed it was unhealthy, and you’ll be making a better food for your family if you just stay away from it.

I buy my honey at Thrive Market, where it’s ethically sourced.

To get the full benefit of honey and bee pollen, stick with organic.

I’d like to hear from you!

I know you love ketchup (why else would you be here!) but do you think you’ll try making my homemade fermented ketchup recipe? Email me at [email protected] or comment below!