If you have ducks, they’ll need a place to live, right? That’s where our free duck house plans come in!

We added 4 new ducks to our farm this year: 2 Khaki Campbells and 2 Pekins. We even hit the jackpot and managed to get both a hen and a dake of each breed! Sometimes things just work out.

Since they needed a safe place to live, grow, and lay eggs (fingers crossed for ducklings!), we drew up plans to build them a duck house for free. And, naturally, we used recycled materials.

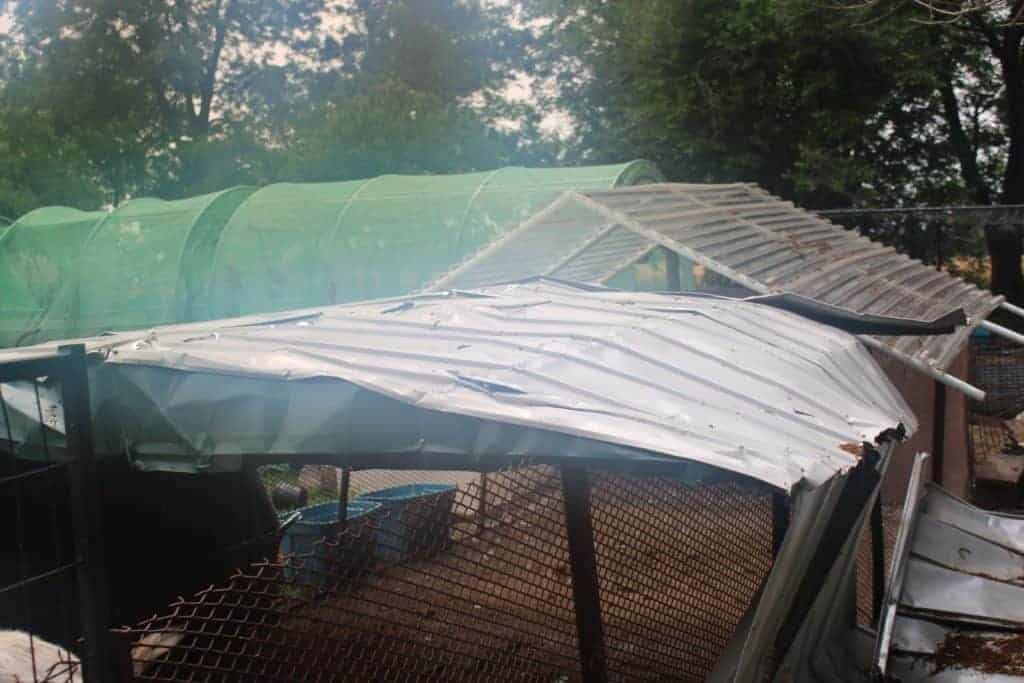
Earlier in the year, we invested a tin shed that was meant to house horse grain – until a tornado came by with other plans.

To build our duck house and salvage some of the tin, we used it for our duck house.

Here’s how you can build a duck house too, too, using our free plans!

Build a duck house that’s safe

Perhaps more so than when building a chicken coop, the #1 thing you should keep in mind with your duck house is it needs to be safe from predators. Chickens can fly up to roost, but drakes and hens cannot, and so have one less defense than chickens should a predator enter their domain. 

They call easy targets “sitting ducks” for a reason, so our free plans take this into consideration.

So, it’s best to build your duck house inside a safe area. We use an old cotton trailer.

Build a duck house in 1 hour and for free!

With it’s thick wire walls (much thicker than chicken wire), predators don’t have a hope of ripping it open, and the sides are high enough that it would take a very committed predator to jump it. Plus, it’s big enough that our fluffy butts are free to roam around a good-sized space.

It’s also transportable, and can be moved every month or so to keep the parasite issue at bay.

We’ve even gone a step further and given our goat, Dahlia, the job of “protecting” the ducks. She won’t actually run off a predator, but her size makes sneaky raccoons and opossums think twice about getting a free meal.

To protect your duck flock, if you can’t find a cotton trailer or something similar, hardware cloth is a good option. It’s thicker and sturdier than chicken wire, and since ducks are pretty defenseless, you will want to make sure their area is secure.

Duck house roofs

Next, your duck house will need to have an area that provides shade and protection from rain, snow, ice, etc.

We reused an old shed we had; if you don’t have anything similar, even an old dog house would work.

It’s easy to make small roof trusses with 2×6 wood, and it will be sturdy enough to last. Any free roofing material will work; you just want to make sure it will last when wind, rain, and other bad weather comes.

The roof should be around 3 feet in height as a minimum, but remember that you will have to get in there to at least clean it out, or even to help a sick or hurt duck.

Ours is made of recycled tin, and is 4 feet high – tall enough to allow us to get through if we’re crouching.

It doesn’t look like much, but it’s been tested in 60 MPH winds during tornado season, and it’s stood it’s ground – so we know it works!

We installed a corrugated plastic roof in the back so the goat has a place to lay – she loves her sun naps, and the ground stays dry.

The plastic roof also has the added benefit of keeping predators (such as hawks) out while allowing for air circulation and light.

Build a duck house in 1 hour and for free!

Space considerations

You will also need around 4 square feet of floor space inside the house itself for each duck you plan to have inside.

You will also want  to have at least 10 square feet of outside space for each duck; this will let them feel free, and help prevent stress and pecking order issues (believe me, the drakes will bring enough pecking order drama).

Our duck house plans let us have an open end on each side, but if yours will have a door, it should be at least 14 inches in width and 14 inches in height. (Remember, you will need a separate entrance for you to get into it).

Since modern hens and drakes have been bred to be heavier and flightless, it’s best if your duck house is on the ground. If you really want it raised, be sure to add a ramp so your feathered friends can actually use their new home.

You will also want enough space to put a kiddie pool full of water – your duck flock will undoubtedly enjoy taking baths. Ours go wild whenever it rains, we spray them with water, or the sprinkler hits them. It’s the highlight of their day!

What kind of bedding should be in your duck house?

There’s lots and lots of opinions about this, but I’ve found a simple solution is to just use straw. It’s clean, dry, and easy to remove.

Ducks are pretty messy, and they definitely poop more than chickens.

Once your hen ducks start laying eggs, they will do so on the ground. Straw will help keep the eggs clean, and give your hens a comfortable place to do their business. Like chickens, they like a bit of privacy, although ours have never used nesting boxes.

How long did it take to put our plans into reality?

Our duck house only took us about an hour to put together, once we had our plans figured out (the design might take you another hour).

We all want chicken coops and duck houses that look beautiful, but what matters most is that it’s safe for your flock – so don’t worry too much about the design as long as it’s functional!

I’d like to hear from you!

Have you used free duck house plans on your farm? What are your best tips? Leave them in a comment below!

There’s a lot of advantages to train your chickens to come when called, including keeping them safe from predators.

It’s also pretty fun to see these tiny little dinosaurs come running, excited for their treat (mealworms are a favorite).

We used to have a Rhode Island Red hen named Daisy who would not just come running, but would wait for us to pick her up!

Realistically, if you train your chickens to come when called, you’re giving them another way to defend themselves when you spot a predator, but in their free-range daze, your chickens might have missed (a good example are hawks or eagles – these predators like the element of surprise, and chickens pretty much have no chance once in their clutches).

You will also have an easy way to find them when they’ve wandered off out of sight. There’s been many times on our farm when we’ve been looking for a particular hen, who has gone off somewhere.

In this article, I’m going to show you how to train your chickens to come when called, and luckily, it’s pretty straightforward (especially if you train dogs or any other sort of animal.) All you will be doing is treat-training your chickens.

Decide what THE CALL will be

You will have to have a single call to signal to your hens that it’s time to come home, and use only that call.  

The call can be long or short, whatever works for you, as long as you can do it loudly, since your chickens might not always be close to you.

I use my voice, but you can use whatever signal you like, but be consistent.

Use a treat your chickens like, that they can specifically associate with your call

You want to choose a treat they love, and only give them that treat while you train them (continue to only give it after they understand the exercise, otherwise you will un-train them).

Pick something that you can be certain each chicken will be able to get, such as scratch, mealworms, unsalted pumpkin seeds, unsalted sunflower seeds, etc. Mine go nuts over mealworms, and they don’t get them all the time, so they’re perfect for us.

Specifically choose something that you can spread out over a few feet; if you don’t, then only some of the chickens will get the treat – and only some of the chickens will come home when called.

Train them to associate the call with the treat

Just like training a dog, you want your flock to associate the behavior (coming when called) with the treat.

Begin to train your chickens to come when called by giving them the treat in their coop. At the same time give your call.

Repeat this exercise at least once a day, and use your call each time. You can do it several times a day if you have the time.

Test whether they understand

After 2-3 weeks, test your chickens. Give the signal – do they come when called?  If so, congrats! Your chickens are trained.

If not, don’t worry – teaching any animal can take some time. They will get it eventually.

Pro tips to successfully train your chickens to come when called

There’s a few other things I’ve learned over the years to do this successfully. When teaching your hens, make sure your flock hasn’t just eaten. If they’re not hungry, they’re less likely to respond.

Of course, chickens are pretty big pigs, and mine are ALWAYS hungry, so this might not be an issue for you!

Similarly, if they’ve been cooped all day, and you want to get them to come right after they’ve been let loose, you’re less likely to be successful. Time their free-range time so they have at least a couple hours outside in the sun.

I’d like to hear from you!

Did you train your chickens to come when called? What are your best tips? Leave a comment below!

If you have chickens, chances are you’re wondering “What does a fertilized egg look like?” I have the answers plus some tried and true tips!

The first time we hatched chicks on our homestead, it was a great day – we could increase our flock (and our food supply), develop our own line of healthy hens, and watch as the chicks grew into healthy adults. Fun!

I’m sure you will want to start incubating your own chicken eggs also – there are some things you need to know (to help you be successful).

(Looking for an incubator recommendation? Here’s my favorite!)

In this article, I’m going to explain how you know if an egg is fertilized and show you how to store your chicken eggs so they’re in the best shape possible for incubation. Yes, how you store the eggs does impact whether they are likely to hatch or not.

If you want to learn how to hatch chicken eggs, I have a detailed article on that here.

Chick standing next to an egg on all white background

What Does a Fertilized Egg Look Like?

Can you tell if an egg is fertilized by looking at it?

Nope. Unfortunately, there is no way to tell if an egg is fertilized by just looking at it. After you start incubating the eggs you can look inside the egg through the shell by candling it (hold a bright light up to it and see growth inside). But you can’t tell if the egg is fertilized this way before you start incubating.

Can you tell if an egg is fertilized if you crack it open?

Yes. But if you crack it open you will no longer be able to grow it and hatch it (obviously). However, you can at least confirm that your rooster is adequately doing his job. This will give you more confidence that other eggs are also likely fertilized.

An unfertilized egg will have a tiny white spot on the egg yolk – this solid spot is called a blastodisc. A fertilized egg has a tiny white circular ring (a white ring, not a solid spot) on the yolk. It’s called a blastoderm. The blastoderm becomes the chick. See the diagram below to know what this blastoderm looks like.

Diagram of an unfertilized chicken egg and a fertilized egg

Is a spot of blood on an egg yolk a sign of fertilization?

No, it’s not. It simply means a blood vessel ruptured as the egg was passing through the oviduct inside the hen. It’s not a cause for panic and the egg is perfectly safe to eat.

Can you eat a fertilized egg?

Yes. You can eat fertilized eggs. They will not change the look or taste of the egg.

Are fertilized chicken eggs healthier to eat?

This is a myth. There is no proof that a fertilized chicken egg has any additional nutrients or vitamins.

How are chicken eggs fertilized?

If you want to learn how chicken eggs are fertilized, read this article we wrote about it. It’s very interesting and worth the read.

What if my eggs are not getting fertilized?

First thing to know is, do you have a rooster? You must have a rooster in order to have fertilized eggs. Second, if you have a rooster and your eggs are not getting fertilized you need to figure out why.

Maybe your rooster does not know how to do his job. If this is the case, you need to get a different rooster. But it’s also possible that either your rooster or your hen, is not getting the proper nutrition. Just like people, if they aren’t getting the right vitamins and minerals it may be interfering with proper reproduction.

Be sure to feed your flock a high-protein feed that has good, healthy ingredients like this. It’s also a good idea, especially if you have a health concern, to supplement your birds with vitamins. Here’s my favorite.

3 Mistakes You Need To Avoid

Tip #1: Avoid washing the chicken eggs

When eggs are laid, they have something called the “bloom” on them. This extra layer keeps bacteria and other nasties out of the egg, protecting the precious oocyte from harm.

It’s important to not wash your hatching eggs – you’ll remove the bloom, and potentially expose the chick embryo to bacteria, crushing your hopes of hearing peeping and getting to watch them zip into life.

Tip #2: Stay away from eggs that have abnormal shapes

Abnormally-shaped eggs are good for eating in most cases (there are some exceptions like lash eggs), but they won’t really give you a good result when it comes to hatching.

Excessively big eggs might contain double yolks (these rarely hatch because there’s not enough room in the shell for both embryos in most cases).

Chicken eggs with a lumpy shell might not have a big enough air sac or an air sac that’s too large.

Bottom line: You only want to incubate eggs that are a regular egg shape.

Tip #3: Stay away from cracked eggs.

Yes, you can glue a crack back together, and it might hatch. But make things easy on yourself – only incubate uncracked eggs.

Storing Fertile Eggs

Start by collecting eggs no more than 10 days before the incubation process (the fresher, the better), and keep them out of an area that’s too hot or too cool (room temperature is best) and away from the sun. The last thing you want is too much heat to kick-start the incubation process.

If you live in a hot area (for example, if it’s over 100 degrees every day in the summer), you’ll want to collect your eggs frequently.

I’ve had readers send me photos of eggs they had left in their coop for too many days – and indeed, the embryos in the eggs had started to develop. It’s gross, and you don’t want to deal with that.

Store chicken hatching eggs

Keep eggs in cartons – pointy side down

Keep your chicken-hatching eggs in cartons like you get from the store (or like this if you want a reusable one) to keep them safe and clean. Be sure to store them with the pointed end down. This will protect the air sac and make sure the yolk stays where it should, which is critical for your chicken embryos to grow into chicks.

Turn your eggs consistently

This is to prevent the embryo from sticking to the internal membrane. Hens turn their eggs several times a day; you can do it 2-3, and just be sure to do it gently.

That’s pretty much the skinny on storing chicken eggs for hatching!

What If You Have a Broody Hen?

You can let your broody hen incubate the fertile eggs or you can try to discourage her. You can read more about this here. If you decide to let your mother-bound female brood and hatch her chicks herself you will want to keep a few things in mind.

You will still want to remove any cracked, misshaped, or extra-large eggs from the nesting box. Candling the eggs throughout the process, and removing any unviable eggs, is helpful so she’s not sitting on rotting eggs. You’ll also need to be sure the space is appropriate for hatching and raising chicks. Read tips on this here.

As you probably know, we raise rabbits on our homestead, which means we have a LOT of rabbit manure.

What you may not know is that rabbit manure is one of the easiest to use, yet super healthy, fertilizers for your garden. In this article, I’m going to show you how to use rabbit poop to improve your harvest.

Garden compost made from animal manure does two amazing things for your garden. First, it’s a free byproduct of your animals, so it’ll save money on topsoil and fertilizer. Second, it is a nutrient rich way to help your garden grow and thrive.

Why Rabbit Manure?

Great question! Unlike other manures which have to be well composted before you can even think of using it in your garden, rabbit poop can be immediately applied to your soil. It won’t burn crops, and can be used as a stand-alone planting medium or mixed with topsoil (although your best bet is to mix it with soil.)

As rabbit manure decomposes, it helps build up the structure of the soil, and injects valuable nutrients and organisms into your garden that will promote strong, speedy plant growth.

Rabbit manure, in particular, is rich in potassium, nitrogen, zinc, and calcium, and it’s one of the most nitrogen-rich manures out there – so you’ll get lush, green, well-fertilized growth. The potassium will also improve the quality of the fruit your vegetable plant sets.

Finally, unlike cow, horse, or pig poop, rabbit manure is odorless – so as you collect it and incorporate it into your garden, your nose (and your neighbors!) will thank you.


Want more awesome gardening tips? Check out my book, Organic By Choice: The (Secret) Rebel’s Guide To Backyard Gardening.

Organic by Choice


How to Use Rabbit Manure In Your Garden

First decide on the source of your rabbit manure. If your kids have pet rabbits, have them collect the rabbit’s waste each day. If you already raise bunnies on your homestead, then what are you waiting for? Go start collecting rabbit manure for the garden!

Collecting it is relatively easy, and everyone has their own “system.” One of the simplest methods is to place plastic tubs under your rabbits’ cages and dump them out every day (don’t wait on this – flies WILL lay eggs which will hatch into maggots – GROSS.)

You can dump them into a compost pile, or directly into your garden. If you haven’t planted anything in your garden yet, then till the rabbit manure to a 2-inch depth.

If your garden is already established, then side dress your plants with the manure – it’s usually best to do this as your plants are flowering and setting fruit. They’ll need all the nutrients they can get during that time!

If you just got your rabbits, or don’t want to raise any but definitely want to use bunny poop in your garden, then you might also be able to find rabbit manure to buy. Check with neighbors or even Craigslist in your area.

How to Make Rabbit Manure Compost

Not everyone is enchanted with the idea of directly applying manure to their garden. That’s ok – you can compost the rabbit poop.

To make rabbit manure compost, mix the poop with other compost ingredients that will decompose, such as fruit peelings (like bananas), bits of leftover food, coffee grounds, and grass clippings, and leaves.

Add equal parts of wood shavings and straw, then blend all these things (and other kitchen waste) thoroughly, then add enough water to moisten. Be very careful not to completely saturate the compost pile.

Cover with a protective tarp and turn every two weeks. If you’re hot composting (which is unlikely with rabbit poop but, hey, stranger things have happened!), then water regularly to maintain heat and humidity levels. Keep adding to the pile and turning and blending it until it fully composts.

If you’re cold composting, then simply turn the pile until the manure and other ingredients have turned to sweet-smelling soil.

Making Rabbit Manure Tea for A Larger Garden Harvest

A third option, other than putting rabbit manure on your garden directly or composting it, is to make a tea fertilizer. Luckily, this is pretty simple.

In a 5 gallon bucket, place a burlap bag. Fill the bag about half way with rabbit manure (or however much manure you have on hand), and close it tight with string.

Add water to the bucket until the burlap bag is full submerged. Allow your tea to “brew” for 5-7 days, stirring daily. Once the allotted time has passed, simply remove the bag of manure from the bucket.

You can use the tea directly on your garden, and compost the rabbit manure, or use it on your garden as well.

I’d like to hear from you!

Do you use rabbit manure in your garden? Leave a comment below!

Check Out My Other Rabbit Articles:


Do you love gardening, herbs, natural remedies, self sufficiency, and/or homesteading? Learn how to grow 30 different herbs in this encyclopedia! Herbs In Your Backyard is a digital book, delivered to you INSTANTLY!

Herbs in Your Backyard


It’s always a very good idea to create your own chicken emergency kit – and in this article, I’m going to give you ideas about what to keep in it.

While we all might like to think our chicken-keeping experience will be bucolic and without any trouble, the straight truth is you will likely come up against some sort of trouble at some point.

Mites, worms, cuts, or infections tend to rear their ugly head at the most inconvenient times (like when you plan to be out of town for a week – chickens have great timing like that) and having an emergency kit on hand will make a stressful situation easier.

The items in this article are just a suggestion – you can add or subtract or include your own items as you find what works for your particular backyard chicken flock.

There’s also links where you can buy these items directly from Amazon, so you have them on hand.

What should you add in the chicken emergency kit?

The first thing you may want to purchase is a plastic container that also has a cover, like this one. You will want to clearly mark it (write “Chicken Emergency Kit” on it with a marker, for example) so you can easily locate it, and your family doesn’t raid it for supplies for other projects.

Once you have the plastic container ready, you will have to think about the items to include.

Here’s some that are easy to source and can save your butt (and possibly your hen’s life):

Nutri drench

Click here to get it on Amazon

This is powdered electrolytes, vitamins, and minerals that you mix with water. You can offer it to your chicken when they’re hurt to keep them hydrated and healthy enough to combat their illness or trauma. If they’re stressed and in pain, they’re less likely to eat and drink. Very important!

Saline solution

Click here to get it on Amazon

If your chicken has dust or dirt in her eyes or an open wound, saline solution will help you flush it clean.

Triple antibiotic ointment or natural alternative

Click here to get antibiotic ointment on Amazon

Click here to get a natural alternative on Amazon

If your chicken get an open wound, you will need to put something on it after flushing it clean. If you use over-the-counter drugs with your flock then triple antibiotic ointment is great, or a natural alternative if you’re raising them 100% natural.

Blu-Kote

Click here to buy it on Amazon

Another topical antiseptic alternative. I don’t personally use it, but a lot of people like Blu-Kote because it’s blue, and deters other chickens from picking at open wounds. (However, if you use an all-natural thick salve, you will have the same effect)

Pure organic honey

Click here to buy it on Amazon

(Check the label that there’s ONLY honey in it – no corn syrup or other additives). Honey is great for wounds, especially if the sores are wet and gooey. It can be hard to put salve or ointments on wet wounds, and honey has natural antibacterial qualities and gets into tiny crevices to battle bacteria.

Poultry VetRX

Click here to buy it on Amazon

This is based on an all-natural formula that’s been around since the 19th century. It’s particularly great for colds or upper-respiratory infections, and can come in handy for eye worms, scaly legs as well. Ingredients include Canada balsam, camphor, oil origanum, oil rosemary, all blended in a corn oil base.

Diatomaceous Earth

Click here to buy it on Amazon

Just keep a small bag around for emergencies. It’s great for scaly leg mites, but be sure to apply it on a windy day or at least in a breezy area so neither you nor your chicken inhale it. Food-grade only!

Coconut oil

Click here to buy it on Amazon

If you plant to use essential oils to support a healthy hen, then you can dilute it in the oil. Also great for adding moisture to excessively dry skin.

Heat lamp or heating pad

Click here to buy a heat lamp on Amazon

Click here to buy a heating pad on Amazon

Even if your chicken isn’t a chick, when they’re sick, keeping them warm is a good idea, as long as the ambient temperature in the room isn’t too hot. Also be sure to give them an area to get out of the heat, if your chicken wants to.

Penicillin or Tylan 50

It’s best to get this through a vet or from your local feed store

If you’re using Western medicine to treat your flock then having injectible antibiotics on hand is a good idea. Check with a poultry vet for the correct dosage.

Probiotics

Click here to buy it on Amazon

If you have a sick or injured chicken, giving them probiotics will help ensure their body has good gut health to help them heal (it won’t heal a broken leg, for example, but it WILL ensure your chicken has good gut health to maintain SOME standard of health – a wonky gut will only make healing more difficult).

Some standard chicken emergency kit items also include:

  • Gauze pads
  • A first aid tape
  • Cotton swabs
  • Wooden popsicle sticks to act as a splint for legs or wings
  • Syringes for dosing or helping a hen stay hydrated – Click here to buy syringes on Amazon

I’d like to hear from you!

Do you have a chicken emergency kit created yet? What do you keep in yours? Leave a comment below!

The warm, sunshiny, fun-loving, carefree days of summer are almost here!

That means the kids will be out of school, and your family will spend more time outside playing, gardening, and entertaining.

While those days are eagerly anticipated all year long, they also bring mosquitoes out in droves – especially around homesteads that have animals (read: manure!). I know because we battle them from the time the weather turns warm until temperatures mercifully dip below 60 degrees F.

But when the mercury rises, it surely means biting, itching, ugly, raised welts, and a financial jackpot for the manufacturers of calamine lotion and other itch relieving creams and sprays.

But luckily, I have some amazing solutions help you you to get rid of mosquitoes – and these solutions are frugal AND chemical-free methods of keeping mosquitoes and their itchy, annoying bites at bay. (Because who wants to put toxic chemicals on their kids and animals, right?)

Grow your own mosquito-repelling plants

A few mosquito repelling varieties you can grow include citronella, basil, catnip, lavender, peppermint, and lemon balm (you can eat them all too!)

To use these natural solutions, start by crushing the leaves to release the plants’ aroma. This will release the essential oils. Then rub the leaves on your skin. The natural oils they emit will keep mosquitoes away and help keep you bite free.

This is a great one to use in the garden, where you likely already have these herbs growing. Make them convenient to use by arranging them in pots indoors and in outdoor areas where people tend to gather (you can encircle your entire patio in citronella plants like these for less than $100, for example!)

Wear white tees and other light summer colors

Light colors stand out to these annoying pests because they search for targets and sources of food during the daytime hours. That means that dark colors are more pronounced to them and they tend to shy away from lighter colors.

Try a few drops of lavender essential oil.

Rub it lightly on your skin or use it strategically around your home. Add a few drops to strands of ribbon and hang them near doors and windows.

The scent has a threefold purpose. It makes your home smell amazing, its aromatherapy properties promote relaxation, and the scent sends mosquitos on the run.

Make your own mosquito repelling spray

In a clean spray bottle, mix three cloves, eight ounces each of witch hazel and boiling water, and two tablespoons each of mint, sage, rosemary, lavender, and thyme.

Cover and steep, then cool and strain the mixture into the spray bottle. Use as a mist on skin and in the air. It makes a toxic-free, all-natural mosquito repelling spray.

If you want to use essential oils you have on hand, check out another great recipe I have that uses lemongrass and peppermint!

Rid indoor and outdoor areas of your home of standing water

Inside, make sure to drain sinks and tubs. Outside make a point of emptying kiddie, wading, or collapsible backyard pools.

Also, empty pet bowls and make sure your gutters are not clogged so that water can drain freely from the top of your house. Mosquitoes love standing water and are attracted to the light it reflects. Eliminating as much standing water as possible, sends mosquitoes off to look for water in other places.

Don’t let the beauty of summer get ruined by incessant mosquito bites or by their annoying buzzing sounds. Summer is a time for barbecues, pool parties, and picnics. Your home, garden, and environment can be itch free with one or more of the techniques listed above.