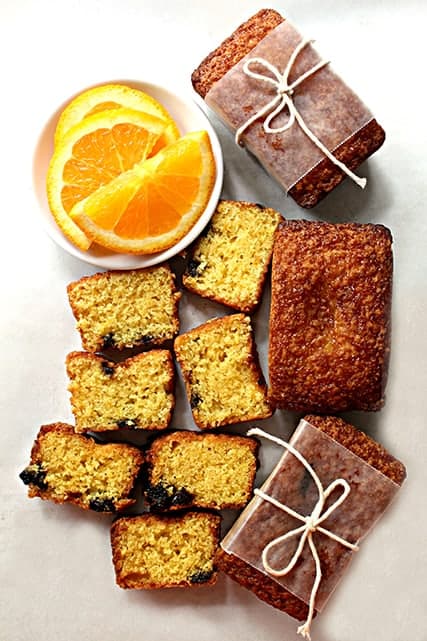
Don’t let the mini size fool you! Orange Cherry Olive Oil Cakes are bursting with fresh citrus flavor and the tang of dried cherries. Olive oil makes the texture moist and tender. These little cakes are the perfect size for gifting, but you will want to save a few for yourself!

Hi, I’m Wendy from The Monday Box here to share another Read-and-Bake recipe. This series links children’s picture books and baking. The books are a fun way to connect with the children in your life and the baked goods make everyone smile regardless of age!


This month’s featured book is “You Can Do It Sam” by Amy Hest. Delightful, brightly colored illustrations and a simple text tell the story of Sam baking cherry cakes with his mom.


Sam is especially excited about these particular cakes because, once packaged in their cheery, red bags, the cakes will be shared as a surprise for his sleeping neighbors.

As they drive from door to door, Sam’s mom encourages him to make each cake delivery, ensuring him that, “You can do it, Sam!”

Sam is pleased to find that he is quite capable of delivering the cakes! He is also pleased to find that at the end of the deliveries, there are two cakes left; one for his mom and one for him!

This story teaches about building self-confidence and the joy of sharing

Orange Cherry Olive Oil Cakes

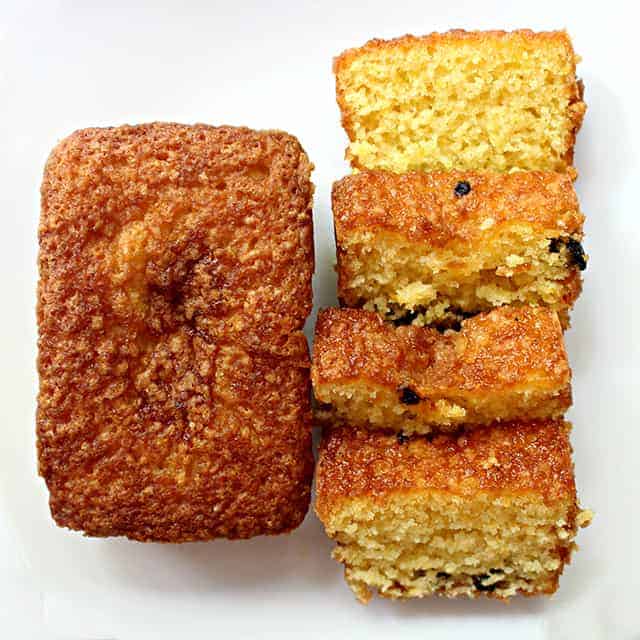
Fabulous Orange Cherry Olive Oil Cakes are dotted with chopped dried cherries just like the cherries that Sam and his mom used in their cakes. For this light, fluffy batter, the dried cherries are chopped and tossed with a teaspoon of flour to help keep the cherries from all sinking to the bottom of the loaves while baking.

I don’t know if Sam’s mom knows about olive oil cake, but she should! Olive oil produces cakes that are light, fluffy, and incredibly moist. For this cake, you can use any light or extra light olive oil, which don’t add any flavor to the cake.

If you happen to have an orange infused olive oil, that’s even better. Though orange zest and juice bring plenty of citrus flavor to the cake, orange infused olive oil adds just a touch more.

This recipe is written for an electric mixer, however, the batter is so easy to mix, the ingredients can easily be combined with a wooden spoon or spatula in a mixing bowl if you prefer.

Orange Cherry Olive Oil Cakes, baked in a mini loaf pan, produces 8 little cakes (3 ¼”x 2 ½”) for sharing and snacking. The cakes stay deliciously moist for up to 5 days.

Orange cherry olive oil cakes are the perfect treat for gifting!


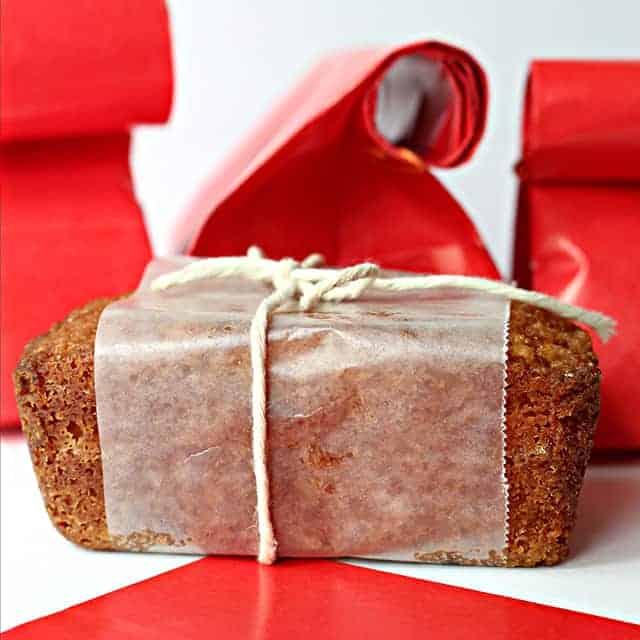
To encourage confidence and sharing in your own little one, red paper party favor bags, just like Sam uses, are readily available online at Amazon.com and at party supply stores, like Party City. Wrap your cakes in plastic wrap or wax paper, then pop one or two in a bag for gifting.

Don’t forget to save a few Orange Cherry Olive Oil Cakes to enjoy for yourself!


Other Monday Box recipes that would work well with “You Can Do It Sam”


If you like this recipe, be sure to check out my other Read-and-Bake recipes here on Pampered Chicken Mama and many more care package recipes on The Monday Box.

Orange Cherry Olive Oil Cakes

Adapted from “American Cake” by Anne Byrn

Makes 8 mini loaves (3.25” x 2.5”)

  • 1 1/2 cups all-purpose flour
  • 1 1/2 cups granulated sugar
  • 1 teaspoon baking powder
  • 1/4 teaspoon baking soda
  • Pinch of salt
  • 2 large eggs
  • 2/3 cup orange juice*** (see warm weather shipping notes)
  • 2 teaspoons grated orange zest*** (see warm weather shipping notes)
  • 2/3 cup light olive oil or orange infused olive oil
  • 1/2 cup dried cherries, chopped and tossed with 1 teaspoon flour to coat
  1. To prepare the mini loaf pan, grease and flour the short sides of each loaf mold. Cut a strip of parchment paper to line the bottom and long sides of each mold. The parchment strip should extend above each mold to use as handles when removing the loaves from the pan.

  2. Preheat the oven to 375°F.

  3. In the bowl of an electric mixer, combine the flour, sugar, baking powder, baking soda, and salt.

  4. Mix in the eggs, orange juice, orange zest, and olive oil until combined.

  5. Fold in the chopped dried cherries.

  6. Place ½ cup of the batter into each of the mini loaf cavities in the prepared pan.

  7. Bake for about 20 minutes, until the tops are deep golden brown and a toothpick inserted in the center of a loaf comes out clean.

  8. Allow the loaves to cool completely in the pan (about 20 minutes).

  9. To remove the cakes from the pan, lift up using the parchment paper strip overhang as handles. If the loaf doesn’t come up easily, use a knife between the short ends of the loaf and the pan to loosen, then lift.

  10. Store in an airtight container at room temperature for up to 5 days.

***Warm Weather Shipping Notes: Orange juice and zest may not travel well in warm weather. If shipping these cakes in warm weather substitute 2/3 cup water and 2 teaspoons natural orange flavoring.


Ever see an awesome coop and wonder how the owner made it?

Well, this week’s adorable coop is a spotlight on reader Patrick Ober, who sent me these awesome coop photos!

I especially love the size of the coop and the windows – it’s easy to put windows in your coop to let in extra light and ventilation, and it looks like this coop will have plenty of both!

It looks like solid construction that’ll last for year and years! Congrats Patrick on such an Adorable Coop design!

Hey y’all! Here’s this week’s sneaky peek photos of life on our farm!

These images also appear on my Instagram account where I share MANY more photos and stories from the farm!

If you aren’t yet following me there, you can right here.

Enjoy the photos & be sure to share some of yours with me!

This week, we also have a super cute video! We had a chick born on the farm, and Lilli has 2 hens caring for her! Meet Lilli!

https://www.instagram.com/p/Bk8z5Yulmle/?taken-by=pamperedchickenmama

https://www.instagram.com/p/Bk_gQhhlpZ3/?taken-by=pamperedchickenmama

https://www.instagram.com/p/BlB0coqlCCk/?taken-by=pamperedchickenmama

https://www.instagram.com/p/BlEkOQBlEIE/?taken-by=pamperedchickenmama

https://www.instagram.com/p/BlG-kcZlaBM/?taken-by=pamperedchickenmama

https://www.instagram.com/p/BlJx32sltgx/?taken-by=pamperedchickenmama

https://www.instagram.com/p/BlMWWFsF_I7/?taken-by=pamperedchickenmama

Barbecue season is in full swing and I am loving it! 

I love barbecuing, and having outdoor parties (check out my favorite decorations for outdoor parties here) but I’m not a huge fan of some of the ingredients that are in some of my favorite barbecue basics. I’m talking things like ketchup, pickles, hamburger buns etc. That’s why I prefer to make a lot of the basics at home, so that I know exactly what ingredients are going to be in my food.

And most barbecue basics are so simple and easy to make at home and they taste SOO much better because they’re homemade! Keep in mind that I’m not suggesting you make all of these items every single time you have a barbecue because that would be a TON of work! I suggest that you start out making one item on this list and then go from there! You’ll be surprised how big of a difference that can make!

So here are 10 barbecue basics that you can make at home!

Barbecue Sauce

I LOVE barbecue sauce! It’s one of the most important things at any barbecue in my opinion. And it is so easy to make! Here are my favorite southern barbecue sauce recipes that you can make yourself!

My favorite simple barbecue sauces recipe is to simply combine ketchup, mustard, and brown sugar (or honey). All you need is 1 1/2 cups of ketchup and then you mix in 1/3 cup of mustard, and 1/4 cup of brown sugar (or honey, you can check out my honey conversion chart here). You can add more or less mustard depending on what your family likes. I really like mustard so I add a 1/3 a cup, but if you aren’t a mustard fan use 1/4 cup instead.

Pickles

While I’m not a huge pickle fan, my family is, so we always have to have pickles at every barbecue. And my family loves homemade pickles! I personally love this recipe for refrigerator dill pickles because it’s quick and easy to make! My family also likes other vegetables besides cucumbers pickled so check out my collection of more than 100 pickle recipes you can make practically for free.

100+ Crazy Delicious Pickle Recipes You Can Make Practically For Free

Hamburger Buns

I’m a huge fan of homemade bread and nothing makes a burger taste better than a delicious homemade bun! This recipe is great because even though it takes a little bit of time to make, you can make several batches and freeze them! Homemade hamburger buns taste great and I try and make them for every barbecue!

Ketchup

Ketchup is a staple for any barbecue and I LOVE this recipe for homemade ketchup. Making ketchup is a great way to use up extra tomatoes from your garden because my tomato plants produce like crazy in August and we have tomatoes coming out of our ears! If you want to learn more about gardening in your backyard you can check out my book about how to grow an organic garden!

https://www.instagram.com/p/BF4TL41iZd_/?tagged=homemadeketchup

Cheese

Ok hear me out. I know making cheese seems scary, but I’ve been making it for years and I LOVE my homemade, natural, and sustainable cheese. Making cheese is actually much simpler than you would think it is! I preserve a lot of the milk from our goat as cheese, like chevre. You can check out my step by step guide to making chevre here and my recipe for  mozzarella here. I recommend that you check out this book here to learn more about trying to make your own cheese. And here’s the list of inexpensive tools that I use to make cheese. Give natural cheese making a try at your next barbecue! And if you’re looking for an awesome homemade chevre recipe for your barbecue check out my favorite chevre cheese and grilled zucchini sandwich! It’s SOOO good and it’s an awesome recipe for any barbecue.

Mozzarella Recipe You Can Make In 30 Minutes

Hot Dogs

Now this is something I had never thought of making myself before, but now I’m so excited to make my own hot dogs! It’s actually simpler than it seems and I love that when you make your own hot dogs you get to control exactly what is in your hot dog! Check out this amazing homemade hot dog recipe here that you can make in just an hour!

Hot Dog Buns

And if you’re going to make your own hot dogs you can make your own hot dog buns too! Check out this awesome recipe here!

Mustard

So this is a something I had never even thought of making myself, but now I’m dying to try this recipe for homemade mustard! I love that this recipe helps you to learn more about using mustard seeds to make your own mustard and which types of seeds will produce the flavor that you want! I’m so excited to try this quick and easy recipe at my next barbecue!

Pasta Salad

I don’t know about y’all, but pasta salad is definitely a staple item at every barbecue around here. I used to buy the boxed kind, but then I realized that pasta salad is so simple and easy to make at home! I love making my own pasta salad because I can add in extra yummy vegetables from my garden and add extra flavoring! Check out one of my favorite recipes here!

Grow Your Own Fruits and Veggies

Let’s be honest, the best part about a barbecue are the yummy fruits and veggies. And nothing tastes better than home grown fruits and vegetables! Plant some tomatoes, cucumbers, or watermelon in your garden this year for your summer barbecues. If you don’t have space or time for a garden, check out your local farmers market and buy some local fruits and vegetables!

Looking for some help with grilling? Check out my favorite grilling hacks that will make you next barbecue so much easier! Also check out my guide on how to grill lamb chops perfectly every single time!

What items do you make for your barbecue every summer? I’d love to hear about it in the comments below!


Although we’re still waiting for our tomatoes to come in, I know by August, we’re going to be looking for ways to use them up, and I’m sure you are too!

That’s why I’ve invited Alix and Hugo from A Hedgehog In The Kitchen to share another recipe with us!

I know a lot of you are gluten-free, and this recipe is super yummy, so I know you’ll love it!

Quinoa stuffed tomatoes

Gluten-Free Quinoa Stuffed Tomatoes

The sun is out, the birds are chirping and the streets of Paris are bright with the color of fresh heirloom tomatoes in every vegetable stall. This is the perfect moment of the year to make our favorite quinoa stuffed tomatoes! (Added bonus: this recipe is entirely gluten-free and bursting with flavor.)

Heirloom tomatoes are my absolute favorites. They are naturally gorgeous; some of the prettiest food in my opinion. I wait for them each year and buy them immediately when they start to line the fruit and vegetables stalls on our local market street: the Rue des Martyrs. Have you been to Paris?

Maybe one day we will have a lush garden growing so many heirloom tomatoes that we will just pop outside and gather them into a delightful little basket before bringing them into our kitchen and using them to make these juicy quinoa stuffed tomatoes. (A girl can dream!)

If you are growing heirloom tomatoes (or any large tomato), this recipe is a great way to use them. It’s entirely gluten-free, stuffed with quinoa, chickpeas and corn, healing turmeric and tasty Herbes de Provence spices. Everything is topped off with a balsamic vinegar glaze.

If you are interested in eating gluten-free, we have put together a whole week of tasty gluten-free dinner recipes for you. You can grab your free GF meal plan here.

Quinoa stuffed tomatoes

One of our favorite ingredients in this recipe is the turmeric. Turmeric is a super spice. It’s naturally anti-inflammatory, keeps your brain healthy, helps reduce arthritis symptoms, wards off depression and even delays aging.

It also adds beautiful flavor and color to this recipe. If you’d like to learn more about the benefits of cooking with spices and how to incorporate them into your meals, get our free spice guide here.

This recipe is quick and simple to pull together. Just prepare the ingredients, stuff the tomatoes and put them in the oven. Your kids will love them too. You can serve them alone or on a bed of lettuce.

We made 2 stuffed tomatoes for a dinner at home à deux, but you could definitely double the quantities and make the recipe for a family of 4.

QUINOA STUFFED TOMATOES (GLUTEN-FREE)

For 2 people / preparation time : 10 minutes / Cook time: 45 minutes 

1/2 cup of quinoa
2 heirloom tomatoes (or other large tomatoes)
1 tsp of turmeric
2 tbsp of chickpeas
2 tbsp of corn
1 tsp of Herbes de Provence 
Salt and black pepper to taste
1 tbsp olive oil
2 tbsp balsamic vinegar

Prepare the quinoa according the instructions on the packet. 
Remove the top of each tomato and put aside. 
Set the juice aside. 
Preheat oven to 350°F (180°C).
Mix the quinoa with the tomato juice you put aside, corn, chickpeas, Herbes de Provence spices, black pepper, olive oil and turmeric. 
Stuff the tomatoes with the quinoa, corn and chickpea mixture and put them in the oven for 30 minutes. 
Heat 2 tbsp of balsamic vinegar in a pan on medium heat for 2 minutes. 
Drizzle balsamic vinegar over the tomatoes. 

I’d like to hear from you!

Have you tried this recipe? How did you like it? Leave a comment below!

Bee pollen for chickens? It’s one of my favorite superfoods and it’s very healthy for hens!

Yep, you can feed bee pollen to chickens, and as I discuss below, it has great health benefits for your flock. And honey bees are to thank!

One of my favorite ways to share this treat with my hens is by offering it in the spring, when my flock starts to consistently lay again. The ground is muddy (yuck), which means the amount of parasites and bad bacteria that flourish in wet environments SKYROCKETS.

As your chickens hunt and peck (and poop), they’re going to naturally pick up parasites. (They need to invent chicken shoes.) It’s gross, and even grosser when you look at it under a microscope. Who wants a mouthful of eggs teeming with salmonella and who knows what? Not me!

Don’t limit this golden jewel to just Spring though, there are benefits in the winter months too. It’s so beneficial, that I use it year-round.

That’s why I am sharing this bee pollen treat for backyard chickens. You’ll be surprised how healthy it is!

What Is Bee Pollen?

Bee pollen is made by busy bees working their magic. As bees buzz from flower to flower, collecting nectar, they also get covered in pollen. They mix this pollen with a bit of nectar and their own enzymes to create small, sticky pellets. These pellets are what we call bee pollen.

Bees carry these back to their hive, tucking them into special baskets on their legs – it’s like their grocery shopping! Once back at the hive, they store this pollen in the honeycomb, where it’s used as a food source for the colony. It’s a pretty cool natural process, turning flower dust into a super nutritious food!

If you haven’t seen the Bee Movie, now would be a good time. It’s a cute animated movie that has a great way of showing how bees use pollen.

Why Is Bee Pollen Good?

Honey bee pollen is like nature’s multivitamin! It’s a mix of sugars, proteins, fats, vitamins, and minerals, with a bit of health-boosting compounds like antioxidants thrown in.

The exact mix depends on the plants the bees visited, but generally, you’ll find stuff like fructose, glucose, amino acids, and fatty acids in there. It’s also packed with B vitamins and minerals like potassium and zinc. Basically, it’s super nutritious and great for health.

Bee Pollen for Backyard Chickens

We’re starting to recognize the health benefits of bee pollen for humans, but believe it or not, it’s also been pretty well studied for chickens.

In case you didn’t know, bee pollen is one of those “superfoods” that contains not just a ton of vitamins and minerals, but also more protein than meat! The use of bee pollen is not new, yet many people still don’t know about it.

It helps that chickens LOVE to peck at the tiny bits of bee pollen!

Studies

Multiple studies have been done to examine the health impacts of feeding bee pollen to chickens. And the results are pretty interesting (if you want the fast version: it’s really healthy.)

As a feed additive (or feed mixture), bee pollen shows signs of being a powerful way to prevent parasites and bad bacteria while increasing the overall health of the chicken.

In one study, chickens fed 35 grams of bee pollen per 1 kilo of feed showed more beneficial bacteria in their guts – which means a healthier bird overall.

This same study also showed that bee pollen reduced the amount of bad bacteria – meaning that bee pollen showed antibacterial properties. In particular, bee pollen was shown to reduce the amount of K. oxytoca, a bacterium that can cause sepsis and colitis in people.

Multiple studies have shown that chickens with higher amounts of beneficial bacteria not only GREW better (because their immune response increased which meant they weren’t battling bad bacteria like campylobacter as much) but LAID healthier eggs (because the eggs were less likely to be transmitters of bad bacteria like salmonella).

In another study, bee pollen was shown to increase the length of villi in the digestive tracts of chickens. In case you didn’t know, the villi in the digestive tracts allow people and animals to absorb nutrients as we digest. So, longer villi have more surface area, which can mean it’s easier for your chicken to absorb nutrients – which means she’ll be healthier. It’s a small difference, but a crucial one.

As you can see from all these studies and statistical analysis, the effect of bee-pollen supplementation is worth taking a look at.

Peppermint, Rose, and Parsley, Oh My!

I’ve also included peppermint in this treat for a similar reason: Peppermint has strong antibacterial qualities while also helping to settle tummies.

Rose, as well, is known for its soothing and skin-healing properties (that’s why you see it in so many lotions for people). My chickens particularly love rose because it’s red — for some reason, red is a popular color with hens!

Parsley is one of my favorite “hidden gems” — it’s a humble herb we’ve relegated to garnish status, but it’s full of vitamins!

So, as your hens enjoy eating the bee pollen, they’ll also get lots of extra nutrients from the parsley.

Don’t Forget The Mealworms!

And, of course, mealworms! Mealworms are an all time favorite of chickens, and they are packed full of protein! You might find that your hens go for the mealworms first, but rest assured, they’ll finish off the rest of the ingredients as well!

Bee Healthy Backyard Chicken Treat

You can gather the ingredients and make this chicken treat or hit the easy button and order Be A Happy Beautiful Hen treat here. Either way, your flock will benefit and so will you!

Ingredients (per chicken)

½ tsp Bee pollen

1 tablespoon Peppermint

1 tablespoon Parsley

¼ cup Mealworms (buy in the store here)

1 tablespoon Rose buds

¼ cup Non-GMO Wheat Berries

Directions

Combine ingredients in a bowl and offer immediately. Serve as part of a complete diet, like this Preium Layer Feed, alongside grit.

Did You Know?

  • Bee pollen has over a dozen vitamins (such as Vitamin A, Vitamin C, Vitamin D, Vitamin E, a whole host of Vitamin B’s, and more).
  • Bee pollen is also packed with minerals (such as potassium, phosphorus, calcium, sodium and zinc).
  • It also has many essential fatty acids.
  • Supplementing with bee pollen can promote growth and boost immune systems.
  • Bee pollen is about 50% carbohydrates.
  • Can be used strategically (considering the effect of different levels of bee pollen) as a dietary supplement for broiler chickens to increase productive performance (mainly feed intake) and, therefore, increase body weight.
  • The trophic effect of bee pollen on poultry intestinal tracks is impressive.
  • Bee pollen is a rich source of essential amino acids.
  • Don’t forget the bonus surprise, bee pollen has a lot of protein!

Bee Polen VS Bee Propolis

Bee pollen and bee propolis are both awesome bee products, but they’re quite different. Pollen is basically the substance bees collect from flowers, mixed with a bit of nectar and bee enzymes. It’s like bee bread – a protein-rich food for the hive. On the other hand, bee propolis is more like bee glue. Bees make it by mixing saliva and beeswax with sap from trees and other botanical sources. They use this sticky, resinous substance to seal cracks and sanitize their hive.

So, pollen is bee food, and propolis is a bee-made building and cleaning material. Cool, right?

How Bee Propolis Is Used

Bee propolis is like nature’s antibiotic and has been a go-to for both people and animals for ages. For us humans, it’s often used as a natural remedy for colds, and sore throats, and even as a skin healer for cuts and burns because of its antibacterial and anti-inflammatory properties. It’s also found in various health supplements and cosmetics.

As for animals, beekeepers sometimes use it to help keep their hives healthy, and some pet owners use propolis-based products to treat their furry friends’ wounds or skin issues. It’s pretty amazing how this bee-made substance can be so handy for both us and our animal buddies!

There are a fair amount of studies regarding the effects of propolis as well.

Summary

Animal nutrition is much like human nutrition. It’s important to use good “fuel” to produce the best chemical composition.

Bee pollen is one superfood you don’t want to skip in order to embrace an excellent nutrition plan. All that and it can boost immunity too! So why not?