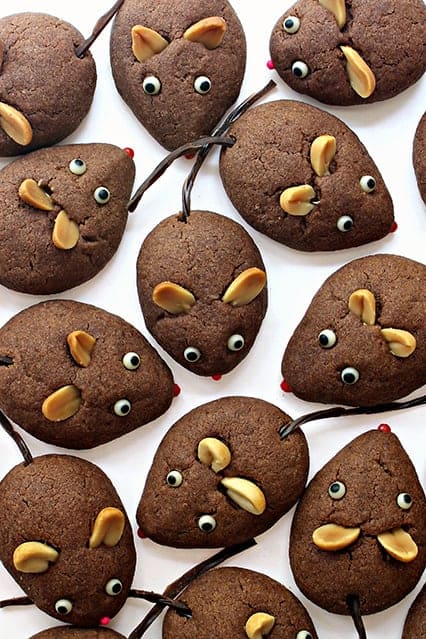
Adorable Chocolate Cookie Mice are as much fun to make as they are to eat!
These cute little critters start out as rich chocolate cookies. The addition of just a few sprinkles magically transforms the cookies into mice.
Hi, I’m Wendy from The Monday Box, bringing you another Read-and-Bake recipe. This series links children’s picture books and baking. Whether you have children in the kitchen baking with you or you are baking goodies for a Read-and-Bake care package, the featured books and the companion baked goods are sure to generate smiles!
This month’s featured book is “Frederick” by Leo Lionni. A beloved children’s classic, “Frederick” won a Caldecott Honor in 1967!
The magical story and the enchanting torn paper illustrations have made “Frederick” a favorite for more than 50 years!

“Frederick” tells the story of a family of mice gathering supplies for the winter. While most of the mice scurry to stockpile food supplies, Frederick sits quietly observing the world around him. He isn’t being lazy. Frederick is gathering colors and words.
Toward the end of the long winter, when the food supplies have been used up, Frederick tells his mouse family stories of the colors in the world and the warmth of the sun. His words warm their hearts and feed their spirits.
“Frederick” teaches the power of words and imagination to transport us and bring us joy.
What better way to celebrate Frederick’s imagination, than with a batch of Chocolate Cookie Mice! Perhaps your little ones will want to be like Frederick and will tell the cookie mice a story before gobbling them up!
Chocolate Cookie Mice are easy to make, but do require planning. The dough needs to chill in the refrigerator for at least 3 hours before using so that it will hold its shape in the oven. I suggest you make the dough one day (it takes only about 10 minutes) and create your batch of mice cookies the next day.
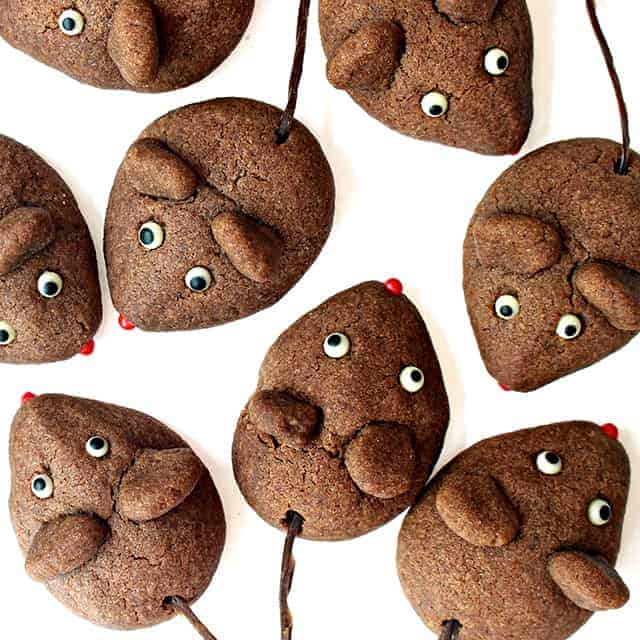
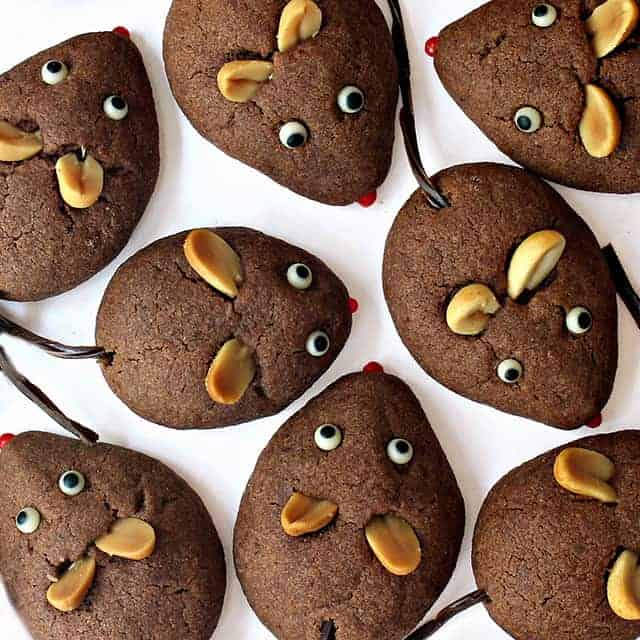
There are lots of possibilities for decorating the mice. I used nonpareil sprinkles in pink or red for the noses, candy eyes, ears made out of peanuts or cookie dough, and tails made out of chocolate licorice cut into thin strips.
Licorice whips that come in black or red are the easiest candy for making mouse tails. I used thin slices of chocolate licorice as an alternative for kids who don’t like the other flavors.
All of the decorating items can be found at most supermarkets or at a cake/cookie decorating store. If you can’t find any of these items, there are lots of other options.
Decorating ideas to consider for the noses:
- Mini M&M’s
- Red cinnamon candies
- A dot of melted pink or red candy melts added after the cookies are baked
- A dot of packaged tube decorating icing
- Pink or red heart sprinkles
Decorating ideas to consider for the eyes:
- Mini chocolate chips (white or chocolate) with the bottom facing out
- White or black nonpareil sprinkles (with or without a dot in the center made with edible marker)
- Dots of melted white/brown candy melts or chocolate added after the cookies are baked
- Dots added with packaged tube decorating icing
- Mini M&M’s
Decorating ideas to consider for the ears:
- Brown M&M’s
- Chocolate chips with the flat bottom facing forward
- Sliced almonds
Chocolate Cookies Mice are thick and chewy and have a deep chocolate flavor. They will most likely continue to be a family favorite even when the kids grow out of picture books!
It’s hard not to smile just looking at those cute little mouse faces and it’s impossible not to smile once you take a bite.
Chocolate Cookie Mice
Adapted from ImperialSugar.com
Makes about 36 cookies
Ingredients:
- 2 1/2 cups all-purpose flour
- 1/4 cup cocoa
- 1/2 teaspoon baking powder
- Pinch of salt
- 1/2 cup butter, room temperature
- 1/2 cup vegetable shortening
- 1 cup granulated sugar
- 1 large egg
- 2 teaspoons vanilla extract
- Black or chocolate licorice laces for tails
- Pink or red nonpareil sprinkles for noses
- Candy eyes (or white/black nonpareil sprinkles)
- Optional: peanuts or almonds for ears
**NOTE: This dough requires chilling for at least 3 hours. May be chilled overnight.
Directions:
- In a large mixing bowl, whisk together the flour, cocoa, baking powder, and salt. Set aside.
- In the bowl of an electric mixer, cream the butter, shortening, and sugar until light and fluffy.
- Gradually mix in the flour mixture, just until combined.
- Form the dough into a disc. Wrap with plastic wrap and refrigerate 3 hours to overnight.
- When ready to bake: Preheat the oven to 350° F. Line a baking sheet with parchment paper.
- Remove the dough from the refrigerator.
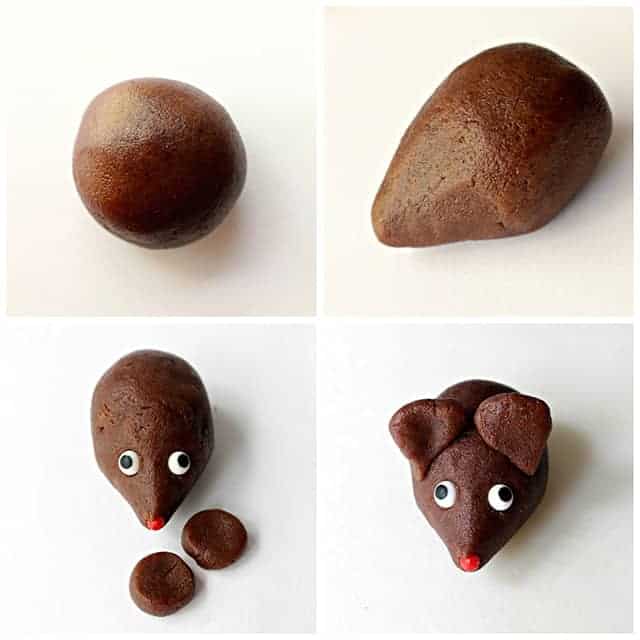
- Use a small (1 tablespoon) scoop to portion the dough. Roll the dough into a ball, then pinch one end of the ball into an elongated point for a nose.
- Gently press in the candy eyes and nonpareil nose.
- Ears: If using dough for ears, form two 1/8 teaspoon portions of dough into discs and press the discs onto the mouse head. If using peanuts or almonds, insert the nuts onto the mouse head.
- Place each mouse cookie 2 inches apart on the prepared baking sheet.
- Bake for 10 minutes.
- Remove from oven and immediately push a licorice lace tail into the back of each mouse cookie.
- Allow the cookies to cool on the baking sheet for 5-10 minutes before moving them to a wire cooling rack to cool completely.
- Store in an airtight container at room temperature for up to 10 days.
Chocolate Cookie Mice
Adapted from ImperialSugar.com
- 2 1/2 cups all-purpose flour
- 1/4 cup cocoa
- 1/2 teaspoon baking powder
- Pinch of salt
- 1/2 cup butter, room temperature
- 1/2 cup vegetable shortening
- 1 cup granulated sugar
- 1 large egg
- 2 teaspoons vanilla extract
- Black or chocolate licorice laces for tails
- Pink or red nonpareil sprinkles for noses
- Candy eyes (or white/black nonpareil sprinkles)
- Optional: peanuts or almonds for ears
- **NOTE: This dough requires chilling for at least 3 hours. May be chilled overnight.
- In a large mixing bowl, whisk together the flour, cocoa, baking powder, and salt. Set aside.
- In the bowl of an electric mixer, cream the butter, shortening, and sugar until light and fluffy.
- Gradually mix in the flour mixture, just until combined.
- Form the dough into a disc. Wrap with plastic wrap and refrigerate 3 hours to overnight.
- When ready to bake: Preheat the oven to 350° F. Line a baking sheet with parchment paper.
- Remove the dough from the refrigerator.
- Use a small (1 tablespoon) scoop to portion the dough. Roll the dough into a ball, then pinch one end of the ball into an elongated point for a nose.
- Gently press in the candy eyes and nonpareil nose.
- Ears: If using dough for ears, form two 1/8 teaspoon portions of dough into discs and press the discs onto the mouse head. If using peanuts or almonds, insert the nuts onto the mouse head.
- Place each mouse cookie 2 inches apart on the prepared baking sheet.
- Bake for 10 minutes.
- Remove from oven and immediately push a licorice lace tail into the back of each mouse cookie.
- Allow the cookies to cool on the baking sheet for 5-10 minutes before moving them to a wire cooling rack to cool completely.
- Store in an airtight container at room temperature for up to 10 days.