Greek yogurt is one of those pantry staples that go over big in my house.
It’s the only food, no matter my mood, I can eat. When I learned how to make greek style yogurt, it was a revelation.
I swear, it’s so much easier to make than I thought. You can make this recipe today, using ingredients you probably already have in your home.
For this recipe, I took it one step further. I’ve recently become a convert of yogurt that also includes some of the cream – I can make it a much richer, butterier flavor that’s still tangy.
Let it drain a little longer to make it greek style, and O-M-G. You’ve made tangy, creamy goodness.
This is yogurt that tastes incredible, and is good for you (because, let’s face it, milk is right up there with bone broth, right?).
And the best part? If you don’t have access to raw cow milk, that’s ok, because you can still make this greek style yogurt with pasteurized, store bought milk.
Oh yeah.
If you’re on a diet, it might not be for you, but if you don’t mind a super healthy indulgence, like me, you’ll crave this yogurt, and make it time and again.
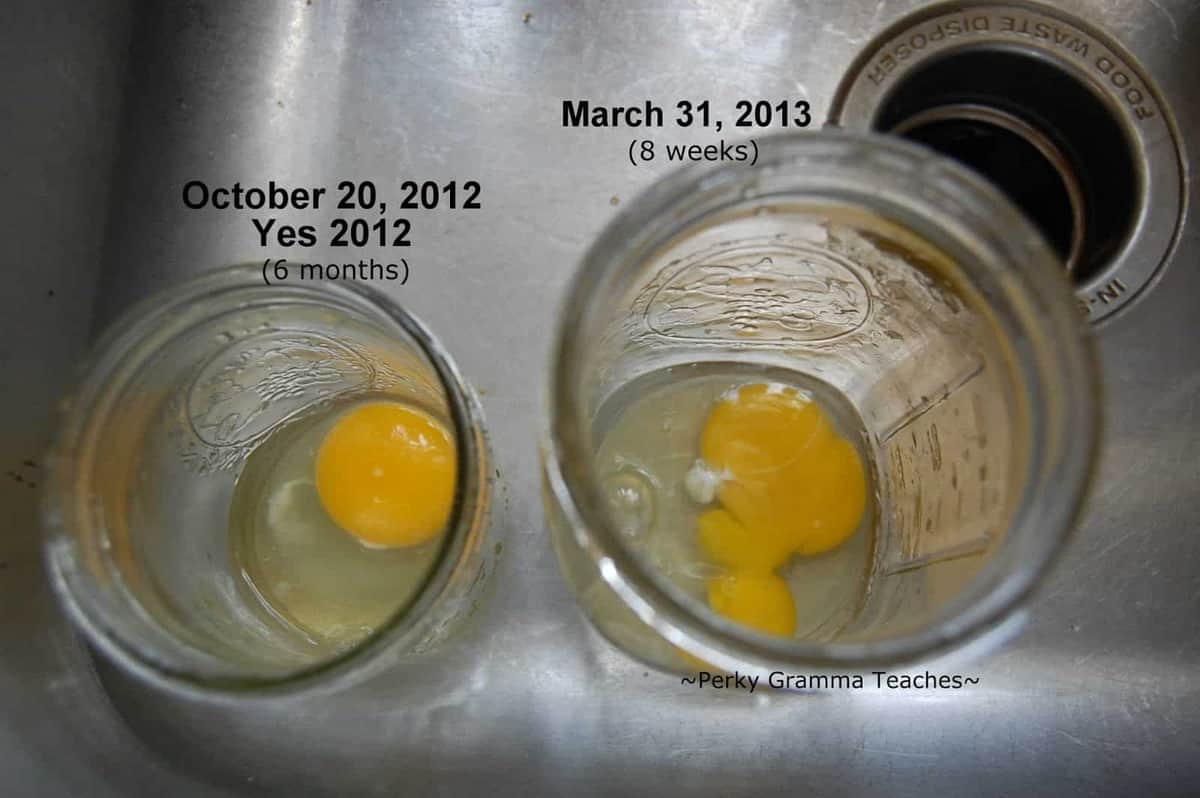
Regardless of how other recipes tell you to strain the yogurt to make a smoother, greek style dairy product, I’ve found often the yogurt is too thin to get an appreciable amount of food out of it – so for this recipe, I used pectin to aid in the gelling process.
If my yogurt is too thin, it tastes great, but I won’t eat as much, and I’ll waste it. So thicker, it is.
The pectin I used needed sugar to activate, but you can also buy pectin that activates using calcium if you want to avoid sugar.
How to Make Creamy Greek Style Yogurt
Ingredients:
1/2 gallon of milk (raw or pasteurized, just not ultra pasteurized)
1 pint cream
2 tablespoons greek yogurt with active cultures or 1 packet yogurt starter
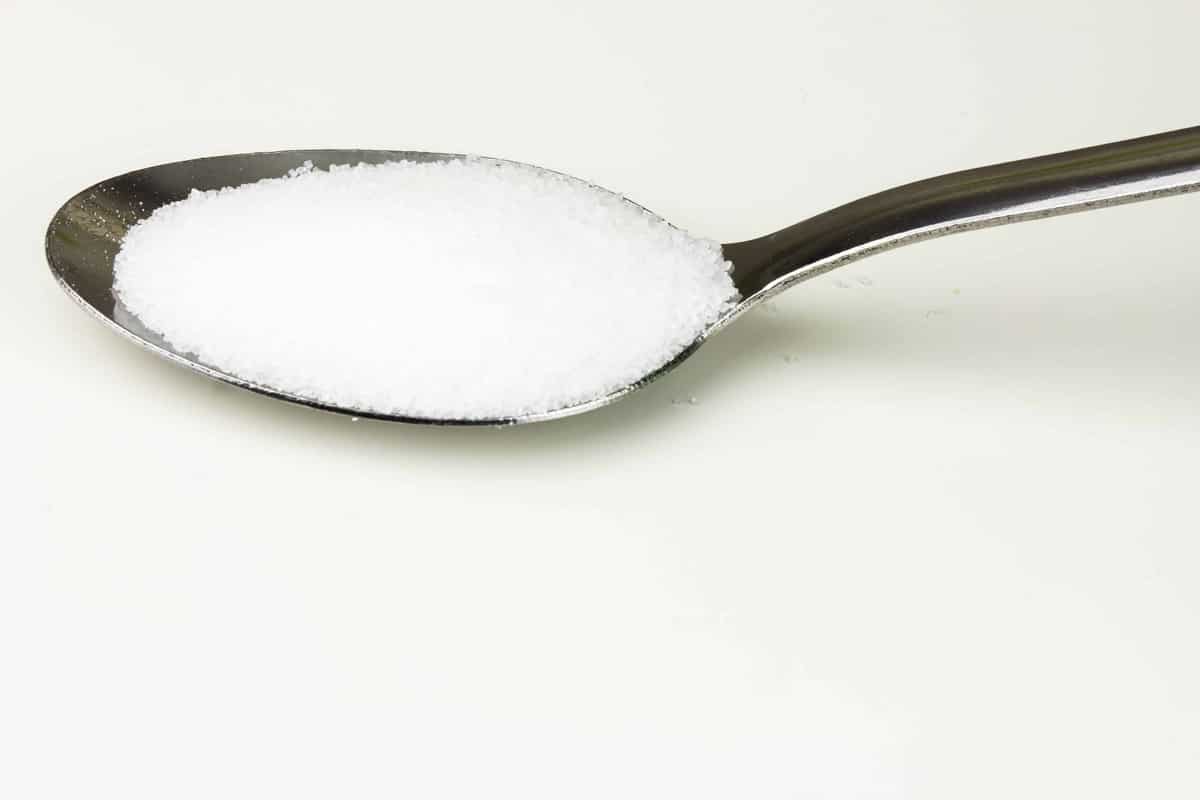
1 tablespoon pectin
1 tablespoon sugar
What you’ll need to make yogurt:
Non-reactive pot (such as stainless steel)
Thermometer (like this one that’s great for yogurt)
Rags to insulate the pot or a Yogotherm (I got a Yogotherm as a gift so I use that)
Here’s everything I used in this recipe, and some options if you don’t want to use sugar.
(Full disclosure: I don’t see the YogoTherm I use for sale, but I know other people are very happy with the Euro Cuisine Yogurt Maker, and it’s less expensive than my model):
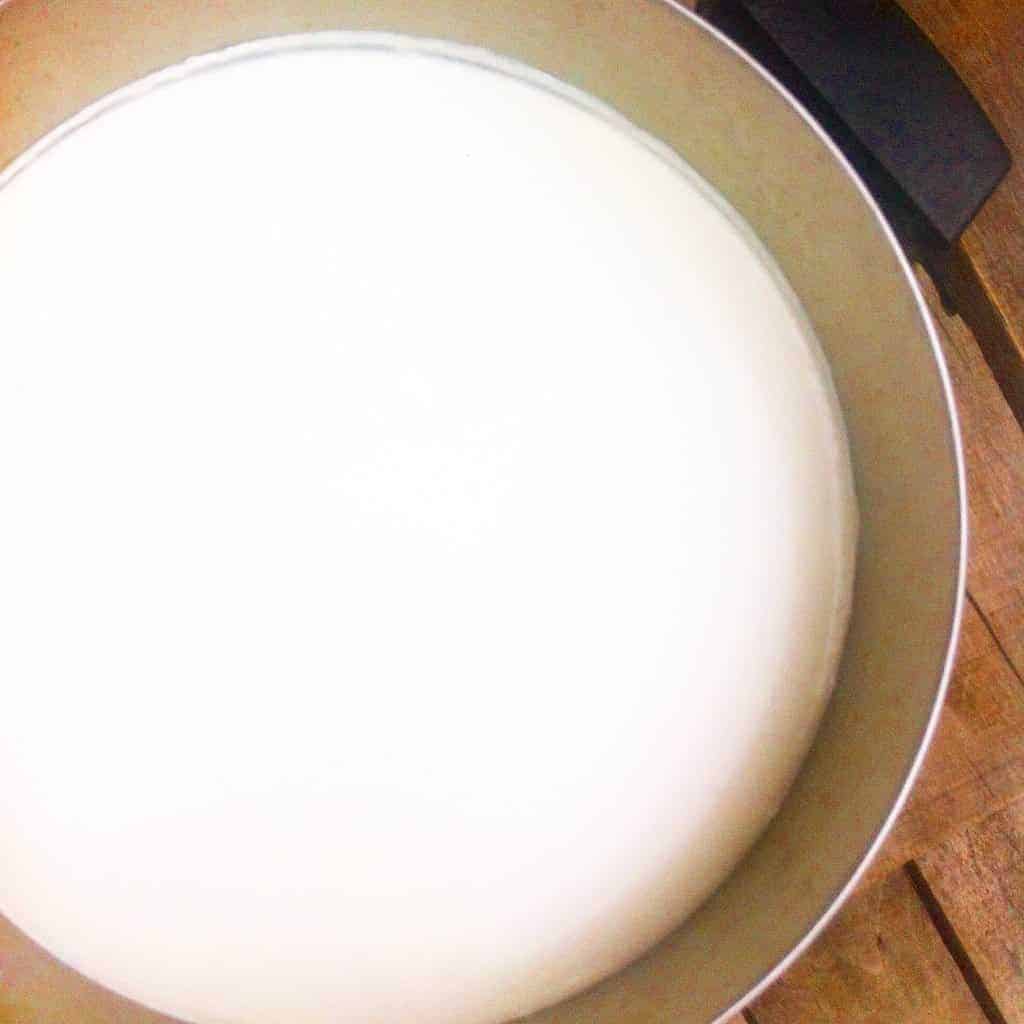
Make your milk/cream mixture
In your non-reactive pot, make your whole milk and cream mixture.
You can use raw or pasteurized milk, but not ultra pasteurized (you’ll know by the UP on the label). It’s ok to use ultra pasteurized cream, though.
Use an “up/down” motion to make sure they’re thoroughly mixed.
Heat to 180 degrees
Heat your milk/cream mixture to 180 degrees. This can take a while, but you don’t want it to get too far above 180 degrees, so make sure to keep an eye on it.
Once the mixture reaches 180 degrees, add 1 tablespoon of pectin and 1 tablespoon of sugar, and stir to thoroughly mix.
Remove the pot from the heat.
Cool, and add a culture to kick start your greek style yogurt
At this point, I transfer my mixture to my Yogotherm. I do this because it takes less time for it to cool.
Allow the mixture to cool to 118 degrees. Once it’s at 118 degrees, you’ll want to add the yogurt or your packet of yogurt starter.
You need to add one or the other so your milk mixture has the cultures to turn into yogurt – the cultures will proliferate over the next few hours, and you’ll be left with creamy goodness.
For this recipe, I used greek yogurt with active cultures since it was readily available.
Add 2 tablespoons of greek yogurt or a packet of your yogurt starter, and allow to sit overnight. You want the milk mixture to cool very slowly, so it needs to be in an insulated container.
You can use a Yogotherm, which does the job of insulating the yogurt, or you can cover your pot, and wrap it in towels or rags.
Let it sit for several hours or overnight. I usually make my greek style yogurt at night so it can sit quietly overnight and not be in the way.
In the morning, you should have yogurt! It will be on the thinner side, especially if you left out the pectin, but it will thicken in the refrigerator.
You can strain it further with butter muslin (or an old, clean, pillowcase if you don’t have butter muslin) to make it even thicker, and you’ll make a nice, creamy greek style yogurt!
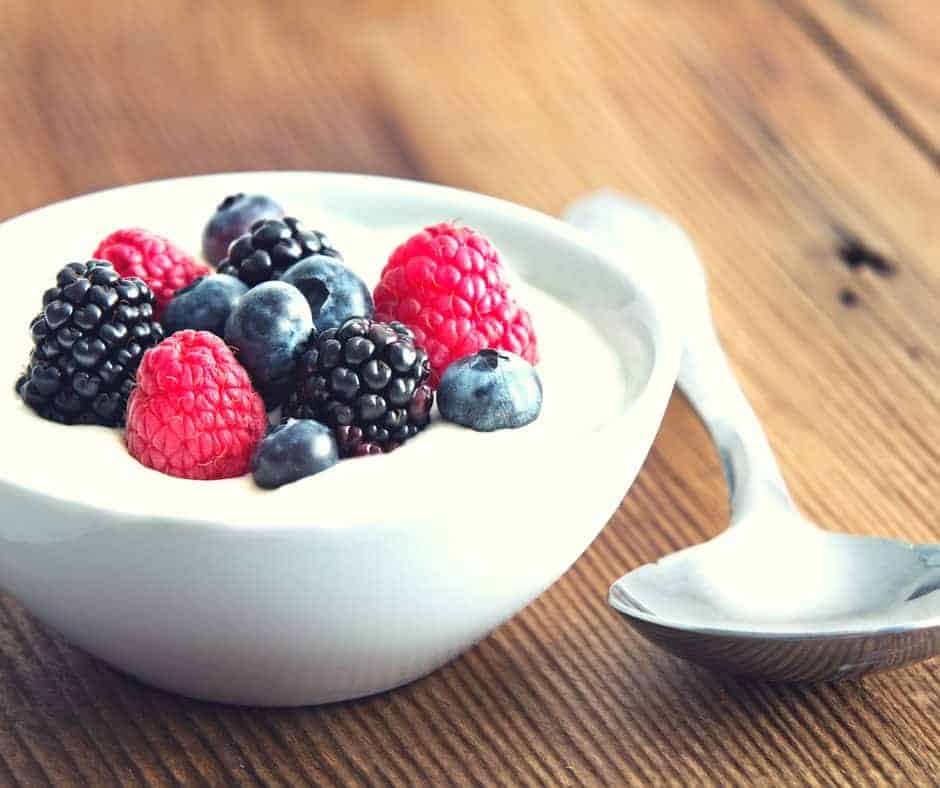
Mix it with berries and granola for a great breakfast! You can also use cucumbers and spices to make a great addition to a steak sandwich.
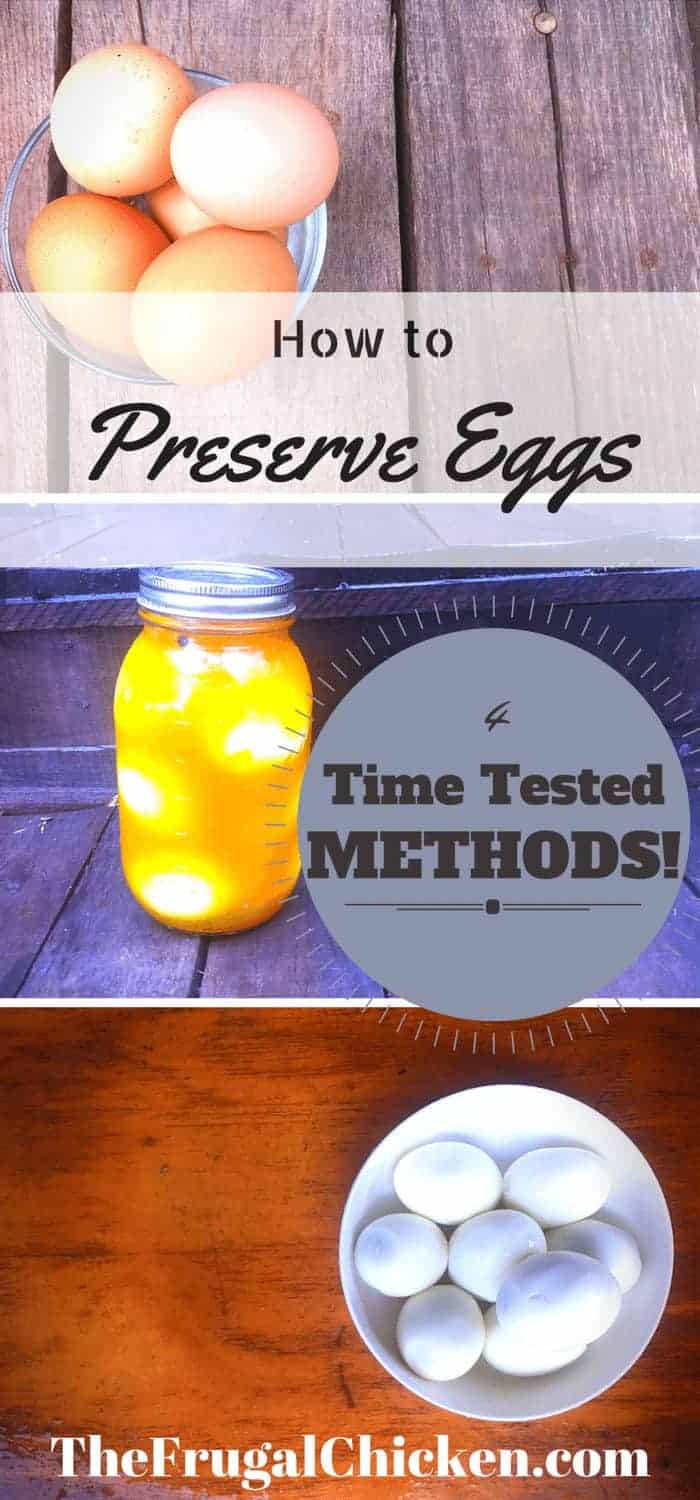
Back in the old homesteading days (and even in some modern-day cultures), it was important to preserve eggs during the summer months since hens will decrease (or stop) their egg production in winter.
It was an important part of survival to preserve eggs during more bountiful times for those leaner times, especially out on the prairie where other people were few and far between.
After all, backyard chickens won’t lay eggs forever – just when there’s enough light.
As modern day homesteaders, even though eggs are available year round at the store (they’re typically old, from unethical sources, and these eggs do go bad after a while), you might wonder how to preserve some of your farm fresh eggs for winter use.
Here’s some time tested techniques to preserve your eggs, along with quotes from old time sources! Just remember: before bothering to preserve any eggs, if you’re unsure whether the egg is fresh or not, try the egg float test to confirm.
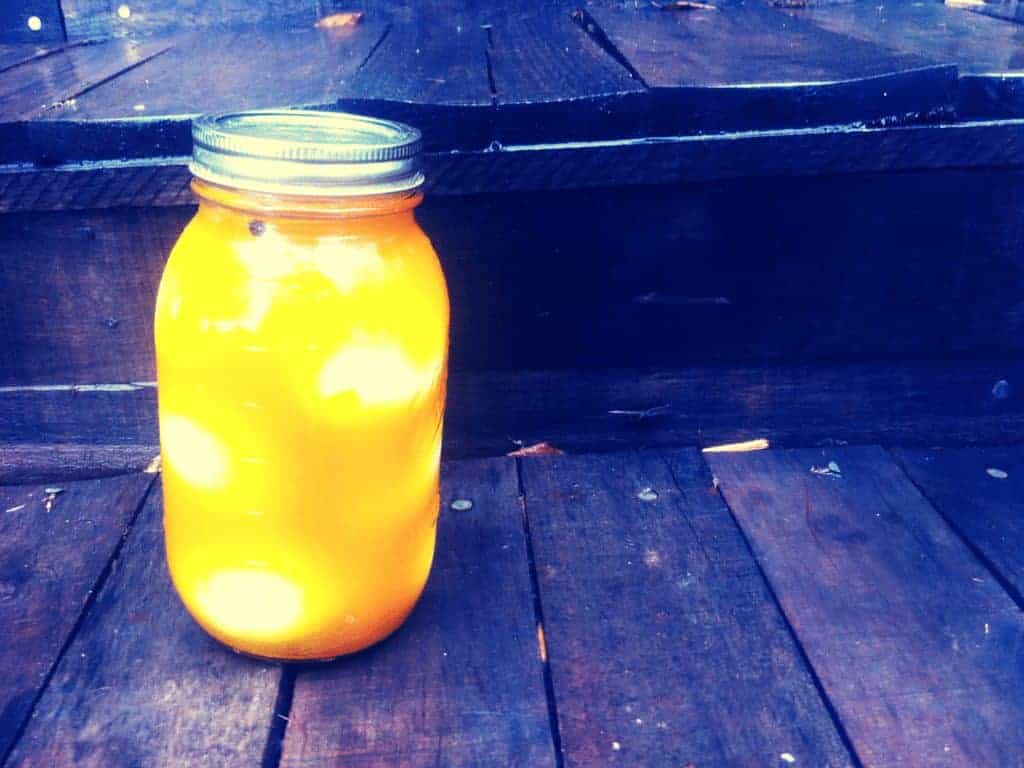
Some people pickle them with beets, so the preserved eggs get a beautiful red color, and others prefer to use turmeric so the beets get an orange or yellow color. Each way yields a different flavor too!
How to Pickle Eggs
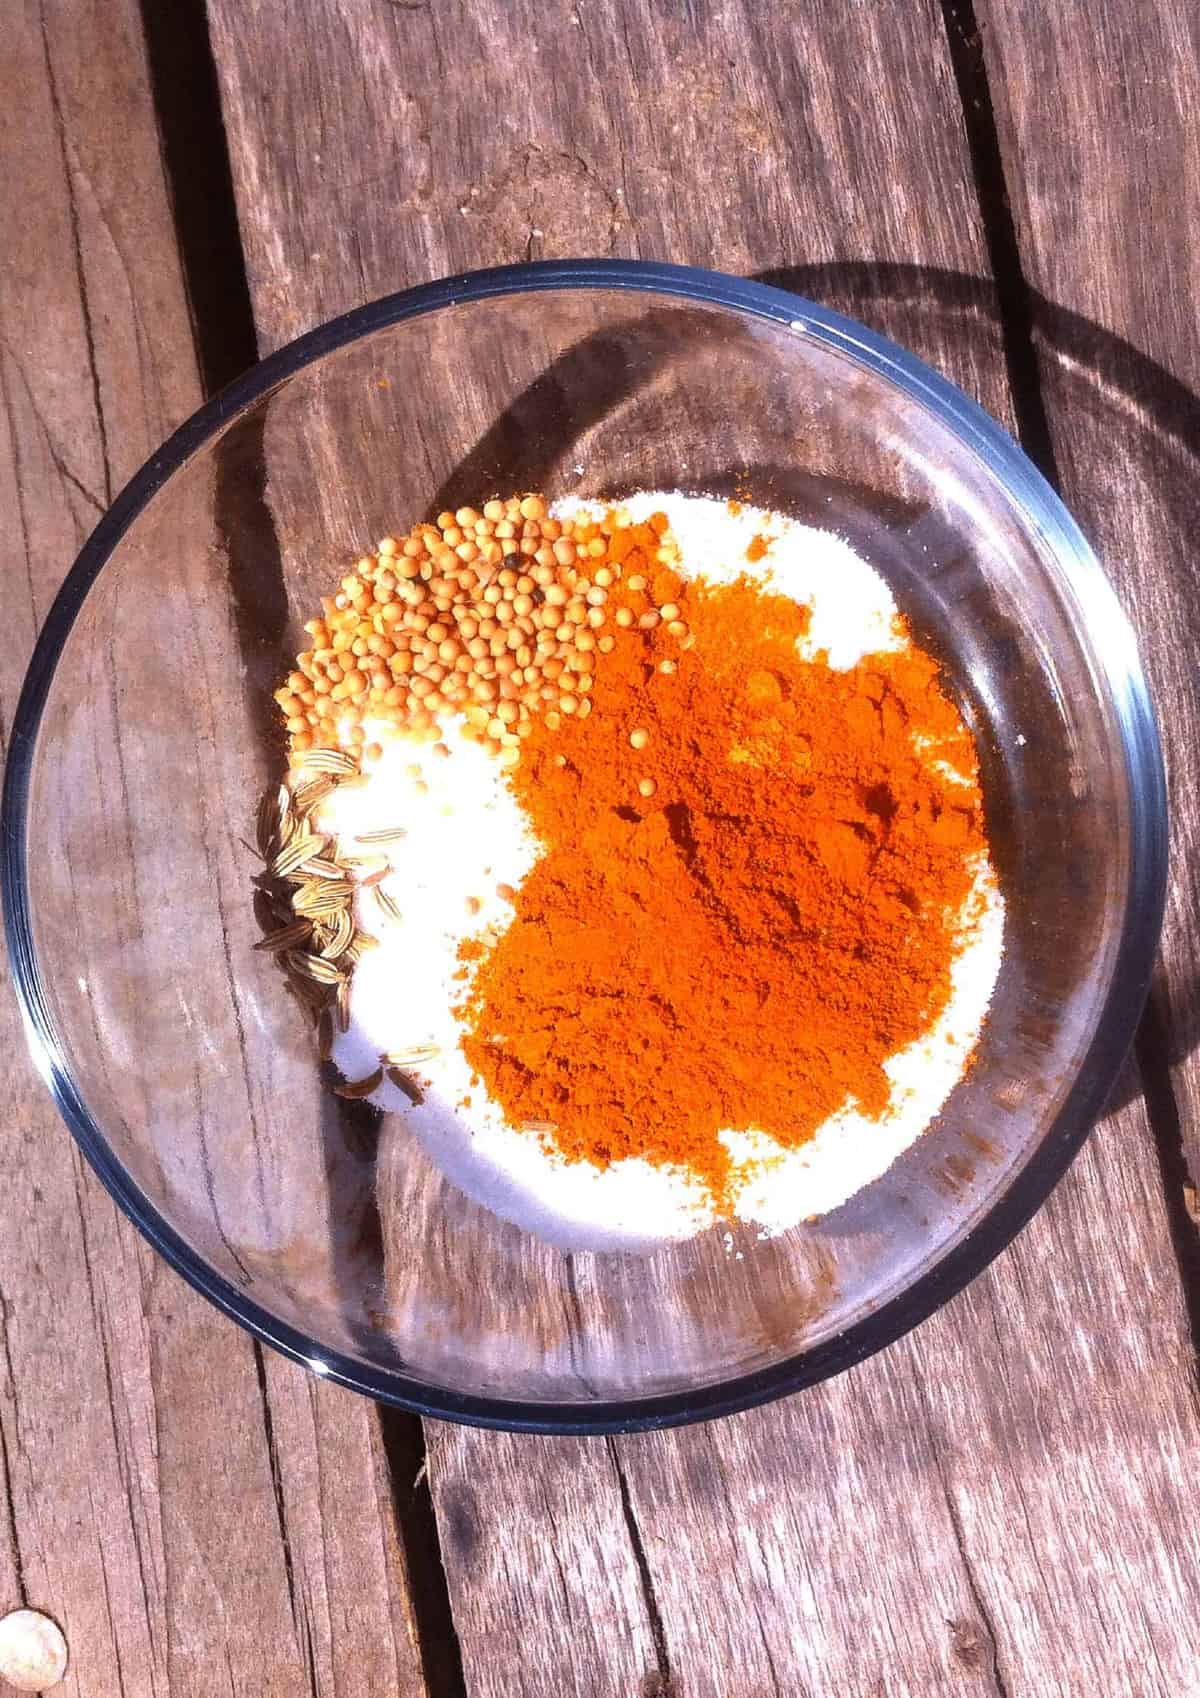
To make the pickling brine, mix 4 cups of vinegar with your spices. You can use any spices you like. I prefer turmeric, peppercorns, and mustard seed. Heat the vinegar/spice mixture to a boil, and simmer for 5 minutes.
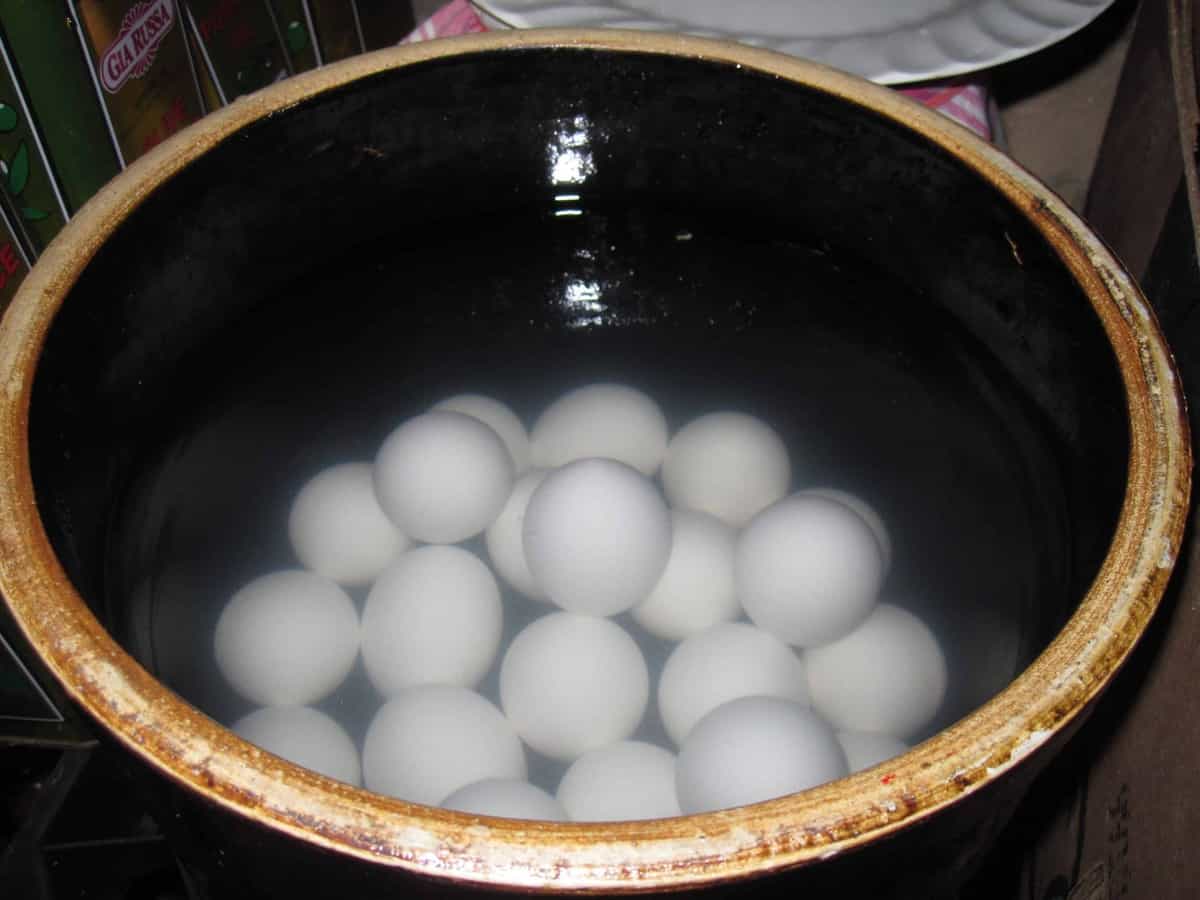
Cool your mixture (important to prevent the glass from breaking), and pour over the hard boiled eggs.
Allow 4 weeks in the refrigerator for your pickled eggs to absorb all the seasonings. The pickled eggs will remain preserved in your fridge for 3-4 months.
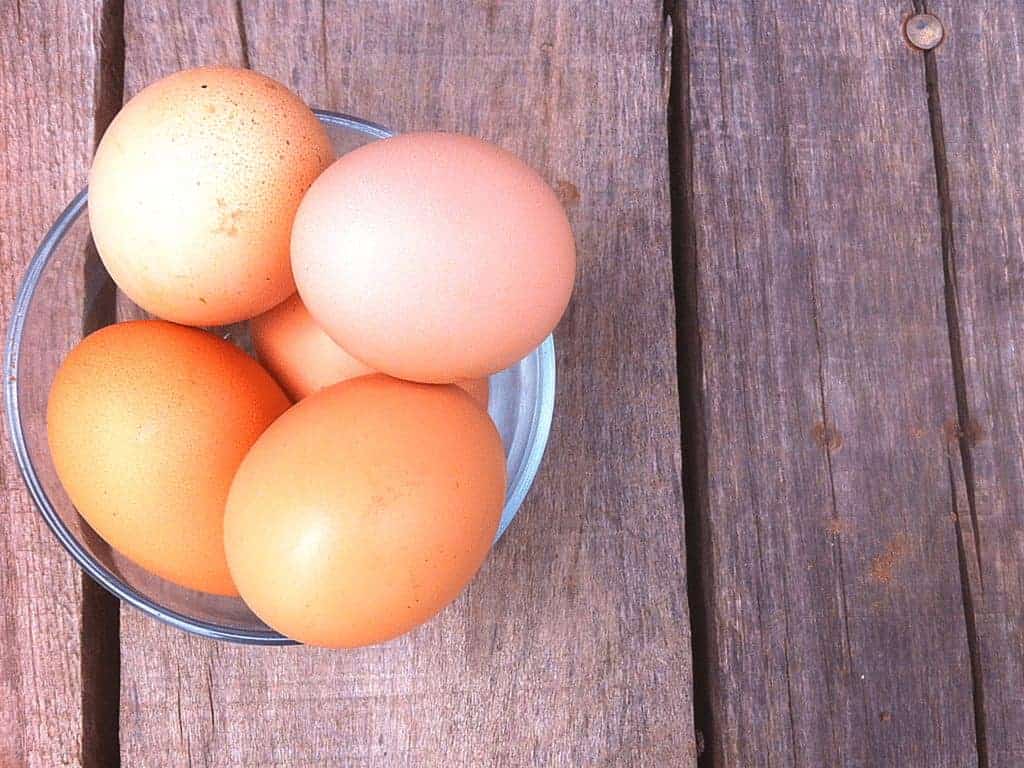
Fresh eggs are the best to use for pickling to ensure the highest quality possible since the eggs will be stored over a relatively long period of time.
In her book Pickled, Potted, and Canned: How the Art and Science of Food Preserving Changed the World (Simon & Schuster:New York 2000 (p. 96), Sue Shephard wrote, “When the English farmer’s wife had a glut of eggs, she would boil then hard, shell them, and pile them into earthenware or glass jars and over them scalding vinegar well seasoned with pepper, ginger, garlic, and allspice. ‘The eggs are fit to use after a month’ and were quite a treat in the farmhouse kitchen.”
While I understand that refrigerating is not preserving for long term storage (for example, on a shelf for years), you’re still using your excess eggs in a great way, and they’ll keep for months when pickled.
A Note About Canning
My research about canning has been inconclusive. Here’s a couple links about how to can pickled eggs at the end of this article, but some sources say to not can eggs, while others endorse it.
My own conclusion, until I’ve tested it out myself, is to proceed at your own risk. Whether you decide to can them or not, pickled eggs will do well in the refrigerator, and definitely taste great.
I don’t personally can eggs because eggs don’t usually last too long at our place. If we find ourselves in excess, we simply pickle them to make them last longer, or hatch the eggs to increase our chicken flock for meat or to sell the chicks (or I freeze them for use later).
2. Preserving in Water Glass
Water glass was a prevelant method to preserve eggs until the early 20th century, in particular in rural areas, before electricity was widely available. Its use has fallen off, but you can still preserve eggs using it.
Photo from Granny Miller
What is water glass? It’s the street name for sodium silicate, which has been used with wide success to preserve eggs.
Imagine being able to pull blue eggs from your Ameraucana, Easter Egger, or Araucana chickens – even in the dead of winter! How fun!
It works because the bacteria that would enter the egg to spoil it are kept out by the mixture.
To learn about how to use water glass to preserve eggs, I referred to my friend, Katherine, who writes at Granny Miller, and is an expert on this subject.
Granny Miller recommends diluting the water glass in 11 parts water to 1 part sodium silicate. “It works out to 1 quart of water to 1/3 cup of water glass.”
Boil your water before mixing it with the sodium silicate (in fact, many recipes advise to use rainwater, although boiled tap should be fine). Allow the water to cool completely before adding the water glass.
Once you’ve made your mixture, pour it into a sterilized ceramic crock or plastic bucket (avoid metal). Sterilize your vessel by cleaning it with boiling water – you want to kill any bacteria, yeasts or other yuckies that might lurk there.
The mixture needs to be completely cool before adding eggs (so the eggs aren’t cooked).
Add the eggs pointed side down – you can add as many eggs as you like (storing pointed end down) but be careful not to stack the eggs too high and cause the bottom ones to crack.
Leave 2″-3″ of liquid above the eggs, and make sure the vessel is covered tightly. Store in a cool area.
You can add fresh eggs daily to the crock – but be sure to never use store bought eggs or eggs that have been washed. They won’t store well, and could ruin your entire harvest.
Some people don’t like this method because they don’t want to ingest sodium silicate – it’s completely up to you.
Sodium silicate is a naturally occurring mineral, and there’s been no reports of it being unsafe to consume. If you want to use it to preserve eggs, it’s up to you.
3. Freezing Eggs
One common modern-day method to preserve eggs is to freeze them. There’s a couple different methods to this, each with advantages and disadvantages.
To freeze your eggs, you can crack them into an egg tray, cover with plastic (in case it spills before freezing) then place in your freezer. You should be able to stack ice trays as needed.
When you need an egg, simply pull it out of the tray as you would an ice cube and allow to thaw. (You can use my favorite sugar-free egg custard recipe if you’re itching to cook with them!)
Now that you know how to freeze an egg, you have a couple choices. You can either scramble the yolks and whites together, which has the advantage of better consistency.
You can also preserve your eggs by freezing with the yolk intact – it’s up to you.
4. Mineral Oil
One popular modern day method to preserve eggs without refrigeration is using mineral oil. Perky Prepping Grandma has a great article about using mineral oil to preserve eggs.
Here’s what you need to know!
Using about a tablespoon of mineral oil for 18 eggs (that means that bottle of mineral oil will last a while – very frugal!), slather a layer of the oil onto the eggshell.
Photo from Perky Prepping Grandma
Store back in the container, pointy side down to preserve. You can refrigerate at this point, or put in a cool, dark area. Turn the eggs over once a month to keep the yolks from settling.
You must use mineral oil – other oils won’t work to preserve eggs. They will go bad, and so will your eggs you worked so hard to store.
Common Ways To Preserve Eggs In The 19th Century
Here’s some common ways to preserve eggs, 19th century style! (Note, I don’t have experience with these methods. It’s a great read, though!)
Unslacked Lime (Calcium Oxide)
Similar to using water glass, it seems a common way to preserve eggs in the 19th century was using lime water containing unslacked lime:
“To half a bushel of water add little over a pint of unslaked lime, and as much coarse salt, and when the whole is dissolved, put in the eggs; be very particular that you do not put in one that is cracked, as it will spoil the whole; there would be plenty of water to cover them well; if the brine is too strong with lime, it will eat the shells; this of course can be easily detected; if the eggs are fresh and whole, and water of the proper strength, it is said they will keep good for years. —Kentucky Housewife, Lettice Bryan, Cincinnati [1839]”
“To keep eggs til 17th of June, or for Christmas: Buy eggs for family use when cheapest; put them into two gallons of water, mixed with half a pint of salt and half a pint of unslacked lime. Make the pickle with boiling water. Put it cold to the eggs. Let the eggs be new laid,and perfect; quite covered with the lime water, and kept in a stone pot in a cool place. Thus preserved, eggs will keep good six months. If occasionally turned over, the better. —Improved Housewife, A Married Lady [Mrs. A. L. Webster], Hartford [1844]”
Another way (and a very good one) is to put some lime in a large vessel, and slack it with boiling water, till it is of the consistence of thin cream; you may allow a gallon of water to a pound of lime. When it is cold, pour it off into a large stone jar, put in the eggs, and cover the jar closely. See that the eggs are always well covered with the lime-water, and lest they should break, avoid moving the jar. If you have hens of your own keep a jar of lime-water always ready, and put in the eggs as they are brought in from the nests. Jars that hold about six quarts are the most convenient. It will be well to renew the lime-water occasionally.” —Directions for Cookery in Its Various Branches, Miss [Eliza] Leslie, Philadelphia [1849]
However (and this is a relatively important however), unslacked lime can cause problems with humans when inhaled, so I don’t recommend it as a resource to preserve eggs.
Salt
“To preserve eggs: Take a keg or pail, cover the bottom with half an inch of salt, and set your eggs close together, on the small end; sprinkle them over with salt so as to cover them entirely, and then put down another layer of eggs, and cover with salt, till your keg is full; cover it tight, and put it where they will not freeze, and they will keep fresh and good a year, or longer. The eggs must be new and fresh when put down. If you take eggs as soon as the hen has laid them, and smear the shells with lard or butter, they will keep as good as new-laid eggs for some time; but if you rub the shells with butter at any time, it will keep them good for months, and will prevent their being hatched.” —New England Economical Housekeeper, Mrs. E. A. Howland, Montpelier [1845] (p. 68)
“To keep eggs:They will keep a few days in a jar of salt; but do not afterwards use the salt in which they have been immersed. —Directions for Cookery in Its Various Branches, Miss [Eliza] Leslie, Philadelphia [1849]
Butter/Grease to Preserve Eggs
They are frequently preserved for two or three months by greasing them all over, when quite fresh, with melted mutton suet, and then wedging them close together (the small end downwards) in a box of bran, layer above layer; the box must be closely covered. —Directions for Cookery in Its Various Branches, Miss [Eliza] Leslie, Philadelphia [1849] (p. 206-7)
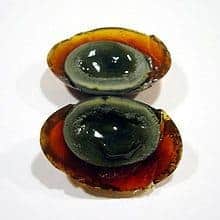
Thousand Year Eggs
And then there’s Thousand Year Eggs. Considered a delicacy in China, they’re actually preserved for about 100 days – “Thousand Year” is just a romantic term.
Photo from Wikipedia
Although there are a few recipes floating around out there, the general consensus is it’s a mixture of salt, black tea, ashes, and lime. Here’s one recipe to preserve eggs in this way.
The eggs are then coated in the mixture, and placed in a crock in a cool, dark area to preserve.
However, modern Thousand Year Eggs can be full of toxic chemicals used to speed up the preserving process, so skip them unless you’ve concocted them yourself.
I hope this article helps you preserve your eggs in time of bounty for those times when fresh eggs aren’t readily accessible! Which do you think you’ll try? Comment below!
Did you get chicks this spring? Me too. Soon they’ll start laying, but if you let your hens free range, you might not find those eggs easily. Here are some of the best ways to tell if your hens are laying!
Even if you keep your hens in an enclosed area, knowing when they’re ready to lay is one of the most exciting moments of chicken ownership.
I’ve ranked these ways in the order I use on our homestead because they’ve worked well for me and my flock.
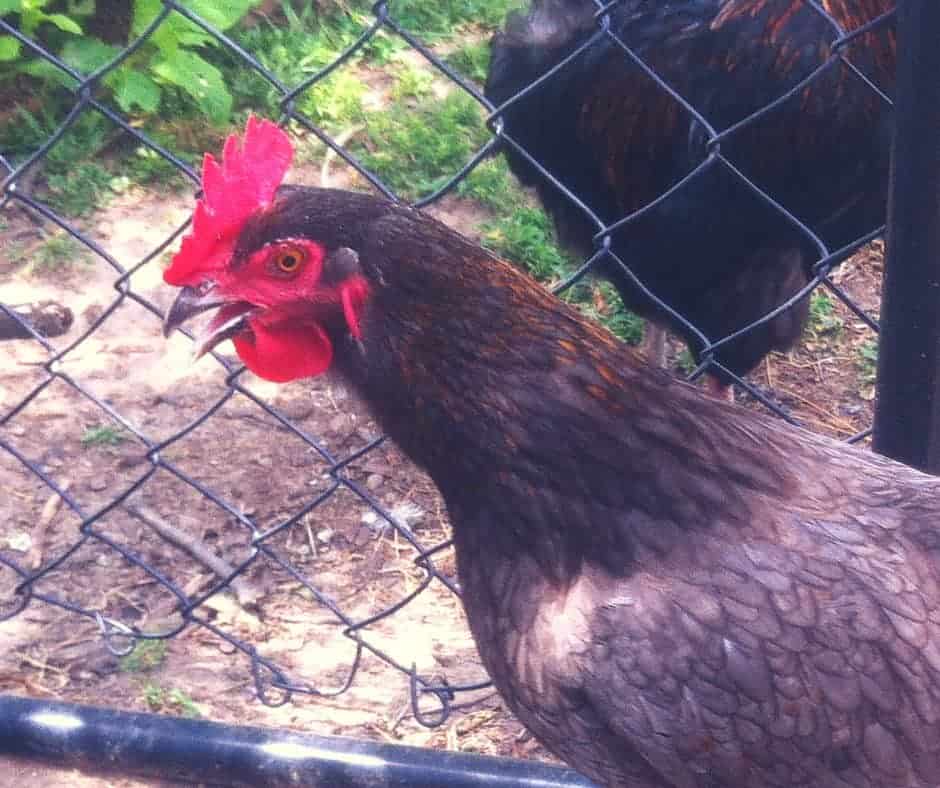
1. Look at your hens’ comb and wattles (The best way I use)
I like using the comb and wattles (and the area around the eyes to a certain extent) to tell if my hens are laying or might lay soon.
It’s not the most scientific way, but it’s the least invasive, and in my experience, reasonably accurate.
Take a walk out to your coop and look at your pullets – what do their combs and wattles look like? Are they vibrant red or dull?
Are the wattles small, or are they starting to droop and sag?
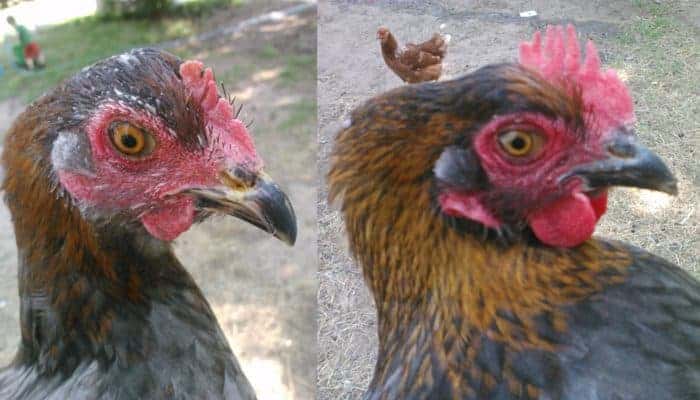
These two pullets are from the same hatch, but the pullet on the right looks like she might lay soon. Her waddles are longer and redder than the pullet on the left.
Vibrant red wattles are my best bet for telling whether my chickens are laying (aside from the hens laying an egg in front of me).
When Qwerty was about 6 months, the length and color of her wattles quickly started to change.
Here’s Qwerty!
Her comb also became more prominent, and the color around her eyes changed, and sure enough, she soon started to lay eggs.
Qwerty came to the homestead with 2 other pullets, also Blue Copper Marans, who were born 4 weeks after her. One has wattles that have started to change, while the other one from the same hatch hasn’t.
You can easily see the difference between the two. While I’m not sure the pullet is laying yet, I’ve isolated her from my other laying hens to find out! I’ll be keeping an eye on that nest box for sure! More on isolation below.
2. Behavior (My second best way to tell)
If you have a rooster, this is one of the best ways to tell if your hens are laying.
Watch your hen’s behavior – is she happy-go-lucky as a pullet, eating and minding her own business, or has she become glued to the hip with a rooster?
Roosters don’t really worry too much about pullets that aren’t laying. Once the hens are ready to produce eggs, though, it’s a different story.
The rooster starts to feel more possessive and does his “mating dance” around her to show that’s his girl. It’s hilarious and a good indicator that your pullets are becoming hens.
I definitively knew Qwerty was entering the egg layer group when my king rooster stole her from another rooster, Lavender (whom she was best buds with). I was pretty sure she had started laying or would lay very soon.
3. Skin Bleaching
This one gets a little tricky and takes some experience to determine. Here’s a short description of this process:
As hens start laying, they divert the yellow color in their skin pigment from their vent, eye rings, legs, and beak to their yolks.
The vent is the first to start losing its yellow color. The yellow will fade from the vent within the first week of laying and become white, pink, or bluish-white.
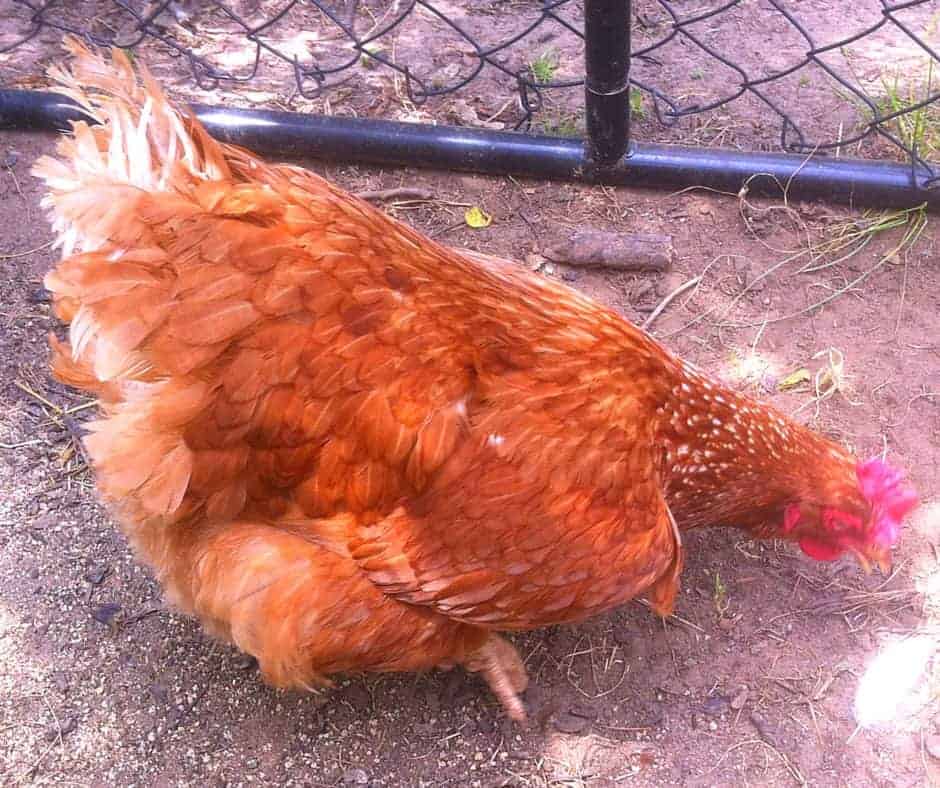
This hen lays, but isn’t my best layer. You can see her vent is pink, but not completely bleached.
Within 2 weeks, the eye rings will start to bleach, and finally, her beak will begin to lose its pigment, too, starting at the base and heading out toward the tip.
A hen that shows black in its beak is likely laying, although this is breed dependent since darker-colored breeds sometimes have dark beaks.
It takes 4-8 weeks for the beak to begin to bleach. Hens that have beaks that aren’t bleached haven’t started laying or haven’t laid an egg for 4-6 weeks.
Hens who have been laying will have feathers that are possibly broken or rumpled, while hens with sleek and clean-looking feathers might not be laying.
While messy feathers are a good sign of egg laying, I don’t use it as a sign alone, instead, I use it as a secondary indicator.
I think the methods outlined above are the best ways to tell if your hens are laying.
Regarding feathers, keep in mind that molting is almost always a sure sign your hens aren’t laying since the bird needs to put her energy into making new feathers instead of eggs.
When hens molt, it’s always in a certain order. The feathers are first lost from the head, then on the neck, breast, body, wings, and tail in that order. They also lose their primary flight feathers before secondary flight feathers on the wings.
This hen lays regularly. See how her feathers are kinda messy?
5. Isolate them or keep them in an enclosed area if they’re free-range birds
When in doubt…if your hens seem like they should be laying but you have no eggs, pen them in an isolated area that’s safe, has water and shelter, and see if they will lay.
In my experience, if your hens aren’t used to being penned this process can cause a good deal of stress for them. It can take up to 2 weeks for them to start laying again, so give them time if you do decide to pen them.
We had laying hens, but no eggs. We didn’t realize the cause of the problem was an overly aggressive rooster who was creating large wounds in the hens (which were hidden by their wings and feathers) until we isolated the hens from the rest of the flock.
After a couple of weeks and a bump in their protein, the girls started laying again.
Bonus Tip
There might also be nutritional reasons your hens might not be the best layers. This is a very important topic. If your hens aren’t layinglaying it’s very likely that they do not have enough proteinor nutrients of some kind. Be sure you are feeding them a high protein diet with good ingredients. Also, make sure they are getting enough food.
Tips For Egg Production
Be sure your flock is getting plenty of protein in their layer feed and treats
You may want to consider giving oyster shells for extra calcium
Boost your bird’s immune system and egg production with vitamins and nutrients
Ensure they have fresh clean water every day (and give them warm water in cold weather)
Make sure they have privacy where you want them to lay eggs (they like and need privacy)
If you are trying to figure out if and when your backyard chickens are laying, try out these methods. You have nothing to lose and knowledge to gain. Best of luck to you! And may your days be filled with chicken eggs.
Here’s a step-by-step video, and there’s also directions below.
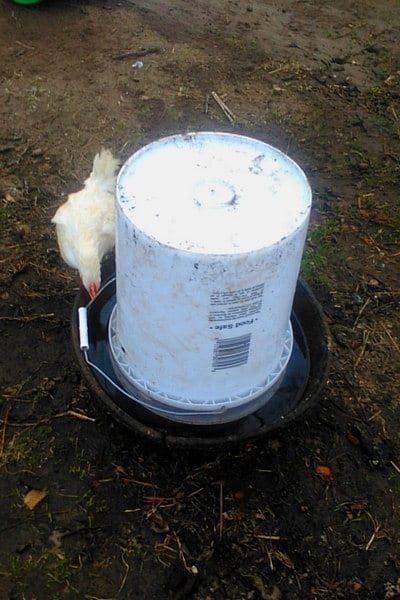
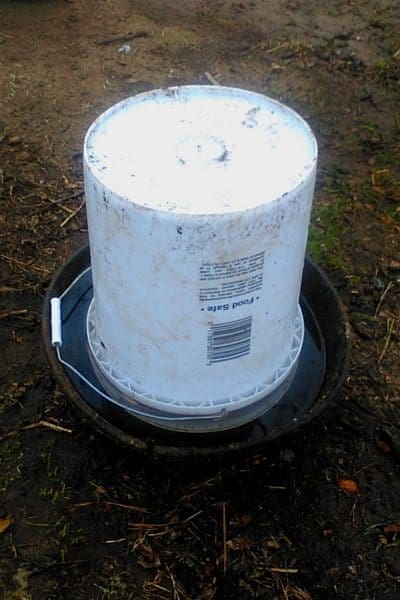
The chickens love that it makes water available all day, and I love that it’s close to the ground and shallow enough that chicks won’t drown in it (unless their seriously committed).
It’s easy to disassemble and clean and because it’s made of plastic and rubber, it’s easy to sanitize.
Here’s the DIY automatic chicken waterer we made:
You can use galvanized steel instead of rubber, if you prefer.
Seriously, this took us about 5 minutes to make. Once you have the materials, it’s super simple.
What you’ll need to make this DIY waterer:
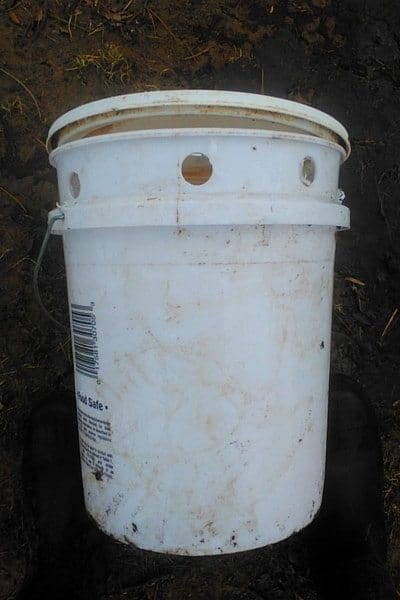
A 5 Gallon bucket
Plastic top that fits on the bucket
A 1/2″ to 1″ drill bit
Electric drill
Ground feeder or oil pan
Here’s how to make it!
Start with a 5 gallon bucket
We found one at our local big box store, but you can buy it on Amazon as well.
How do you tell if it’s made of food grade plastic? If it has a 2 and the HDPE designation, it’s safe for food.
If you do use a bucket that’s been hanging around, either clean it with bleach or avoid making a DIY waterer with it altogether if you don’t know what’s been in it.
Our bucket was brand new and cleaned with bleach when we brought it home.
Drill holes in the bucket
We got a 1″ drill but for about $3.
With the bit, drill evenly-spaced holes as close to the top of the bucket as possible – it’s these holes that will create the automatic part of your DIY chicken waterer.
If you don’t have the right drill bit, here’s what we use:
You want to DIY holes so they’ll be large enough to let out enough water, but not so large that the water will come gushing out and all over the place.
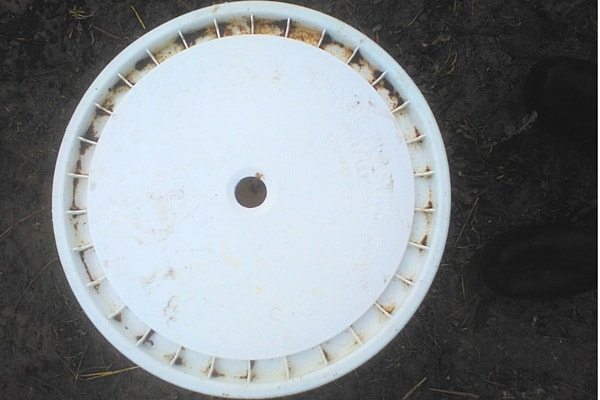
Drill a hole in the top
We were able to source a bucket top for our DIY waterer at our local big box store.
Once you’ve drilled holes in the 5 gallon bucket, drill a 1″ hole in the top.
Secure the top to the bucket by snapping it into place.
This forms an air-tight seal when under water so the pan refills only when the water level has sunk low enough.
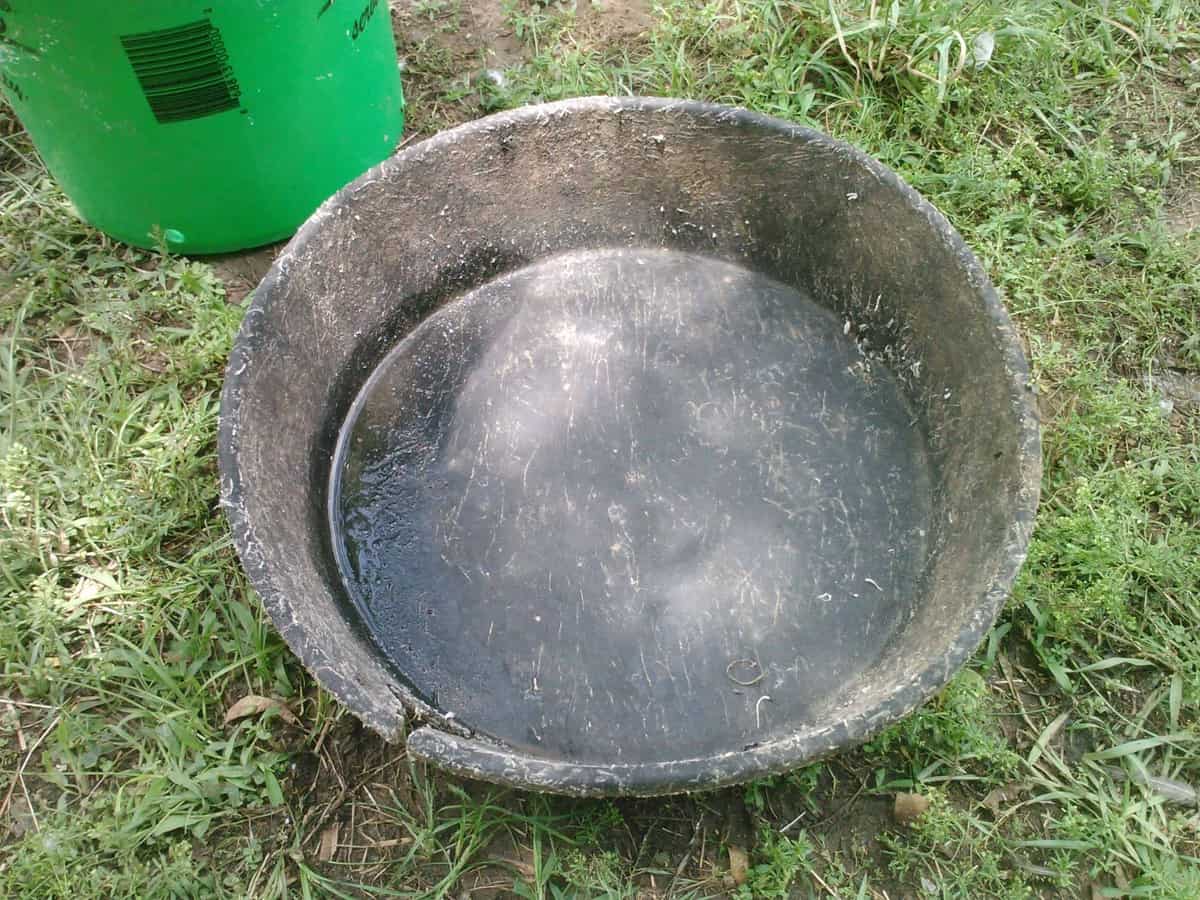
Get a ground feeder or oil pan
We used an old ground feeder for horses that we had lying around, which made this project super cheap, since we just had to buy the bucket and top.
Ours is rubber, but a galvanized steel one will work well since it also will be easy to clean.
Whatever you use, the water line must be able to rise higher than the holes you drilled in the 5 gallon bucket when it’s inverted and placed into the ground feeder.
Here’s the rubber one we use (and next to it is the steel one, if you prefer):
Fill the bucket with water
Through the 1″ hole, fill the bucket with water.
After the bucket is full, quickly flip it upside down and place it into the ground feeder or oil pan.
The ground feeder will fill up with water, and should stop filling once the water line exceeds the holes in the 5 gallon bucket.
Anytime your flock drinks down the water, the bucket will automatically fill.
Doesn’t get much easier than that, and our flock loves to drink water from it!
This ultimate cheat sheet on chickens has everything you need to know (and then some!) to get you started on the right scale-covered foot.
Why aren’t my chickens laying?
There can be a ton of reasons your chickens aren’t laying, so here’s a few to get you started.
Are your hens the right age? They can start laying anywhere from 6 months old, although most start laying around 7 to 12 months.
Is her nutrition good enough? She should eat at least 18% protein in her feed.
Data shows that chickens that free range eat up to 70% protein (because they eat bugs, worms, etc), but if free ranging isn’t an option, make sure her feed hits that 18% mark. I personally feed between 18% and 22% protein grain, along with letting my flock forage for other goodies.
It’s also possible she needs to eat more vitamins and minerals, and her intake is off. You can read more about the vitamins and minerals chickens need here.
Is there some sort of stress going on? For example, chickens who constantly battle predators might not lay.
Is she just old? While some chickens will lay for years and years, the average age most chickens stop laying regularly is 2-3 years old.
How do I introduce new chickens to my flock?
There’s a ton of ways to introduce new hens to an existing flock, including just putting the new hen in the coop, but here’s how I do it.
Whenever I get a new hen, my first step is to isolate her for a week or two to make sure she doesn’t get sick.
The last thing you want is to bring a disease into your flock. Ask me how I know.
Assuming that goes well, I next put her in what I call the “Hello Box” for a day or so. It’s nothing fancy, just a wood frame made from scrap wood with chicken wire stapled to it, but it keeps everyone safe.
It also reduces drama during feed time, because the new chickens can eat their dinner in peace. The new hen can see the other chickens, and they can see her.
If the vibes seem good (I’ve never had a problem), then I let the hen out in 24 to 48 hours to integrate with the flock.
My king rooster is usually happy to add a new girl to his brood.
Why do I go through all this trouble?
Well, I have, in the past, had disease introduced to my flock by sick chickens (who didn’t look sick at the time).
It’s a huge pain in the butt, and caused my chickens to stop laying.
I’ve also had roosters beat up new hens in a bid to become king rooster, and that lead to torn up hens, and – you guessed it – they went off their eggs.
For chicks, I give them an 18% protein chick starter to eat until they’re 12 weeks old.
I do give medicated chick starter, although it’s up to you if you want to go that route. I know plenty of people who feed unmedicated feed and their flocks do well on it also.
What you give your chickens to eat is an individual choice.
Some people recommend providing a 20% protein feed, which is fine, but an 18% feed is readily available in my very rural area, and I’ve never had a problem with it.
The “medicated” on the label means the feed has a wormer in it to help the chicks fight coccidiosis, which is probably the #1 killer of baby chicks. You can read more about that here.
I believe there’s so much working against my chicks in this world, I want to give them every defense possible, including letting them eat medicated feed.
Young Pullets (12 weeks until they lay)
My young pullets eat a grower feed of 16% – 18% protein mixed with chopped corn. I just take a 50 pound bag of grain and mix with a 50 pound bag of corn.
I do this, honestly, to reduce the expense since my chickens get to run around and hunt bugs to eat, and, since we have 50 or so chickens, the expense of feed adds up quickly.
I feed this mixture to my young roosters I keep to breed and my meat chickens.
Layers
Once they begin to lay, my hens get to eat a higher protein ration in addition to the bugs and goodies they dig up in their tractor.
I’ve fed 16% protein and up to 22% protein. Every flock is different, and my layers respond better to a 22% protein feed.
Since it’s more expensive, I only feed it to my layers (who are isolated to their own run so I can keep a watch on who’s laying).
They also eat an extra calcium supplement, such as oyster shells, to ensure they produce good, hard eggs. Offer this in a separate dish, not mixed with the feed.
I avoid giving them egg shells, but that’s a choice individual to my flock. One of my hens realized she could eat her own eggs to get the shells she loves so much, but egg shells are another great source of calcium.
The only other one who eats this feed is my king rooster, when I want him with the hens so I have fertile eggs.
I don’t personally feed scratch since there’s not enough vitamins in it to justify the expense.
Scratch is a good supplement for your chickens to eat if they free range, but it’s more a source of energy rather than a source of nutrition.
A great way to add some protein and let your chickens “hunt” for food is to offer mealworms, either alive or freeze dried. You can even start a mealworm farm to always have fresh protein for your girls to eat!
Looking to improve the taste of your eggs? Here’s what to feed your chickens for great tasting eggs (my most popular article!)!
How do I feed chickens that are different ages?
If I have to feed chickens of different ages together, I let them eat a starter/grower ration that’s around 18% protein.
If you have layers and chicks together, you’re better off sticking to a grower ration, because the amount of calcium in a layer feed can cause permanent damage to a growing chick’s kidneys.
I recommend making sure there’s enough feed stations, especially if your chickens are housed in a coop and not allowed to free range.
If you have a lot of chickens, it’s possible some won’t be able to get to the feed to eat if there’s not enough stations available (water too!), which can bring up another host of issues.
What are the best chickens for a starter flock?
Layers
You’ll get answers as varied as there are stars in the heavens, but here’s a list of chickens to get you started if you’re looking for layers.
My personal recommendations are:
Barred Rock (great layers and very pretty),
Blue Copper Marans (same reason),
Production Red (excellent, hardy egg layers even in winter),
For meat chickens you can harvest to eat, you can go with a heavy breed chicken (like a Buff Orpington), or you can try Cornish Crosses.
Heavy breeds will be ready at about 15 weeks (give or take) while Cornish Crosses will be ready much sooner, between 6 and 10 weeks.
Cornish Crosses can have a host of health issues, such as sudden heart attacks and leg issues, caused by their rapid growth, but they’re cost effective because they convert feed to muscle so easily.
Heavy breeds take longer to reach harvest weight, but have fewer health issues.
Should I let my chickens free range?
The answer to this question is: it depends.
I tackle that topic in this article about free ranging your chickens, and the short answer is it’s completely up to you and your particular situation.
There’s advantages and disadvantages to allowing free ranging. You can also provide a tractor for your chickens if you want them to free range and eat bugs, worms, etc., but have predators in your area.
Can I keep chickens in the city?
Yes, as long as your city allows it. If there’s restrictions on livestock, I would not recommend keeping chickens because you won’t want to deal with the stress and heartbreak of giving them away if your neighbors complain (and it happens a LOT!).
If you’re able to keep chickens – great! Provide a coop, protection from predators (like hawks), let them eat grain and water, and your chickens should thrive!
You can try boosting their protein with some mealworms. You can feed them live mealworms (gross but chickens LOVE “hunting” them) or freeze dried ones.
How much space do my chickens need in the coop?
Well, the more space the better, but the minimum suggested space is 4 square feet per chicken if your birds will be allowed to free range or go into a run, and 10 square feet if they will be cooped all the time.
If your coop can only be a certain size, you’re better off getting fewer birds. They’ll be happier, and so will you because they’ll lay better.
Chickens that are confined to an area that’s too small start to develop nasty habits like egg eating and pecking at each other. Waste can also build up, giving them respiratory diseases and nutritional deficiencies.
Should I clip my chickens’ wings?
The bottom line answer to this question is no. Unless you want eggs all over the coop floor and dead chickens.
I know people who do clip their chickens’ wings, and one of my hens, Floppy Head, who was a rescue from factory farming, had her wings clipped. It’s not a good life for them.
Even though we made a special nesting box for her, she never wanted to use it, and laid her eggs on the coop floor since she couldn’t get into the nesting box the other hens use.
She also couldn’t roost with her friends, making her a prime target for any hungry predator looking to eat a chicken dinner. She couldn’t fly away in defense, so we had to keep an extra eye on her.
I personally can’t support clipping the wings of chickens since the ability to fly (they can sort of fly) is their only defense against a predator. Wings also help them get to their roost, which as another way they protect themselves against predators.
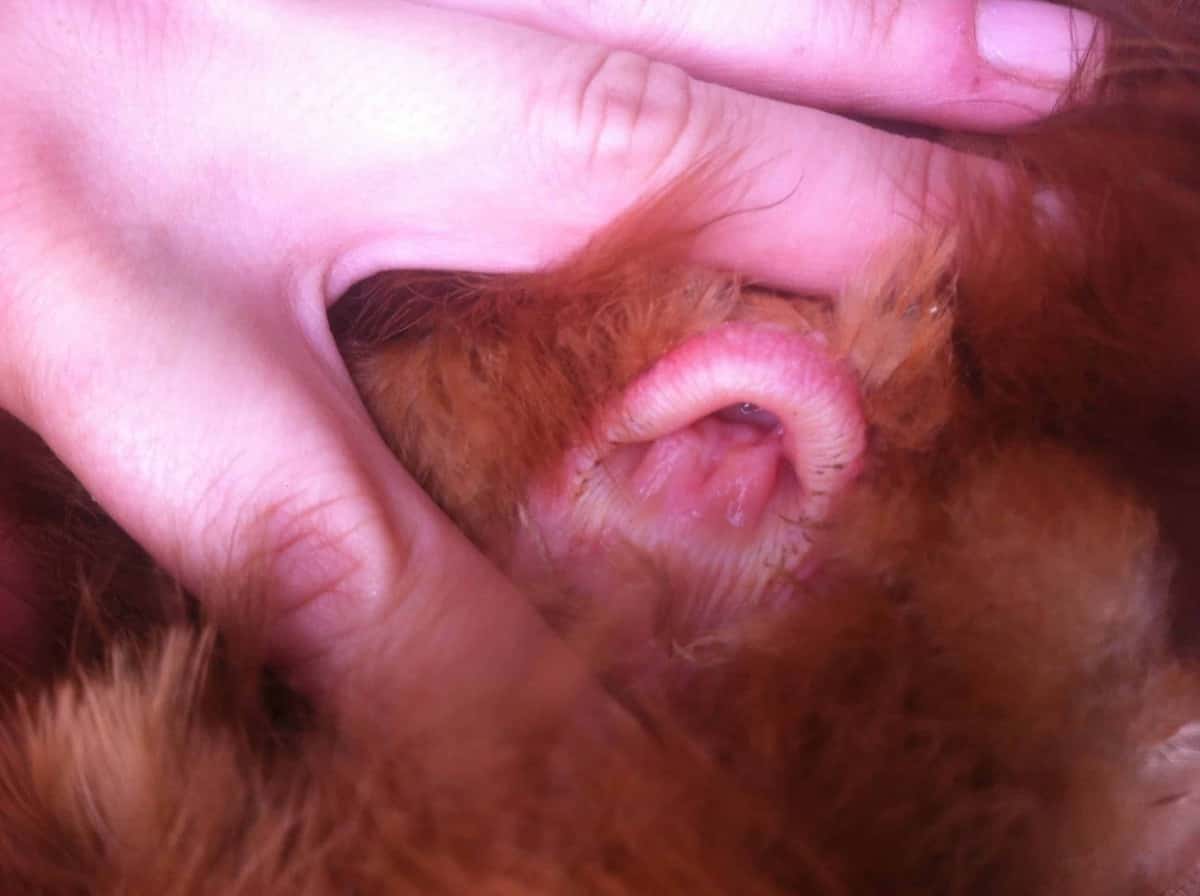
How can I tell if my chicken eggs are fertile?
While this one takes a little practice, once you got it, you got it.
First things first, to have fertile eggs you can incubate, you need a rooster that knows his job. Without a rooster, you won’t have fertile eggs to incubate, and you might as well eat them.
Here’s the thing:
You can’t tell from the outside if a chicken egg is fertile.
You can only tell once you open it up. So check out the eggs you’re planning to eat for breakfast, and if they’re fertile, it’s a pretty good bet the other eggs your chickens lay will be fertile as well.
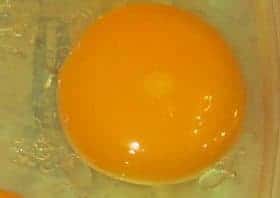
You can tell if your eggs are fertile by looking for the embryo – that’s a small cluster of cells that look like a bullseye. That bullseye means the egg is fertile, and your rooster’s doing his job.
See the bullseye? That means it’s fertile!
Don’t worry, though, the embryo this isn’t actually a chicken until you incubate it, so you can still eat the eggs and feed them to your critters (our ancestors ate them for thousands of years, right?)
If you don’t see the bullseye, then chances are your eggs aren’t fertile, and you should eat them instead of incubating them.
I’d like to hear from you!
Is there a chicken question you have that I didn’t address? Leave a comment below!
For now at least, the sun is owned by everyone and no one, so why not use it’s power to become a little more independent?
Going solar is a worthy homesteading goal, and a simple one to begin.
We aren’t completely off grid yet, but we do hope to go solar soon as we become more involved with our homesteading activities.
Of course, we’ll create our own solar generators, furnaces, ovens, and hot water heaters as much as we can (although we’re okay calling in experts if we have to!)
I’ve scoured the internet, and found some simple solutions to going solar.
Here’s 4 projects you can start today to make homesteading a little more self-sufficient!
You can produce 150 W of electricity, not enough to support electricity-guzzling appliances, but it’s more than enough to power a 60 W light blub for 6 hours or an energy saving light bulb for 25 hours.
In a grid-down situation, you’ll be able to power your laptop for 5 to 8 hours. Not too shabby!
*I’m not an electrician, and I haven’t put together this DIY solar panel together myself. These statements aren’t intended to take the place of a certified electrician. If you attempt this project, you do so at your own risk.
2. Build a Solar Powered Heater Out of Aluminum Cans
Photo from FairCompanies.com
Seriously, I’ve already started collecting aluminum cans for this one since it seems so simple even I can do it.
Last year, the horse barn was FREEZING in the winter, and I’ve vowed that this winter, it will be at least 40 degrees inside.
I’m just not sure I want to do homesteading activities, like milking a goat, in 14 degree weather.
I’m sure you understand.
The nice thing about building your own solar powered heater? You’re reusing something that’s otherwise going to a landfill.
For this project you’ll need:
240 aluminum cans
(3) 2x4x8 studs
4 ft. x 8 ft. x 1/2 in. sheet of plywood
High temperature silicone
4 ft. x 8 ft. sheet of Plexiglas or Lexan
A can of heat-resistant flat black spray paint
Plastic tubing
Drill Press with wide drill bits
Screws
Optional Air Blower (consider a solar-powered unit)
Even though the air blower is optional, I recommend it because from my research, it will heat your space faster and more effectively.
Here’s how to construct it:
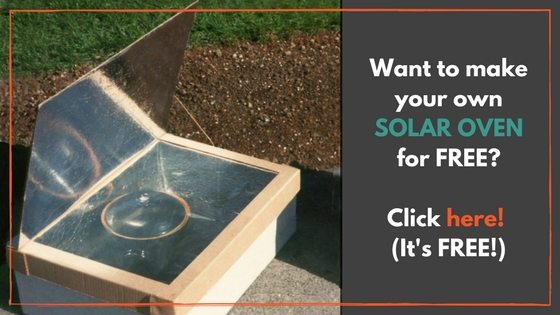
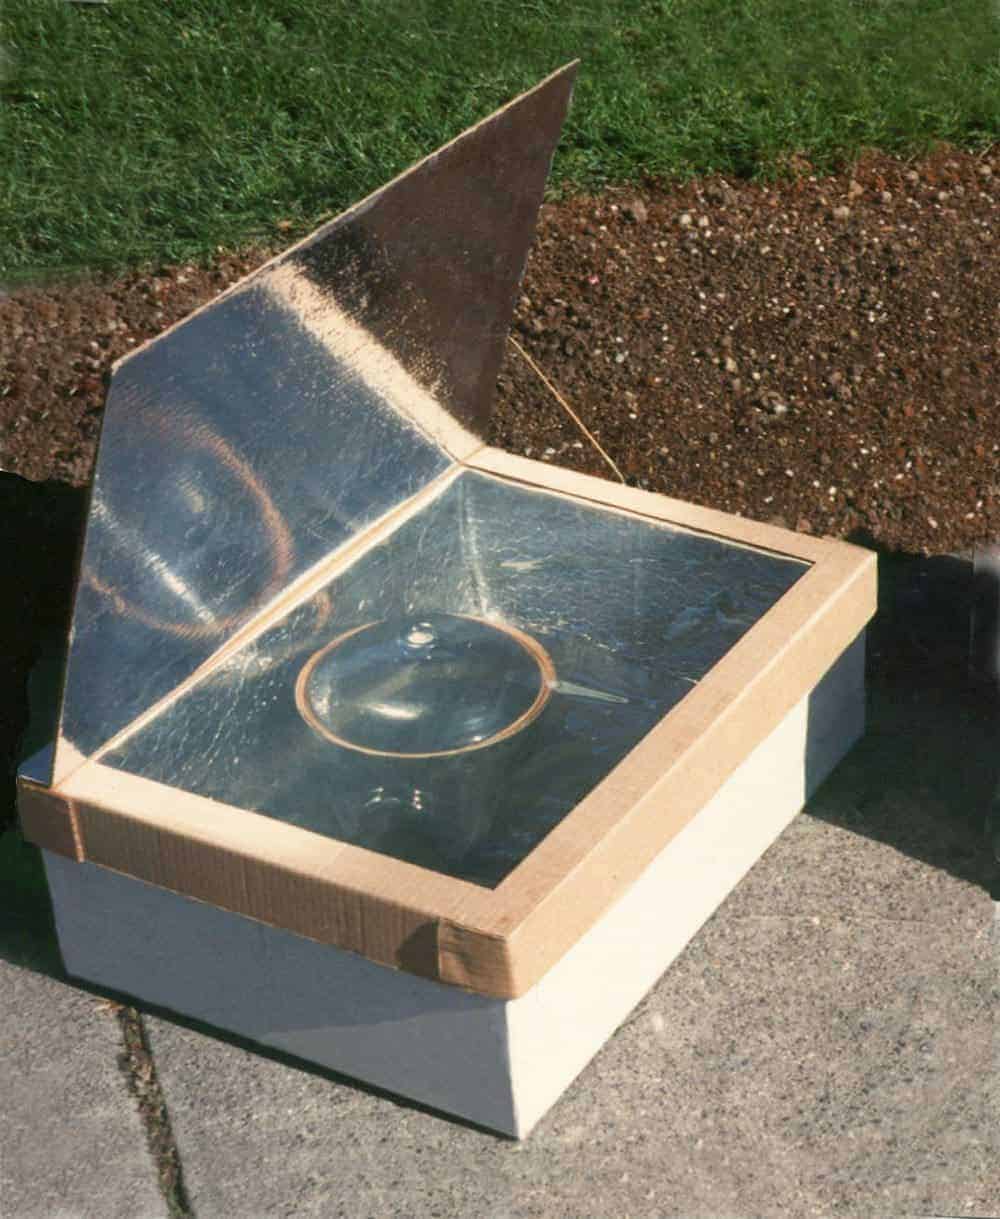
3. DIY Solar Oven
There’s many different ways to build a solar oven, and I’m sure you’ve seen one using a pizza box.
That one is a little too simple to be effective when homesteading, and I’m not sure it will get hot enough to actually cook anything substantial.
Here’s one that will get hot enough so in a grid-down situation, you can still have a hot meal, but that isn’t overly complicated to construct. And you can get everything for this homesteading activity from the dollar store!
Make it this weekend!
For this project you’ll need:
Two cardboard boxes (one at least 15 inch x 15 inch, the other slightly smaller)
Piece of cardboard at least 2 to 3 inches larger than the largest box
Roll of aluminum foil
Flat-black spray paint (you can also use black construction paper if you’re worried about chemicals)
If you just want to buy one (and that’s okay!) here’s a great option:
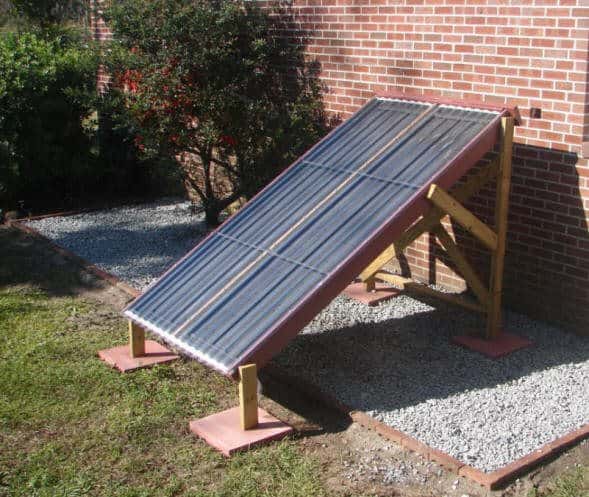
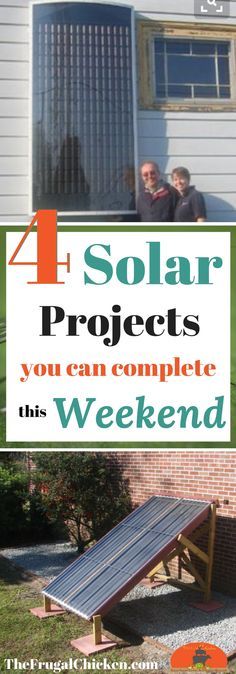
4. DIY Water Heater
Photo from BuildItSolar.com
I love this project because the concept is simple: Water heats up from the sun, and the hot water rises, and becomes available to you. You’ll always have hot water, as long as the sun is out.
Our house is currently heated by propane, but I would love it if we could at least heat our water using solar energy!
Building a solar water heater looks like it might be a little bit of a project, especially if you’re like me and not super handy, but it’s pretty simple.
For this project you’ll need:
Aluminum sheeting
2x4x8 studs
Plywood
Copper tubing
SunTuf polycarbonate (can buy at your local big box store)