Ever have old stuff lying around your home, and you know it can be upcycled into something useful and beautiful, but you’re not sure what? That’s why I’ve invited my friend Adrienne to show you how to make a recycled bicycle planter!
This project is easy and super cute – and would make a great addition to any coop! (and your chickens would love to hop on the bike as a toy!)
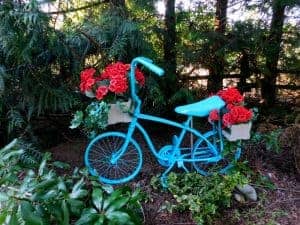
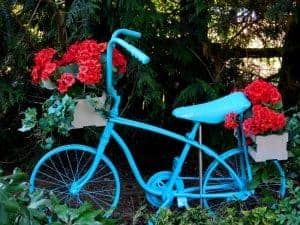
This recycled bicycle planter is made from an old bike that was rescued from the junk pile, and with a little paint and wooden crates filled with summer flowers, an old rusty bike can be recycled bicycle planter that makes a great, colorful addition to your garden!
Recycled Bicycle Garden Planter
Time: 2 days
Cost: $30
Level: Easy
Using recycled objects in the garden has been a trend for many years. Homeowners can decorate their garden areas inexpensively while giving new life to old objects such as glass bottles, old chinaware, and discarded metal items like this old bike.
We have an old metal scrap pile on our property where items have been discarded for many, many years by my husband’s family.
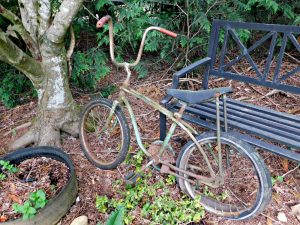
My in laws found this old bike in a dumpster about 30 years ago and my husband used it to learn to ride a bicycle.
After he was finished with it, it sat in the junk pile until I rescued it last week and turned it into a bright, colorful flower planter for my garden.
Supplies for recycled bicycle garden planter
- Old bicycle
- Spray paint and primer
- Two wooden crates
- Twine
- Potted plants
- Metal post ( I used an old curtain rod)
- Hammer
- Scissors
- Knife
Directions for recycled bicycled garden planter
Step one: Clean
Begin by cleaning of the bike the best you can. Since this bike was from the junk pile and had been sitting outdoors for many years there was lots of mud, moss, and pine needles stuck to it.
I used a green scouring pad and dish soap to scrub as much as the gunk off as I could and rinsed it down with the garden hose
Step two: Remove the tires
If the tires on your bike are in decent shape you can leave them on. The tires on my bike were starting to fall off so I decided to completely remove them.
I used a knife and scissors to cut the tires off of the rim. The older the rubber is, the easier it will be to cut through and remove so if your tires are nice you may want to keep them on.

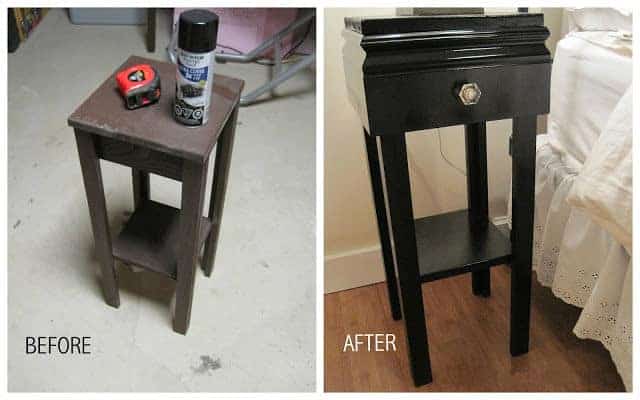
Step three: Prime
After the bike is completely dried, spray paint the bike with white primer. Look for a formulation that will cover rust and is suitable for use on metal. Coat the bike throroughly and let the primer dry.
Tips for spray painting:
- Paint outdoors on a hot day but paint in the shade. Painting in direct sun will cause the wet paint to get to hot and may not cure properly.
- Use the right type of paint for the material you are painting. The paint can should tell you what materials it is safe to use on.
- Spray in a smooth and steady motion going with the grain of the object you are spraying.
- Start by moving your hand before you press the trigger to avoid blotches.
- It’s better to do several thin coats of paint and let the paint completely dry between coats. If you try to do one thick coat the paint may not dry properly.
Step four: Paint
Once the primer is completely dry coat it with two coats of spray paint in the color of your choice, letting It dry between coats.
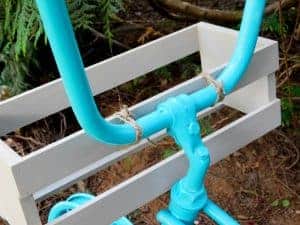
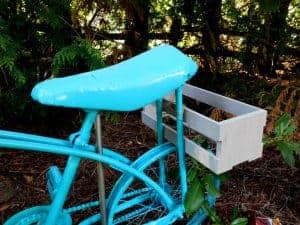
Step five: Attach the crates
After the bike is completely dry it’s time to attach the crates. Use twine or rope to tie the crates to the front and back of the bike.
At the front of the bike I attached the crate to the handle bars and at the back of the crate I placed it onto the tire rim and tied it to the metal.
Step six: Stake it to the ground
Depending on the bike you have chosen, there may be a kickstand and that may be all that is required to keep the bike upright on it’s own. I needed extra reinforcement so I used an old curtain rod and slipped it down through the middle of the bike and into the soil.
Then I used a hammer to drive it into the ground as far as I could. This makes the bike steady.
Remember: When the bike is full of flowers it will be heavier and more prone to tip. You may also want to lean it against a tree or fence.
Step seven: Add potted plants and flowers
Purchase some potted plants of your liking and insert them into the crates. For the most visually appealing look use flowers that are in a contrasting color to the bike.
Take a look at the color wheel and choose a color that is opposite of the bike color you chose. for instance I used orange-red flowers with a blue bike.
Remember to water your flowers several times per week, or as the soil gets dry. Keep your plants healthy and happy, and your bike planter will have your garden looking great for years to come.
Adrienne is a DIY blogger and jewelry artist located in Washington State. She teaches people on a budget the skills they need to complete creative projects around the home and garden. You can find her online at Crafty Little Gnome teaching readers projects like how to cut a glass bottle and make homemade bleach.


Great idea! Thank you for sharing. I am always looking for new ideas for the chickens.