Most people who get backyard chickens want friendly and cuddly pets: good lap chickens, if you will. A question I get a lot is “How do I raise people friendly chickens?”
If you’re going to have chickens running around in your home, it’s important for them to be sociable and friendly.
It’s far more enjoyable to enjoy that time with your chickens than to stress and worry about anti-social behavior. Fortunately, training your chickens to be people friendly is really simple.
In this article, I’m going to give you my best tips so you can enjoy your time with your pets!
Breeds
Raising people friendly chickens does depend a little bit on the breed. For example, we have frizzles that are super friendly, and love being around people. (You can read more about frizzles here).
We also have some barnyard mixes that aren’t super good with humans.
If you want people friendly chickens, I usually tell people to start with getting a people-friendly breed.
Most chicken breeds are people-friendly, but the super people-friendly are:
Bantams(especially Cochin Bantams and Mille Fleurs)
Our cochin bantams love humans. Keep in mind that there are different breeds of frizzles, but typically if someone’s breeding a frizzle, they’re breeding a pet breed. This is a good indicator that you’re getting a people-friendly chicken.
This is just a short list for people who don’t know what breeds to look for. Other suggestions can be found in this article about chicken breeds.
Handling
The simplest way to train your chicks to be people friendly is to spend a lot of time with them, to handle them regularly and gently, and to give lots and lots of treats. If you bring them yummy food, they will automatically come to you because they want the goodies, right?
Spending a lot of time with them and treating them like pets is the way to make them people friendly. That means not just tossing them out in a coop and maybe spending a little time with them every so often, but rather regularly interacting with them, making them feel special.
Think about how you might make a dog feel special. You’ll tell it it’s a good dog, you give him treats, and you’ll spend time playing with it. It’s the exact same thing with your chickens.
When I’m spending time with my chicks, I give them a lot of treats. But mostly, I’m letting them hang out with me. I think that that’s one reason why my frizzles are so friendly.
When they were little, it was March, and it was still a little too cold for them to go outside. So I let them sit on my lap when I was working. I let them hang out with me while I was doing other things in the house.
I just generally just spent time with them, and all of that in accumulation made them very people-friendly. You can see pictures of them on my Instagram account.
But I really do think it starts when they’re little and you spend a lot of time with them and you handle them regularly.
Hazards – Children
Don’t let your kids handle them if your kids are little, or if they tend to be rougher kids. Most commonly, these kids don’t know how to actually treat chickens and grab them the wrong way or rub them too roughly.
Some kids, like my own, are special-needs and lack impulse control, and can accidentally hurt your chicks. You want to avoid uncomfortable experiences for your chicks with regards to people.
So maybe if your kids are younger, are special needs kids, or if they are rougher, you could give them heavily-supervised time with your birds.
Basically, raising people-friendly chickens boils down to treating your chicks with respect, spending time with them, making them feel special, giving them lots of treats (they really like this!), and treating them as a member of the family.
I hope you’ve enjoyed this article. If you have questions about raising backyard chickens, suggestions or comments, go ahead and leave a comment below.
With these tips, you can ferment chick starter feed safely!
Chickens need feed. That is an unavoidable fact. With the right feed, chickens will grow up big and healthy, and then your darling feathery friends will give you all the love that they have.
While all feed is good, there are easy adjustments that you can make to improve the quality of the feed, which will, in turn, improve the quality of life for your chickens!
In this article, I’ll answer the simple question: “Is fermented feed good for baby chicks?” We’ll also talk about how you can ferment chick starter easily at your own home!
Is Fermented Feed Good For Baby Chicks?
In short, yes, fermented feed is good for baby chicks.
When it is done correctly, it has a lot of beneficial bacteria in it that, like apple cider vinegar, can help your chicks develop really good gut flora and avoid pasty butt.
Fermenting Chick Feed
Fermenting your chick starter is a little bit different from fermenting alcohol for beer, right? The goal is quite different.
To ferment chick starter, the basic idea is to submerge your chick starter under water for up to 72 hours. During this time, it’ll develop the beneficial bacteria you’re looking for.
If you’re not sure how these beneficial bacteria develop, it’s simple. They’re everywhere naturally – in the air, in nature, and on food.
Yep, they’re right there on your chick starter! So don’t worry – you already have everything you need to get started.
You don’t necessarily need to add any starters to your chicken feed in order to kickstart the fermenting process.
However, if you do want to add beneficial bacteria to your ferment, some good options are to use something like whey or apple cider vinegar. You can just splash about a tablespoon into the ferment.
How Long To Ferment Chick Starter
If you are planning on fermenting your chick feed, all you need to do is just make sure that the chick starter stays submerged and underwater for a 72-hour period.
I personally don’t ferment chicken feed longer than that. It’s not really necessary, and after 72 hours, it starts to get a little trickier to make sure that it’s actually is full of beneficial bacteria and not harmful bacteria.
There are some people out there who will ferment chick starter for longer than that, and that’s fine. My personal threshold for fermenting chicken feed is 72 hours, however.
Avoid Floating Feed
Now one question that you might have is, “Since chick starter is basically a crumble or a mash, what’s to stop it from floating up in my water?”
The answer is that you can use a weight. Sometimes when we ferment vegetables, we’ll use a glass weight – which often comes with a lot of fermenting kits.
For fermenting chick starter, you can easily replicate this process.
Follow these steps:
Put your chick starter in the water – we use five-gallon buckets or two and a half gallon buckets, which you can get at any sort of big box store.
Put the feed in that.
Pour water until there’s about a 1 inch space between the water and the top of the bucket.
Put a plastic bag over the top of the water, and then put a plate on top of the water. That effectively acts as a weight and creates a vacuum where the chick starter can’t really float up above the water line.
It is really, really important to make sure that your chick starter doesn’t go above the waterline.
The reason is because the beneficial bacteria that we want for our chicks only grow in anaerobic environments, which occur under water.
If the chick starter is above the water at any point, there’s a chance that it will develop bad bacteria that rots food or that causes mold or other issues. So it’s important just to make sure that you’re keeping your chick starter feed below the water line. (You can click here for a detailed article about fermenting chicken feed)
What If The Feed Texture Changes?
Something to keep in mind with fermented chick starter is that the texture will change as the fermentation process goes on. The harder bits of food will break down and the food will be more of a liquid or more of an oatmeal type consistency.
Day old chicks don’t really mind that, but older chickens might, if you try to transition to the fermented feed from a pellet. They often don’t like the texture, and don’t know how to eat it.
They’re used to the harder pellets or a more solid feed. If you want to give your flock fermented chicken feed throughout their entire lives, it’s better to start as day-olds and baby chicks.
It is also important to remember that this is a wet food, so it is more likely to get stuck to your chicks’ down. When it gets stuck to their down, it makes them colder and dirty, and it makes it harder for them to maintain the correct temperature for their body.
If you’re going to feed the fermented feed, I would go with a long chick feeder or mason jar chicken feeders. I stick to these kinds of feeders just to make sure my birds are cleaner.
What If My Chickens Won’t Eat It?
If your chicks object to the texture, or if you’re not too sure about the texture yourself, you can mix dry chick starter with the fermented chick starter. Your chicks will still get the same benefit, but the texture is a little bit more welcoming.
You can do this with older chickens as well – mix their pelleted feed or mash with the fermented feed in a 1:1 ratio.
So, what do you think? Is fermenting chicken feed a good idea for your flock? Leave a comment below!
Should you let your baby chicks play on dirt?
There’s lots of advice out there, and it’s a little controversial, so it tends to be a question that a lot of beginners have. I’m not really sure why, but people get very up in arms in my Facebook group about whether or not baby chicks should be allowed to go outside on dirt.
There are people who just adamantly believe that baby chicks should not go outside until they’re grown.
I don’t personally agree with that opinion. I think it’s perfectly fine, natural, and necessary to let your chicks go out on dirt.
Dirt Encourages Natural Behaviors
Letting chicks out on dirt encourages natural behavior. Chickens naturally want to forage and scratch, and letting them out on dirt lets them do that.
In dirt, they’ll find bugs, seeds, leaves to eat, and grasses. It lets them indulge in their natural behavior and discover food – and they might even get nutrients that they need.
Maybe they’re missing a nutrient. For example, we have a layer who – hand to God – no matter what we do, lays very brittle eggshells.
We give her all the supplements we can, and it’s the only chicken we’ve ever had that has this issue. I’ve just concluded that this hen has some digestive issue and she just can’t absorb calcium efficiently.
These things can happen, and letting your chickens forage might help them fill those gaps that we otherwise might not know about.
Dirt Baths
The other thing that you’ll see chicks do outside is taking dirt baths. This is a natural behavior and very necessary – whether they have down OR feathers.
It’s also a social behavior. Chickens bond in groups, and when they’re taking dirt paths, they figure out their pecking order.
They’re also throwing dirt on themselves, which helps eliminate external parasites like mites, lice, and even other pests, like ants.
Preventing your baby chicks from taking dirt baths is actually harming them both physically and mentally, in my opinion.
Resistance to Environmental Threats
The other thing about dirt is it helps your chicks build up a resistance to internal parasites. If you feed your chicks medicated chick starter, the drug amprolium helps them build up a resistance to parasites.
In order for that medication to work, your chicks need to be on dirt because they need to be exposed to the parasites.
Not exposing them to the parasite doesn’t help them build up the resistance. Then when they go outside as adults, it could backfire.
So that’s why I personally put mine out on dirt: they can forge and indulge in a natural behavior. They can help keep themselves clean. They can look for food. They can have fun.
Cautions
To let your chicks out on dirt safely, make sure the temperature outside is over 75 degrees F (23.89 C). Just remember it’s going to be too hot to put them on straight dirt. Typically, what I do is put them on grass. There, they can peck at the grass, scratch for bugs, and do all the things that we described above.
Make sure they’re in an enclosed area where other chickens and predators can’t get to them. It’s really important to make sure they can’t get out of the enclosure. We talked in this video about dog crates and doggie playpens.
They’re great and easy to use, but you need to make sure that the gaps between the bars aren’t wide enough that your chicks can get through. From when they’re day-olds until they are probably about four weeks, it’s important to put them in something that has hardware cloth on it so that they can’t get out.
Something else you’ll want to do is give your chicks shade. Even though as day-olds, they need a higher temperature, the sun gets hot and you just don’t want your chicks to get too hot, too.
It’s hard to really monitor that consistently. You can put a thermometer in their brooder area, which works inside. But outside it’s hard to factor in things like warmth refraction, so I always give them shade and I always keep a good eye on them just to make sure.
You’ll also want to put them out with food and water. You can’t guarantee that they’re going to find edible food in the brooder area.
So, should you let your chicks play on dirt? Why not – just make sure you do it safely!
For this review, we were sent a ChickenGuard Automatic Chicken Coop Door Opener with Self Locking Door Kit to test. All opinions expressed are our honest review of this product.
In this article, we’ll cover our review of the self-locking door kit and standard automatic door opener.
In a subsequent review, we’ll show how we installed the standard automated door opener on a door we built ourselves.
Below are our first impressions, testing results and overall recommendations! Read on to find out about our experience.
(You can read about all the products we’ve reviewed right here).
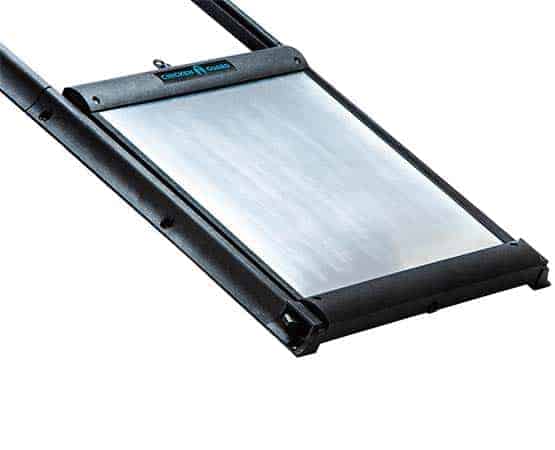
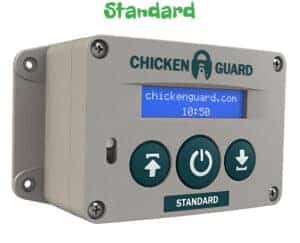
Manufacturer’s image of door kitManufacturer’s image of standard door opener with LCD screen
What it is
The Chicken Guard Self-Locking Door Kit is an aluminum door with runners intended to be used with a standard automatic door opener. The door is 10 inches by 12 inches with 23.5 inch runners, and the door raises and lowers itself on the runners.
The standard door opener is a motorized device that can be programmed to open and close the door so your chickens can access their run at the designated time and be locked securely in their coop at night.
To program times into the Chicken Guard door opener, you use an LCD screen with buttons.
Unlike other automatic chicken coop doors we’ve tested, Chicken Guard door opener runs on 4 AA batteries. It also has an option to run via a USB cable and charger.
Both the self-locking door kit and the automatic door opener prevent predators from getting into your chicken coop and attacking your chickens.
The Chicken Guard Self-Locking Door Kit currently retails on Amazon for $294.99
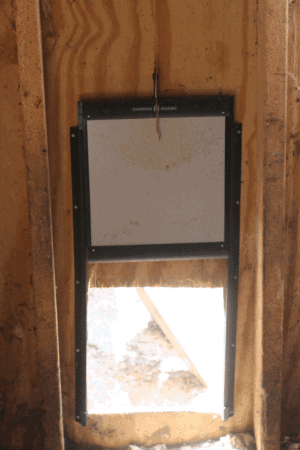
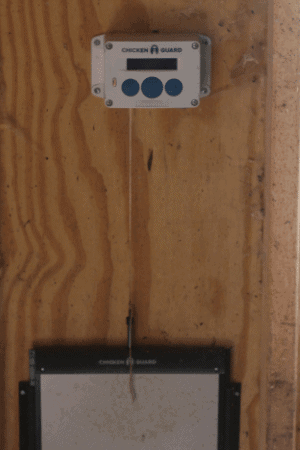
The Chicken Guard coop door in action. We will have to frame the doorway.
Where to buy the ChickenGuard Automatic Chicken Coop Door Opener with Self Locking Door Kit
The Chicken Guard Self-Locking Door Kit can be purchased on Amazon right here. It’s gotten several 5 star reviews.
What the company claims
Convenient opening and closing of chicken coop doors
Long battery life
Save you from getting up in the morning and protect your chickens from predators.
Can be open automatically or manually.
Simple to setup with no complicated wiring or cabling.
Our experience
We were excited to test the ChickenGuard Automatic Chicken Coop Door Opener with Self Locking Door Kit!
We live in the South, and I always worry over summer whether the chickens are too hot. With this automatic coop door, we could let them out at 5 am instead of after we wake up.
When we received the ChickenGuard Automatic Chicken Coop Door Opener with Self Locking Door Kit, we first unpacked the full kit, which came with directions. All the parts were included, and the directions were easy to follow. When we set out to install the door, we felt confident.
We first had to select a spot in the chicken coop for a new door. We have a side run in addition to the main run, but it can’t be accessed easily by our flock.
So we decided to install the ChickenGuard Automatic Chicken Coop Door Opener with Self Locking Door Kit so the flock could use it in the early morning hours before we get up.
The door is made of aluminum with plastic runners, and seemed sturdy. Installing the runners was easy, and the kit comes with the hardware you’ll need. We didn’t forget to bring our electric screwdriver!
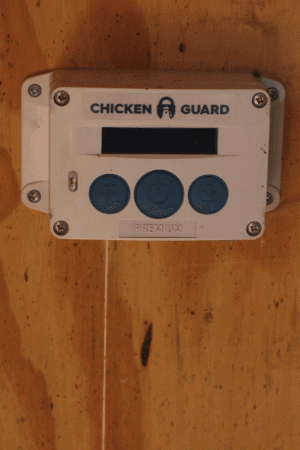
The programmable opener with LCD screen and buttons
After installing the door, we then added the opener to the wall, and attached it to the door itself. The door lifts up via a string attached to the door opener, which raises and lowers the string at the pre-designated times. While it seems simple, it’s very effective.
To program it, we followed the directions in the manual (it’s very simple), and in the span of 10 minutes, our new automatic coop door was installed!
Because we installed it in the middle of the day, we left the door open, but programmed it to shut at 8 PM. Because it was summer when we performed our test, there was still enough light and no predators around. However, if it were winter, we would have programmed it to close earlier in the day.
The door closed at the designated time, but none of the chickens used it (they’re trained to go through a different door) since they hadn’t yet realized there was a new entry portal into their coop.
The door was silent, but operated as promised.
The following day, I noticed my chickens were all out when I woke up. We had programmed the ChickenGuard Automatic Chicken Coop Door Opener with Self Locking Door Kit to open at 5 AM.
The door and automatic opener worked!
My chickens and ducks were happy – they could wander around during the cooler hours of early morning, and didn’t have to wait for me to wake up.
By the following evening, the chickens and particularly the ducks understood they could go back into the coop at sundown via the automatic door. The ducks appreciated the door was at their height.
Note that since our coop is a large walk-in, we installed our kit on the inside. If your coop is smaller, you will need to install the programmable door opener on the outside of your coop. We did not test the weather-proofing of the door opener.
Does Chicken Guard’s Automated Chicken Coop Door Opener live up to its claims?
Yes! This door and the opener are convenient, operate as stated, and lets our flock out at the proper time. The chickens quickly learned how to use it, and appreciate getting out of their coop earlier in the morning. It fully locks at night, and we don’t need to worry about predators getting into the coop.
What don’t we like
The only qualm we have with the ChickenGuard Automatic Chicken Coop Door Opener with Self Locking Door Kit is that the opening (not the door itself, but the opening in the wall of your coop) will need to be framed.
Although the door locks tight and predators cannot get in, we can still see daylight between the door kit and the wall of the coop. Framing the opening with 1×2 boards and brad nails will prevent this.
Is it useful for chicken owners?
Yes! We recommend the ChickenGuard Automatic Chicken Coop Door Opener with Self Locking Door Kit for flocks of all sizes with chickens at least 8 weeks of age (younger chickens that don’t yet roost or who do not have older chickens who will return to the coop at sundown should still be herded into the coop to ensure they’re locked safely away).
The best part is that it automates opening and closing the coop. If you want to go away for a weekend, you won’t need to worry about your flock being safe at night. If you live in a very hot area, your flock will have the freedom to leave the coop early in the morning, and you can sleep in.
Flock size doesn’t matter with this product – we tested it with our very large flock of both chickens and ducks (and the goat), and they all understand how it works.
What to watch out for
Resetting the ChickenGuard Automatic Chicken Coop Door Opener for winter hours
You will want the coop to close at sundown, so you will need to reprogram it based on the season. It’s best to not close the door in the dark, since predators like skunks, rats, raccoons, and opossums start their prowling just after sundown.
Keep a regular door in case of stragglers
We have lots of stragglers (especially ducks) who like to wander around at sundown. You’ll still want a regular door, or you’ll have to install the ChickenGuard Automatic Chicken Coop Door Opener with Self Locking Door Kit on the outside of your coop so you can manually raise the door for stragglers.
When you install the automatic door opener, make sure it and the string are directly above the door
It’s important you install the opener directly above the door for maximum use and longer battery life.
This is just a tip – you can learn from our user error.
We initially installed the door opener so it wasn’t perpendicular to the ground and directly above where it attaches to the door. In other words, the string had a slight bend to it, because the door opener was 1 inch too far to the left.
Because of this, we noticed that the door didn’t raise as quickly, and it likely would run the batteries down faster. So to stop wear and tear on the motor and preserve battery power, we had to adjust its location.
Keep in mind the season and weather
Remember that the ChickenGuard Automatic Chicken Coop Door Opener with Self Locking Door Kit will open regardless of weather, so if you want chickens to stay inside for any reason (freezing rain, for example), you will have to manually turn off the door the night prior.
Summary
The ChickenGuard Automatic Chicken Coop Door Opener with Self Locking Door Kit is a wonderful addition to any coop, and well worth the investment if you want peace of mind. It lives up to its promises, is easy to install, and the chickens appreciate being let out of the coop earlier in the day!