Creating a welcoming entry up to your house can be tricky. If you don’t have the perfect walkway up or your home is built at a weird angle it can seem like you have no options.
In this post, I’m going to share how to build outdoor wall decor to help give your home a welcoming feel.
If you are new to DIY or don’t think that you can create decor that looks like it comes out of the Pottery Barn catalog I’m here to tell you that it’s completely possible and it doesn’t have half of the price tag that you see in that catalog.
This project uses supplies that you can find anywhere and the tools that I used you probably already have at home.
You probably don’t know me since I’m new here. My name is Jenn and I am completely obsessed with DIY.
I look at things at the store and think about how I can make it better. Recently it was time for me to update my front “porch” area.
I quote the word porch because it’s really a long shot for me to call it that. My home is in an L shape with 2 big windows up front so I find it quite challenging to create a welcoming entrance.
Since I finally figured out how to add some decor to my front windows, (you can check that out here) I wanted a welcome sign to display.
I started with kind of a blank slate. With just open space with the house numbers, I would usually add some flowers to a hanging vase and call it a day.
But I just build this stair planter that added some much-needed color to my front area. It was time for a little bit more.
I started scouring the internet, Home Goods, and my neighbor’s front porches trying to get some inspiration for a welcome sign (in a non-stalker way).
I had seen a lot of welcome signs that was vertical that laid against the wall but I wanted something to hang so I decided to create something horizontal with a rustic farmhouse feel.
If you’d like the complete shopping list and dimensions you can get that by clicking the button below.
The supplies you’ll need are:
- 2 cedar planks 5.5”x5’
- W, E, L, C, M, E letters
- Boxwood greenery
- Wood glue
- 3 straight brackets
- Wood stain
- Top coat
- Saw
- Drill
- ½” drill bit
- ¼” Rope
- Sander
- Hot glue gun
- Hot glue
- Drop cloth
- Craft paint
- Paintbrushes
- Finishing nails
- Hammer
- Ear and eye protection
- Mask
I started off with the cedar planks. I love working with them because they’re cheap and you have an instant rustic feel. The ones I use are fencing planks and they’re about $2 each.
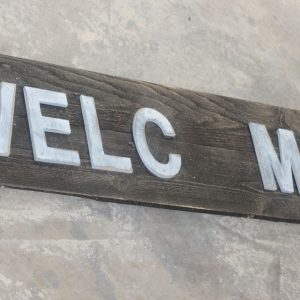
Now I needed to cut the wood down to size. I laid the letters out on the wood. I wanted about 3 inches on each end. I cut the boards to size and started securing the 2 boards together.
Since the letters that I’m using are about the same size as the wood I needed to make the wood bigger so I glued the pieces together and then secured them with brackets on the back to really make sure they’re held together.
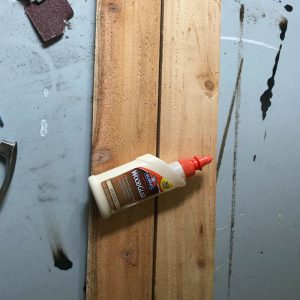
Just add a bead of wood glue to the top of one of the boards and then place the other on top. Lay the wood down and screw in the brackets.
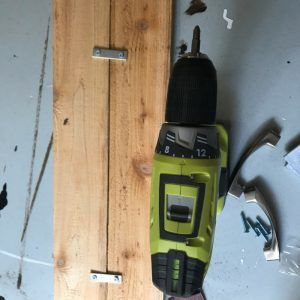
I allowed the wood to dry for about 30 minutes.
Once the glue had a chance to dry, it was time to stain. I wanted a dramatic look so I used the espresso stain color. I like to let the stain dry overnight.

While the stain is drying it’s time to prepare the letters. I purchased these letters from Michael’s they’re the 5.5″ MDF letters. They’re about $1.50 each.
To give the aged look I was going for I painted the letters with a dark blue color, allowed that to dry for about an hour and then went over the letters again with white. I then allowed the letters to dry overnight.
I used the same technique before in another sign I built here.
Now that the wood and letters are dry it’s time for the fun part, assembly.
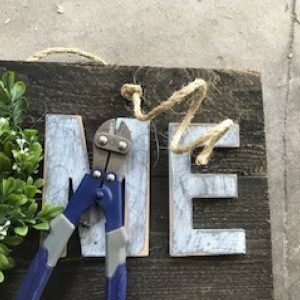
Start off by placing the letters where you want them on the boards giving a 1-inch gap between each letter. Make sure you leave enough room to add your O. I left a 6-inch gap in that space.
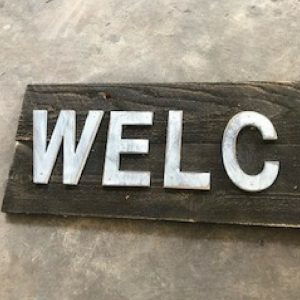
Once you’re happy with the placement of the letters add some wood glue to the back of your letters and then secure them with some 1-inch finishing nails. I nailed 2 nails into each letter.
Then I wanted to give the sign an even more aged looks so I took my sander to the board and letters. Be careful with this step because you can take a lot off quick.
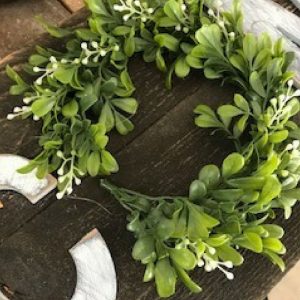
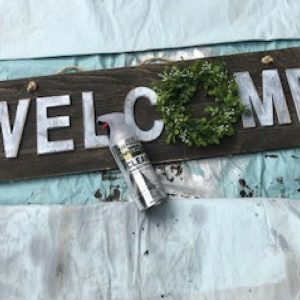
Once you get your desired look it’s time to plug in your hot glue gun to start building your O.
I purchased 2 boxwood greenery pic’s from Michaels for $1.50 each. This gave me enough greenery to use to make a nice full O.
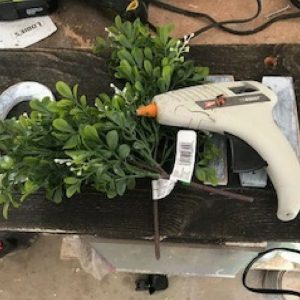
I took the pic apart and used 2 stems at a time. I would add a little hot glue to the board and then place the greenery.
I’d hold it there for a few seconds and then add a little more hot glue. I continued this process until the O was complete.

Now it’s time to drill 2 holes so you can hang your sign. I drilled the 2 holes with a ½” drill bit. Then I added the ¼” rope.
I cut the piece about 6 inches longer than I wanted it so I could have enough space to tie the knots.
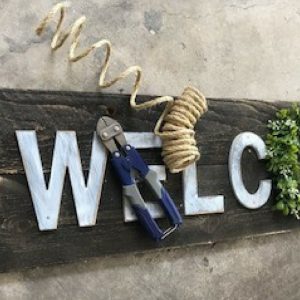
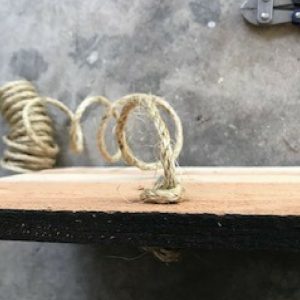
For extra security, I tied 2 knots. One on the front of the sign and on the back of the sign. I did that on both sides so I knew it wasn’t going anywhere.
I finished off by applying a coat of top coat to the sign. Since I was using MDF letters and hot glue I didn’t want the weather to destroy my sign so I thought this step was necessary for longevity.
I allow the sign to dry for about an hour and then hung it up.
What do you think?

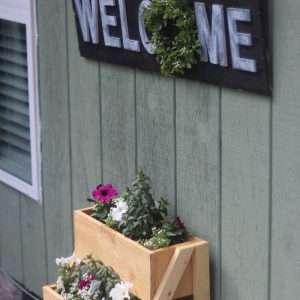
All in all, I was really happy with how this turned out. If you are new to DIY and are wanting to get your “hands dirty” then I think this is a perfect project to start.
You don’t need to buy a ton of weird tools or supplies. Everything you need you will find at any big box store (or even Amazon).
Since I owned most of the supplies this project cost me under $20 to make.
If you’d like to make this yourself, I created a checklist you can follow that includes the shopping list, cut list, exact dimensions, and the steps to take to make this sign yourself.

I want to thank you so much for hanging out with me, I hope you enjoyed this project as much as I did.
About Jenn: Jenn is a mother of 2 daughters and a wife of a very patient man. She loves to build furniture, create home decor, and develop creative ways to organize different areas of her house. When she isn’t crafting up her newest blog post at Home by Jenn she is enjoying the outdoors with her family and training for the next marathon. You can learn more about her at HomebyJenn.com.