Let’s be real, warming yourself up during the winter is a lot easier than finding ways to stay cool in summer without power.  

In the cold months, you can just wrap yourself up in a blanket, add an extra layer of clothing, or drink a cup of hot chocolate and you’re good. On hot summer nights, it gets a little bit more difficult to keep yourself cool.

It’s easy to turn on the AC, but there are times when air conditioning is simply not available. That’s where these ideas to stay cool in summer without power step in!

There ARE other options to actually stay cool without power.  There is a thin line between being a comfortable temperature and having a totally sleepless night because your room feels like a sauna.

These tips might just do the trick!  Yes, it is possible! 

Here’s 10 ridiculously easy ways to stay cool in summer without power!

LOSE THE CLOTHES

Well, not all but some. Before trying anything else, lose the layers and get thin, soft cotton tees and shorts.

Losing the jammies is an unconventional way of surviving through a hot summer night, but I’ll leave that up to your personal preference.

USE INSULATORS

Heat-blocking curtains are great to have in the house during summer.  Foam insulators are also amazing! They work not only in summer, but also in winter when you need to keep your house warm.

They create a barrier that traps cool air while keeping the heat outside. The materials are pretty affordable and installation is easy.

SAVE ENERGY

Turning the lights off during the day and at night doesn’t just save energy, but it also helps you survive those dreaded hot summer nights. You can also stay cool without air conditioning by opening the windows.

CARRY A SPRAY BOTTLE

During the summer, spray bottles come in handy. Fill a small one with water and carry it with you everywhere. Water evaporates easily in warm temperature so spray yourself with mist every now and then to help cool off.

DRINK!

Increasing your fluid intake during terribly hot days helps you to avoid dehydration. Drinking a lot of water also helps your body to regulate your temperature which keeps you cool throughout the day.

It also prevents heat stroke if you are properly hydrated, so make sure you always have a bottle of water with you!

GO GREEN AND PLANT TREES

You know that trees can give you some shade to help you cool off during the summer, but did you know it’s easy to plant trees that will also FEED you?  If you have space in your backyard, plant some dwarf fruit trees!

While this option might take awhile (i.e. years) eventually this will help you stay cool in summer without power for the many years to come.

gardening gifts for fathers day

GO SOLAR

Going solar is probably the most energy-efficient way to keep from sweating this summer.  You can keep cool without power, but you can still turn on the AC, a fan, or any other appliance through solar power.

Check out this article about pros and cons of solar air conditioning, and if you’re curious about how to make your own solar panels, check out our tutorial here!
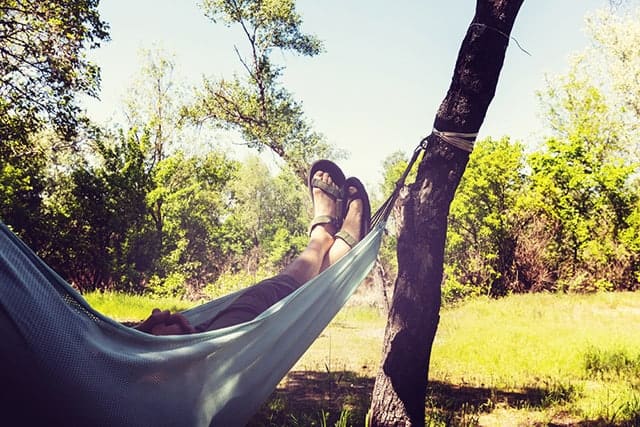
ENJOY THE OUTDOORS

Summer is the time to enjoy the outdoors. Get your hammock from out of the garage and enjoy the cool breeze in the afternoon.

When you’re inside, you can also take advantage of the wind by trying to sleep in a cross breeze in between two open windows.

GET TECHY

If all else fails, take advantage of technology and make use of battery-operated fans to relieve the heat. They are not 100% environmentally friendly, but they have a smaller impact on the environment than running the AC all day.

They may be a costly investment, especially with the rechargeable batteries, but a fan can be your lifesaver in the scorching heat.

REMEMBER THESE DON’Ts

If there are things to do to beat the heat, there are also things you CAN’T DO. Make a note of these DON’Ts this summer:

  • Don’t cook inside the house or in your camper. The heat from the stove will be absorbed and will take until nightfall to cool down.
  • Don’t eat during the hottest hours of the day. Eating burns energy which will make you sweat more.
  • Don’t move around as much in the heat to avoid burning energy. If it helps, organize your work schedule and find ways to keep your activities to a minimum during the heat of the day.
  • Don’t sleep upstairs. Warm air rises and cold air sinks. I’m sure you’ve all experienced this if your house is a 2-story.

It’s not just about beating the summer heat with less carbon footprint.

This is also a survival guide to prevent heat stroke in times of a widespread disaster when power blacks out. Or simply, use these tips to adapt to changing temperatures without relying too much on electricity and help save the environment.

Do you have tips on how to stay cool in summer without power? Share it with us! Let’s help send some blissful Zzzs into everyone’s night.

Father’s Day is coming up, and so I’ve started looking for gifts for the hubby. And there is absolutely nothing I love more than gardening themed gifts!

I wrote a post about gardening themed gifts for Mother’s Day and I thought it would be fun to write another one for all of the dads out there. So here are my favorite gardening themed Father’s Day gifts!

  1. Garden Tool Organizer

I love any DIY project, especially if it is gardening related! This DIY project is super easy and it could be pretty much free if you have any extra pallet wood laying around.

I love using pallets, so this project is exactly what I want to make for this Father’s Day. All you need are a couple of spare boards that you can nail together and some hooks to hang those spare garden tools on. Plus, you’re giving your husband a gift and helping him to be more organized at the same time. That’s a win-win situation, right there.

  1. Gardening Tool Belt

Ok, so I’ll admit the first time I saw this DIY gardening tool belt I thought of a fanny pack. But, there’s nothing cooler than a gardening themed fanny pack, am I right?

Seriously though, I love this tool belt because it is so handy to be able to have somewhere to put all of the tools you could possibly need for a day spent gardening. All you need for this project is a small amount of fabric and an old belt. Get more detailed instructions here

  1. A hammock

Ok so even the best gardener needs to take a break every once in awhile. So I love the idea of giving dad a hammock that he can use to take an amazing midday nap! I love these hammocks because they can be easily stored and cleaned!

  1. DIY Camping Stool

I love this DIY camping stool idea! I love the classic, old-fashioned camping stools because they are so useful! You can use them for sitting around the campfire or somewhere to sit while you are weeding! I love this project because it’s simple and inexpensive!

Or if you aren’t into making things yourself check out these awesome camping stools on Amazon!

  1. Gardening Gift Baskets

So I love gardening gift baskets! They are so fun! This basket is made out of a gardening hose which is great! Here’s a tutorial on how to make a basket out of a gardening hose. You can make the basket and then fill it with seed packets, gardening tools, or gardening gloves! This is a quick and easy DIY gift that any dad will love!

  1. Rock garden markers

I love these cute DIY rock garden markers! All you need to do is to head out to the garden and find some rocks and pull out your craft paint and you’re good to go!

  1. Free Printable Planting Calendar

Do you have a stubborn husband or dad who doesn’t want you to buy them a gift? I definitely do. That’s why I love this printable planting calendar! This would be a quick (and free) gift for dad to help him keep track of when he needs to plant seeds! It’s useful and won’t break the bank.

  1. DIY Vertical Herb Garden

So I love the gorgeous “herb gardens” you see at the store and online, but I am definitely not willing to fork out several hundred dollars to buy one. So I love that this project is DIY!

Ok so this project is a little bit more time intensive (and by a little bit I really mean A LOT) But I love that this project creates a beautiful (albeit large) herb garden that is well designed! This would be an awesome Father’s Day gift! Check out the full tutorial here

  1. DIY Herb Planter

So I love herbs if you can’t tell. This tutorial is a simpler, less time consuming project for those of you who aren’t willing to put hours of work into a Father’s Day gift (I’m not judging I probably won’t spend that long either). All you need for this project is 5 different pots or containers that you stack on top of eachother. Check out the tutorial here

  1. DIY Gardening Glove Rack

This gardening glove rack is a simple DIY project that you can make for Father’s Day. All the project requires is a piece of plywood, twine, and some clips! It’s a simple and fun gift for any gardener!

Do you have any more gardening themed gift ideas for Father’s Day! Share them with me in the comments below!

What are lash eggs in chickens? What do you do about it? If you don’t know, you are in the right place.

Although lash eggs are not very common, they do happen, and they are an indicator that your chicken probably has an infection and you might want to take her to a vet.

Lash eggs can turn into a big problem eventually, so if you do find one in your coop, you will want to pay attention to whether your hen seems healthy, is eating and acting normal, or whether she seems in pain or just “off.”

But first…let me explain what lash eggs are in the first place. Plus we’ll talk about what to do if you have lash eggs and how to prevent them in the first place. Let’s go…

Chicken sitting in a laying box

What are lash eggs?

If you’re wondering causes lash eggs, then the first thing you should know is despite their name, lash eggs aren’t really eggs at all.

A good lash egg definition starts with their cause: Lash eggs result from Salpingitis—an infection and inflammation of the oviduct, which causes a hen to slough off pus and other material accumulated in her body because of the infection. As the material accumulates, it passes through the oviduct and is laid by the hen.

Humans can get Salpingitis, too, and in humans, it’s an inflammation of a woman’s Fallopian tubes.

As of the time of this post, the reasons why Salpingitis occurs in chickens are not known (the exact parthenogenesis), although identified risk factors might be the fact that industrial farms keep chickens so close together. Another potential cause is hormones.

According to the Merck Veterinary Manual, Salpingitis and the resulting lash eggs can be caused by different bacteria, including Mycoplasma gallisepticum, E. coli, Salmonella, or Pasteurella multocida. The Merck Veterinary Manual does not recommend a specific treatment, although studies suggest antibiotics might work to cure salpingitis since it’s a bacterial infection. Because several different bacteria can cause salpingitis, the antibiotic to prescribe depends on the cause. You should consult a qualified poultry vet.

Veterinarians have resouces to figure out the best way to treat your flock.

Lash egg appearance

Lash eggs are pretty gross. They’re comprised of a few things, including pus from the infection, and sometimes egg material or possibly tissue. It is comprised of layers of this material that’s accumulated in the oviduct.

Lash eggs laid by your backyard chickens can be soft or hard, and you might find just a small bit of pus-like material or it might be a large object that closely resembles an egg. It may, or may not, have a yolk, egg white, or eggshell. These “eggs” have all kinds of abnormalities.

When you cut it open, you might be able to see the layers of material. I’ve seen lash eggs of all sorts, from ones that look simply like a broken soft shell egg to one that’s a large hunk of disgusting, compressed pus. Some have insides that look like a mix of a baked potato and hard-boiled eggs gone wrong.

Lash eggs generally have an egg-shape, and the reason for that is because they travel through the oviduct. But lash eggs can take a few different forms, and sometimes look more like strange creatures. The underlying commonality is lash eggs are laid like normal eggs. You might find them in your flock’s nesting boxes or random nests they have made around the barn or yard.. 

Lash egg
Photo Courtesy of Timber Creek Farm

What to do if your chickens lay lash eggs?

What about egg-laying? For most bakyard chicken owners, egg production isn’t their first priority but many of us do care about that. There’s a bit of controversy about what to do if your backyard chickens lay lash eggs. You might see some advice on Facebook or social media that’s conflicting.

One resolution I see doled out is to cull the hen that lays lash eggs. Many claim that if she lays a lash egg once, she will do it again, making her an unproductive member of your flock.

I don’t necessarily agree with this advice. Largely, this advice is intended for the egg industry, which values the eggs a hen lays more than her life. 

For a large egg farm, from a financial perspective, it makes sense to cull a hen who might be sick or not perform, since the bottom line reigns supreme. 

For a backyard chicken keeper, however, this advice might not be necessary. You might not want to cull a hen that lays lash eggs. If your chickens are acting normal and seemingly otherwise healthy, then culling is not your only option.

For a hen that lays lash eggs, treatment can be sought from a qualified poultry vet. They might suggest putting her on antibiotic treatment to see if they clear up the infection.

The bottom line is lash eggs are the result of an infection. You should consult your vet to see if the infection can be treated under your specific circumstances. 

Is this deadly?

Backyard chickens often hide illness symptoms until it’s too late to help them. However, that does not mean if your hen lays a lash egg you shouldn’t at least get her seen by a qualified poultry vet.

While some hens do die from Salpingitis, many don’t and can return to a normal laying life after the event. I’ve seen hens return to a perfectly productive life after laying lash eggs. She might never do it again, or she might lay regular eggs for a while then lay another lash egg. It’s hard to know what each hen will do.

Can you prevent lash eggs?

Unfortunately, there’s not much you can do to prevent your hens from laying lash eggs. Even if your hens are healthy and eat an ideal diet, they can still develop Salpingitis. It is, of course, less likely if the hen’s immune system is robust. You can help by feeding a high-quality layer feed and supplementing with vitamins and minerals

If you don’t know which hens in your flock are laying lash eggs, then your best bet is to observe your flock to see if anyone looks “off” or sick. Lethargy, ruffled feathers, and isolation are some of the main signs of illness.

Does your flock look healthy? Then just continue to keep an eye on them. If you think your hens might have laid a lash egg, and you’re worried, then your best bet is to bring her to a qualified vet. 

If you’re wondering if can you eat a lash egg (one that looks more normal), then the answer is NO. A lash egg is an accumulation of pus for the most part, and you definitely don’t want to be eating it. I would toss it in the trash or hold onto it if you want to take your hen to the vet.

Is Salpingitis Contagious?

Since publishing this article, I’ve had a few people ask if it’s contagious. I’m not a vet, so I recommend consulting one for a definitive answer. However, here is my take on it. Since salpingitis is an inflammation of the oviduct caused by an infection from E. coli, Salmonella, and the like, I personally wouldn’t be concerned about it being contagious.

Think of it like this—if a human woman had salpingitis (inflammation of her Fallopian tubes), would you be worried?

Since chickens naturally carry a bacteria load in their bodies, they’re already at risk for the infection. If they get a laceration or some small tear in their oviduct (or some other way for the bacteria to enter), it’s possible salpingitis might develop.

Summary

Lash eggs in chickens is a bacterial infection that can happen to any flock. It’s important to watch for signs of illness (for many reasons) and behavior changes. If you find a lash egg you need to determine which hen is laying it and seek out a veterinarian who an help.

Hey y’all! Here’s this week’s sneaky peek photos of life on our farm!

These images also appear on my Instagram account where I share MANY more photos and stories from the farm!

If you aren’t yet following me there, you can right here.

Enjoy the photos & be sure to share some of yours with me!

https://www.instagram.com/p/Bh0DI5QB93G/?taken-by=pamperedchickenmama

https://www.instagram.com/p/Bhxdv4-ARlZ/?taken-by=pamperedchickenmama

https://www.instagram.com/p/BhpwIKmgatx/?taken-by=pamperedchickenmama

https://www.instagram.com/p/BhnK9nwAj3o/?taken-by=pamperedchickenmama

https://www.instagram.com/p/BhiAsuSAZsh/?taken-by=pamperedchickenmama

So here at the farm we try and do the best we can to treat the Earth with the respect it deserves. We are so grateful for the amazing planet we live on that allows our homestead to function! With Earth Day coming up on April 22nd I thought I would share some ideas with you of simple things you could do to help the plant this Earth Day.

Actually use your reusable bags

Ok I know, this one is kind of a given. But, we’ve all got those reusable bags that are sitting in the back of our car or are stuffed in the back of a closet. I don’t remember to bring my reusable bags until I get to the checkout and see them bagging my groceries in plastic. Oops. I’m working on it. But this Earth Day try and start the habit of bringing your reusable bags with you to the store. I buy the bags like this one that I can fold up into a small bag and then leave in my purse. That way I always have one with me.

Buy in bulk

Not only is it normally cheaper to buy things in bulk, but when you buy things in bulk they tend to have a lot less packaging which means, less plastic. I use these bags when I buy things like bulk nuts, seeds, oatmeal etc so that I’m reducing the amount of plastic I’m using.

Recycle. Obviously.

Really though. Look into what you can and can’t recycle in your area, and try to recycle as much as you can.

Reuse things instead of throwing them away.

So on our homestead we’re pretty frugal. I try and reuse things as much as I can. Before you throw something away try and think of a way you could repurpose it or maybe donate it to someone else who could use it.

Compost

Composting is awesome! It’s good for your garden and it reduces your food and garden waste! Check out this article for tips and trick on how to make composting easy.

Buy a water bottle you can reuse!

Buy a good water bottle that you can fill with tap water and use over and over again. I use this one because it keeps your water cold for so long which is amazing for a long day working on the homestead!

Fix those leaky sinks!

It’s crazy how much water is wasted when you have a leaky sink, toilet, or shower. The EPA  estimates that the average family can waste 180 gallons of water each week due to leaks. So fix those leaks!

Try out xeriscaping

Xeriscaping is landscaping your yard in way that reduces or eliminates the need to water. This not only saves money, but it also conserves water, especially if you live in a dry area. Xeriscaping includes choosing grass and plants that are native to your area, using a drip system, and using water-efficient plants. Xeriscaping can also reduce the amount of work required to maintain your lawn and flowerbeds. Bonus! Check out this article for more information about xeriscaping.

Ride your bike or walk

Using your car less is an easy way to help the environment. And it’s fun too! Ride your bike to the park with your kids instead of driving. It’s also a great way to motivate your kids to get outdoors and play!

Eat locally grown produce or grow your own garden!

It takes a lot of energy and natural resources to ship corn to the United States in the middle of January. So head out to your farmers market and pick up some fresh, local produce! It tastes amazing and you’re supporting local farmers. Growing your own garden is also an awesome way you can help the environment.

Thanks for reading our simple tips to help the planet this Earth Day! I would love to hear your tips on how you help the planet in the comments below!

Black soldier fly larvae superfood for chickens are like candy for your backyard flock. In other words, hens LOOOOOVVEEEE them.

Many times, we’ve gone out to our coop to give the flock a surprise, and within mere moments, they’ve snatched all the black soldier fly larvae out of our hands!

The nutritional content of these insects means you can make them an essential part of your chicken’s diet – and they might even help your flock grow better and lay better eggs!

Black soldier fly larvae are full of protein content, fat, and essential vitamins and minerals. As you know, protein is essential to raising healthy hens, and for feather growth – especially since feathers are mostly protein.

A diet high in protein is also essential for excellent egg laying – so if your flock’s diet is low in protein, then they might lay abnormal eggs or possibly something else (like a lash egg). It helps that hens really, really love these insects – mine go nuts for them, and I’m sure yours will also!

In this article, I’m going to show you why black soldier fly larvae are a great snack for your chickens and how you can get started raising them yourself!

Black Soldier Fly Larvae in a bowl

What are Black Soldier Fly Larvae (BSFL)?

The black soldier fly (Hermetia illucens) is a member of the Stratiomyidae family, and just about anyone in the United States can raise them for their flock. 

For most people insects are considered pests, but the black soldier fly larvae shouldn’t be! In nature, they play an active role in the ecosystem by converting wastes (such as discarded food) into valuable resources.

Other advantages of Black Soldier Fly Larvae are:

  • Dry to touch (not slimy)
  • Not smelly
  • They don’t sting humans
  • Safe and are not carriers of diseases

Black Soldier Fly Larvae & Adult Life Cycle

This insect has a 45-day life cycle that is divided into 4 stages:

Adult Stage – An adult Black Soldier Fly has a lifespan of about 5 to 9 days where they lay between 600-800 eggs. The adults deposit their eggs near the decaying matter.

Egg Stage – The eggs can be found around compost. They hatch out into larvae within about 4 days.

Larvae Stage – The BSF Larvae grows in the compost for 14 days where they eat, excrete, and convert waste.

Pupa Stage – From larvae, the BSF enters the pre-pupal stage for a week where they finally enter into the pupa stage where their nutritional content is at its peak.

Why are black soldier fly larvae a great snack for chickens?

Several studies have shown that black soldier fly larvae are packed with protein and essential minerals like calcium – making them the perfect way to ensure your flock is getting a high quality snack AND some extra calcium for strong egg shells.

In one study, black soldier fly larvae were fed to 200 laying hens. Researchers found that the hens that ate the insects were healthier and laid better.

Plus, according to The University of Massachusetts, black soldier fly larvae contain:

  • 42.1% crude protein
  • 34.8% fat
  • 7.0% crude fiber
  • 5.0% calcium

All of which are perfect for raising healthy hens!

black soldier fly larvae in a backyard chicken treat

Raising Black Soldier Fly Larvae

Raising these insects yourself is fairly easy (no harm no foul if it’s not for you though! We carry products with them in the store for just that reason!) We have high quality feed with BSFL as well as treats with BSFL. You need it, we have it! And chickens love it.

Whatever you do, be sure your flock’s diet has these superfood nutrients readily avaiable. Not only will they be healthier, but their egg production will benefit as well.

Temperature and Humidity

Here’s some background information about how to raise healthy BSFL to help you decide where on your farm you can keep a black soldier fly larvae farm:

  • BSFL survive at a minimum temperature of 35 F. However, they are productive between temperatures of 50 F – 113 F.
  • The ideal temperature for these flies is around 95 F.
  • During mating, humidity must be maintained at around 30% to 90%. The temperature needs to be at 82 F.
  • BSFL develop the fastest at 70% humidity. The optimal temperature for larvae to pupate is around 77 to 86 F.
  • Keep the feed fairly moist –  if it’s too dry, the flies won’t be able to dig into it and if it is too wet, they could suffocate

What Do Black Soldier Fly Larvae Eat?

The black soldier fly consumes any kind of organic waste such as your own compost, food scraps, coffee grounds, and animal manure. Animal products such as fat and meat aren’t the best, so avoid putting them into your food waste or their feeding container. Since your hens will be eating the larvae, sticking to fruits, vegetables, etc is probably the best idea.

Where to Buy live Black Soldier Fly Larvae for Your Farm

It’s best to go to a reputable dealer for your live black soldier fly larvae, and you can have them shipped to your house. Make sure you have their “home” set up for them before the insects arrive so you’re not scrambling at last minute.

For dried larvae, we carry them in the store right here.

black soldier fly larvae for chickens in a bowl

Setting Up DIY Black Soldier Fly Larvae Farming

If you’re inclined, starting a small-scale operation to feed your poultry with black soldier flies is fairly easy – at least as far as the set up itself is concerned. (Maintaining it….you’ll have to put out effort on a consistent basis. And vacations might be a bit more difficult. Just be forewarned.)

Structure and Design

You need to create a bin or a tub for your black soldier flies to eat from and lay eggs in. Your “home” for your new friends should include:

  • A main body where the insects will live
  • Lid
  • Method to give the insects food
  • Plan fo fluids from organic matter to drain
  • Understanding of how to harvest the larvae
  • No deeper than 3 inches of substrate to ensure the insects have ready access to oxygen

The structure must be weather and mold-resistant. You can see a step-by-step black soldier fly larvae set up from The University Of Massachusetts right here.

Be sure to keep the following in mind:

  • Do not place your BSFL in direct sunlight.
  • Avoid too dry or too wet conditions.

Harvesting Black Soldier Fly Larvae

Harvesting BSFL is probably the easiest part of raising them – simply place a bucket with holes on the side and towards the bottom, and place food scraps in it.

Leave the bucket for a while to allow the grubs to migrate into the bucket for their snack.

You can then feed the harvested black soldier fly larvae to your backyard chickens. Happy eating for your chickens!