So I’ll admit, I’m a sucker for cute chicken coop decorations. I LOVE them!

I think coop decorations are the best and they add a really nice aesthetic to your backyard.

Obviously how your coop looks isn’t the most important thing your coop should include, but it adds a nice touch.

Personally, I think it’s a good idea to dress up your coop. It looks cute, and it can also be helpful depending on your neighbors or homeowners association (Read more about raising chickens with neighbors here)

Some of my favorite home decorations are window boxes.

I love window boxes that are filled with flowers. I think they are so cute and really help bring a certain charm to your home. Plus nothing says summer like flowers overflowing out of a window box, am I right?

And since I love window boxes on homes, I decided to add a window box to our chicken coop. 

It’s one of my favorite aspects of my coop and I think it looks great!

Windows are a really important aspect of your coop. Your chickens need to have proper ventilation because of their delicate upper respiratory system.

And chickens poop. A LOT.

Trust me, you want to have good ventilation because otherwise it gets stinky, real quick.

So, since you already need to have windows in your coop, why not make them cute with a window box?

Not only are window boxes cute, but they can also be really functional! You could plant herbs for your chickens in them

You could even plant part of your garden in the window boxes on your coop to maximise space! Learn more about gardening in small spaces in my article here.

Today I decided that I would gather some of my favorite window box ideas for your chicken coop for you! So let’s get started.

First off, check out this awesome free window box plan. This plan is for a window box for your home, but it should be pretty simple to modify the plans to the size of the window on your coop.

I love that these plans are simple and straightforward (and free!)

window box ideas for backyard chicken coops

I think these plans will get you a good basic box that you can then make your own for your chicken coop and personalize.

If you aren’t into making your own window box, you can buy one like this one.

Be careful when you’re choosing one online that the dimensions will fit your chicken coop (most home sized window boxes could be too big for your coop), but buying a window box online definitely simplifies the process (which is really nice sometimes!)

Picket Fence Window Box

This first idea is definitely one of my favorites (but really they’re all my favorites) I love the cute picket fence look that this window box has! And it would be so easy to recreate!

window box ideas for backyard chicken coops

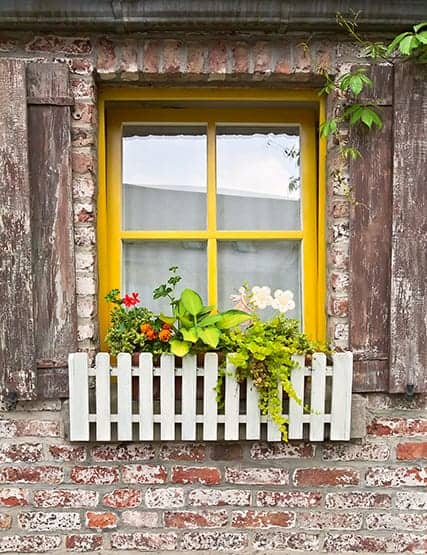
All you need to do to create this window box is to get 12 thins strips of wood (you could even use the small paint mixing sticks that they have at Lowes and Home Depot!)

You would then need to attach each piece to two horizontal boards and wallah you have the front of your box! I love that this idea is simple, but it could add so much character to your coop!

Stand-Alone Picket Fence Window Box

So I clearly love the picket fence look. I love that this box stands on its own! It would be great for a coop that didn’t have big enough windows for you to attach an actual window box!

Or you could put one on either side of the door to your coop to create a cute flowery entryway to your coop!

window box ideas for backyard chicken coops

Check out these awesome plans for a stand alone planter box that could be easily modified for your coop!

Dresser Drawer Window Boxes

So I absolutely love this idea from Kammy’s Korner! She took an old, broken dresser and used the drawers as the front of her window boxes. It looks so cute and it’s a great way to repurpose old furniture! Check out the full tutorial here!

Rustic Wood Window Box

https://www.instagram.com/p/Biwm9Ahggs4/?taken-by=theflowerpotwoodlands

So this window box is absolutely gorgeous! I love the dark colored wood and the contrast with the bright flowers!

This window box is tempting me to try and convince my husband we need window boxes for all of our windows on our home (hint hint hubby)

I think this window box would look amazing on any chicken coop and I think it would look especially good with fresh herbs!

Check out my guide to growing your own herbs, so you can have a gorgeous window box full of yummy herbs on your chicken coop! I also have an ebook all about growing your own herbs for your home and for your chickens! Check it out here!

Terracotta Pots Window Box

This window box is so cute and is super functional! It’s a simple board with three holes in it that you can easily place your terracotta pots in! You can easily switch out the pots depending on the look your wanted for you coop!

Simple Red Window Box

window box ideas for backyard chicken coops

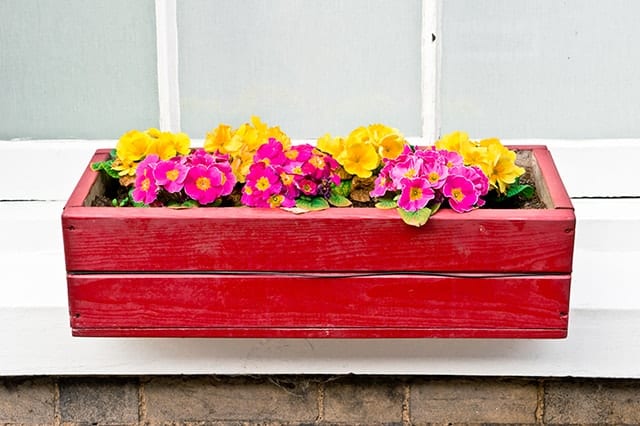
This window box is really simple and would be quick and easy to make. I love the bright pop of color that red window box has and I think it would look really nice with some petunias. Plus I love red! I think it is the perfect color to add to any chicken coop! 

Window Planter with Shutters

Ok. Shutters for your chicken coop. I LOVE it. I love the bright blue in this idea, I think it looks so cute! I also love that shutters are really functional for your chicken coop.

They can help keep water out of your coop during storms.

window box ideas for backyard chicken coops

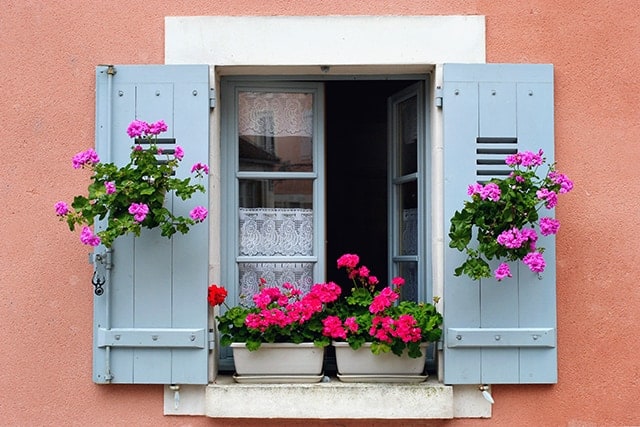
I LOVE the flower pots hanging on the shutters in this idea. I think it really draws everything in this window box idea together.

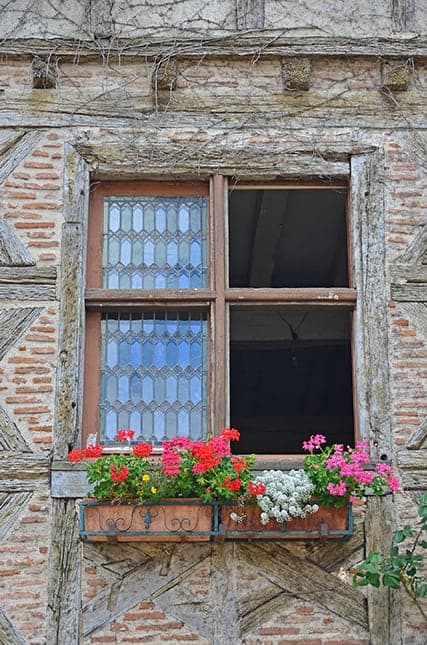
Planters in Container-Simple Window Box

So this idea is gorgeous! I love the two planters in the metal holder. I found these metal hooks that you can use to hang your planter from the window of your coop!

window box ideas for backyard chicken coops

Do you like these window box ideas for your coop? What do you do to decorate your coop? I’d love to hear about it below!

Try to tell me these chicken coops aren’t absolutely adorable. And try to convince me you don’t want a coop as cute as these in your backyard.


Go ahead. Try to convince me.


Can’t, can you? LOL!


This week’s Adorable Coops! are white exterior heaven – they all have a modern “Joanna Gaines” type feel to them, with the white exteriors and pops of color. LOVE THEM.


And the cute accents all seem pretty easy to replicate!


Here’s this week’s 5 adorable coops that we found on Instagram, and each one is giving me coop envy. I hope you enjoy them and find some inspiration for your own coops!


https://www.instagram.com/p/BjLPwBenx3C/?tagged=chickencoop


https://www.instagram.com/p/BjQ3GIsne0P/?tagged=chickencoop


https://www.instagram.com/p/BjQgYLqlaP6/?tagged=chickencoop

https://www.instagram.com/p/BjQHGJ4gvWW/?tagged=chickencoop

https://www.instagram.com/p/BjmmF9YASGf/?tagged=chickencoop

https://www.instagram.com/p/Bjla5BDgmm0/?tagged=chickencoop

I love outdoor decorations (Especially for the coop!) I think they’re so cute and fun!

I think that they really help to make any backyard feel more homey. I also love making outdoor decorations with the kiddos. I love anything my kids make because after awhile it becomes a fun keepsake!

I also try to incorporate sensory activities for my kids when I am doing crafts with them because both of my kids have autism. I think making decorations with your kids is a great way to decorate your yard and get in some amazing sensory activities all at the same time!
So here are 5 of my favorite DIY sensory activities/decorations that you can make for your yard!


Playdough cut outs


So personally I think playdough is on of the best sensory activities out there. And you can make so many fun things with it!

What I do is have my kids roll out the playdough flat (like you’re rolling out cookies) Then we use chicken shaped cookie cutters to cut out chicken shapes in the playdough! I then poke a small hole in the top of the playdough (make sure it goes all the way through!) and I then leave them out to dry for a couple of days.

After they’re completely dried I have my kids thread some twine through the hole in the top and we hang them in the backyard!

I’ve hung them outside of our chicken coop for a fun decoration, and I’ve also hung them in some of the trees in our backyard! It’s a super fun and easy decoration that you can make with your kids that is also a great sensory activity. Check out this awesome recipe for homemade playdough!


Sand foam decorated bucket


This is a super easy sensory activity/decoration that you can do with your kids! What I did is I used a regular sand bucket (you could also use a pretty pot) and had my kids decorate it, however they wanted to.

After they finished decorating we filled it with “sand foam” (check out the recipe here) Basically it’s just shaving cream mixed with sand and it makes an amazing sensory activity!

https://www.instagram.com/p/BDfobLLvbY6/?tagged=sandfoam

You can use spoons, or other toys if your kids don’t like to get messy. This stuff is so fun to play with! The texture of the sand and shaving cream together is really cool!


DIY Outdoor Quiet Area


I love having an area for my kids where they can go to have some alone time or just somewhere they can go and play. I think it’s important that there is somewhere my kids can go when they have a sensory overload or need a safe space.

I’ve seen a couple of amazing ideas online and I’m definitely going to have to try some of them out! I love that with all of these not only are you providing your kids with an area they can go to deal with sensory overloads, but they’re also really cute outdoor decorations.

I totally recommend that you have your kids help when you’re making an outdoor quiet area, so that they can be involved in creating the space that they think will be most beneficial to them.

This first outdoor quiet area is one of my favorites. It’s made out of pallet wood which is a huge bonus for me because we have tons of extra pallets lying around.

It’s pretty simple to make and after you finish you could have your kids help you decorate and add any sensory activities that they would like to! Check out the full instructions here.

Make sure that when you’re using pallets you know that they’re safe! I have an entire article about it that you can use as a guide to help you know if the pallets you are using are treated with chemicals.

I also love this DIY bean pole teepee! It’s super easy to create! You only need a couple of boards and some bean seeds are you’re good to go! Throughout the summer the beans will grow up the poles and create an awesome enclosed space for your kids to get away to!

This last outdoor space for kids is perfect for a reading nook! It’s small and could be filled with pillows, blankets, puzzles, books, or whatever your child loves the most!

You could also hang some sensory based activities around the playhouse for your kids to use if they needed to! Check out this AMAZING DIY tutorial for an outdoor reading nook here!


DIY outdoor sensory board

So I love sensory boards. I think they’re great for any kid and they keep my kids occupied while I get some me time:) This sensory board is made out of things from nature.

https://www.instagram.com/p/BgW4DshjkO2/?tagged=sensoryboard

All you need to do is go outside with your kids and have them choose some nature items that they like the feel of (leaves, feathers, smooth rocks, sand, etc ). Then your just attach them to a board and you have a nature sensory board!

I also love this sensory board that incorporates lights, switches, and wheels! I think both of these would be a fun project to do with your kids and personally I think they add a fun touch to any backyard as a decoration.

https://www.instagram.com/p/BiP8Zx2hOkH/?tagged=sensoryboard


Outdoor musical instruments

So I think outdoor musical instruments are a really fun way to incorporate different noises that your kids like into your backyard. And they add a unique type of decoration to your yard!

One of my favorite DIY musical instruments is a PVC Xylophone. This one is so easy and all you need are some spare PVC pipes in different sizes.

Kids love this because they can experiment with all of the different noises they can make when they blow into the different sized pipes. Here’s full instructions on how to make your own PVC pipe musical instrument.

I also love this DIY Music man project! It’s really easy and you can basically use any materials you have lying around your farm that make awesome noises when you play with them!

Basically it’s almost like a scarecrow made out of several different types of materials that make really awesome noises! This project is so easy and your kids will love helping your put this one together. Plus it doubles as a scarecrow for your garden! Bonus!

This last idea is one of my favorites. It’s a DIY outdoor music wall! I love that this wall incorporates different materials that are great for feeling as well as banging for making noise! Check out the full tutorial here.

https://www.instagram.com/p/BEVweowxSDW/?tagged=diymusicwall


What decorations do you have in your backyard that double as sensory activities? I would love to hear about them! Share your ideas with me in the comments below!

Dried tomatoes add an amazing burst of flavor to any recipe and that’s why it is a must-have in my kitchen here at the farm.

It gives delicious depth to my meals and it is fully packed with nutrients that our body will enjoy. There’s nothing better than something that’s good for your body and your taste buds!

With the high cost (a whopping $20 per pound) of dried tomatoes in the store,  how do you enjoy these heavenly tomatoes without hurting your budget?

Simple. Dehydrate your own tomatoes! And it doesn’t have to be in the sun. There are easy ways on how to dry tomatoes. Check out these tips and tricks to drying them in your home.

Warning: Dried Tomatoes Can Still Spoil

I know how much people enjoy eating and using dried-tomatoes in salsas, pizzas, sauce, etc. And you can’t wait to learn how to produce a bunch on your own without buying from the market.

However, before we go to the methods of drying out tomatoes, we need to keep the following things in mind:

  • Dehydrated food can be stored and consumed for long periods of time but it can still spoil when it is kept for longer than usual.
  • Drying tomatoes correctly and storing them in the proper conditions can give you about 7 months of shelf-life.
  • When you dry and store the tomatoes, make sure you keep them away from moisture (especially inside the containers when already stored) to avoid the growth of bacteria.
  • Dried tomatoes with oil, garlic, and herbs will need to be refrigerated after opening.
  • Watch out for signs of rot. Never eat food that has already started producing molds!

Sun-Drying Tomatoes in Summer

From the Aztecs to the tomato-loving country of Italy, drying raw food has been a reliable method of storing food for a long time. We can dry tomatoes the old fashioned way using the sun (and who doesn’t love a bit of Tuscany in their own backyard??).

When you dry tomatoes the old-fashioned way, it has to be in the summer when the sun is high and the air is warm, and dry.  Find out how to dry tomatoes in the sun from this action guide.

What You Need Instructions
• Screen for drying the tomatoes
• Cheesecloth
• 10 tomatoes of standard size (for 1 ounce of finished product)
1. Slice the tomatoes in proportional sizes, scoop out the seeds, and lay them on the screen.
2. When drying both ends, place them skin down so it dries well.
3. Sprinkle lightly with salt and set out to dry.
4. Place the screen with the tomatoes in a good location that receives full sun and is free from predators.
5. Cover with a raised cheesecloth to keep off insects and provide good ventilation.
6. Bring the tomatoes in at night to avoid the dew.

This method can take up to two weeks of bringing the tomatoes in and out the sun to dry. It is time-consuming,  but you don’t need to invest in any equipment.

Drying Tomatoes All-Year Round

If you live in an area that doesn’t receive a lot of sun throughout the year, we have 2 other options for you to dry your tomatoes.

First, you can use your oven.  Because sun-drying tomatoes can take up too much time and effort, you can use an oven to dry them faster.

This method is pretty simple – set the oven to the lowest heat setting possible and bake the tomatoes until dried. This method takes anywhere from 6 to 12 hours.

But who needs an oven during the summer? Or who wants to waste that much electricity if you know how to dry tomatoes in a dehydrator, right?

As an organic farmer, the best alternative to sun-drying raw food is using a dehydrator. This tool has many advantages compared to the oven method.

  • A dehydrator uses low temperatures that can preserve enzymes which keeps your tomatoes good for you and not just a seasoning for your food.
  • It uses a fan that allows proper circulation of warm air making it more efficient.
  • It comes in different sizes which means you can dry more foods at once.
  • Lastly… a fan VS an oven? It’s a no-brainer. I would go for the smaller carbon footprint

Here is a quick action guide on how to dry tomatoes in a dehydrator with an amazing recipe!

3 main ingredients:

  • Tomatoes
  • Salt
  • Olive Oil

Directions:

  1. Slice tomatoes in uniform thickness and size.
  2. Place the cut tomatoes in a bowl and drizzle with some salt and olive oil. Mix well and let the tomatoes dry partially. *Note that these two seasonings are optional. This recipe, for me, creates wonderful tasting dried tomatoes that you can eat right out of the bag.
  3. Arrange the tomatoes on the dehydrator tray and dry until all moisture is out.
  4. Store in an airtight container (a bag or a jar) and place in the fridge for long-term storage.

Finally, you can enjoy that summery sun-kissed taste of dried tomatoes all-year round! Do you have a unique way of how to dry tomatoes? Share it with us!

Dried Tomatoes

  • Garden-Fresh Tomatoes
  • Salt
  • Olive oil
  1. Slice tomatoes in uniform thickness and size.
  2. Place the cut tomatoes in a bowl and drizzle with some salt and olive oil. Mix well and let the tomatoes dry partially. *Note that these two seasonings are optional.
  3. Arrange the tomatoes on the dehydrator tray
  4. Dry until all moisture is out (consult your dehydrator instructions).
  5. Store in an airtight container (a bag or a jar) and place in the fridge for long-term storage.

So it’s that time of year again. It’s time to pull out the barbecue and start grilling!

I absolutely love grilling, it’s one of my favorite things about the summer time! There’s nothing better than a delicious barbecued meal eaten with family and friends am I right?

Now grilling can be a little bit tricky at times. You have to worry about temperature, texture, and flavor along with trying to perfectly balance how long you cook your food for (because nobody wants charred food, but you don’t want it raw either) And after a long winter, most of our grilling skills are a little bit rusty.

So I decided that since we’re coming into barbecuing season I would share some of my favorite grilling hacks and recipes with you, so at your next barbecue everyone will see you as the grilling genius.


Use two skewers for your kebabs


So my first hack for you to put two skewers through your kebabs. Why you may ask? Well I’ve spent many an evening making kebabs and fighting with all of the individuals pieces of meat.

Every time I make kebabs I have to make sure that each piece on the kebab didn’t rotate on its own when I tried to flip it. If you put two skewers in it prevents this from happening! You can easily rotate your kebabs without having to spend a ton of time checking to make sure each piece turned over in the way that it should have.

And while we’re talking about kebabs check out this amazing grilled steak kebab recipe! I love this recipe! It’s fairly simple to make, but one taste of this amazing recipe and your family will be begging you to make them every night! They’re that good. Seriously.


Use an onion to clean off your grill


My next grilling hack for you is to clean your barbecue off with an onion. So the first time I heard this trick, I thought it was a little bit crazy to be honest with you. But it works so well! I just cut an onion in half and then use it to scrub my grill after each time I use it (wait for it to cool down first!) Not only does this add some amazing flavor the next time you grill, but the onion also does a great job of cleaning off your barbecue!

And just because I love barbecue sauce and onions check out this amazing Vidalia onion barbecue sauce recipe! This stuff is good! It’s super yummy on grilled chicken and it also goes great on your burgers!


Use tinfoil


So tinfoil is the best for creating delicious and easy meals on the barbecue. I use tinfoil for everything when I’m grilling. I cover my meat with one layer of tinfoil (almost like making a mini meat tent) when I cook it so that the moisture and flavor stays in the meat!

I also love cooking meals in tinfoil on the grill. One of my favorite meals to make is what I call tinfoil suppers. All I do is cut potatoes into cubes, carrots into small slices, mince an onion, slice a green pepper, and throw in whatever other vegetables I happen to have around. I lay about a foot and a half of tinfoil out on the counter and place all of my vegetables on to it with a hamburger patty on the bottom. After that I add about a teaspoon of water over the top, add a small slice of butter, and some salt and pepper.

Then I wrap it up with the tinfoil and then wrap another layer of tinfoil over the top of that. All you have to do then is throw it on the grill and cook it until your hamburger patty is done. It’s simple and I normally just add some ketchup and then eat it as is. Using tinfoil is a great way to simplify your grilling without compromising on taste.

I also use tinfoil to lightly scrub down my grill after I finish cooking. It gets off all of the gross stuff off of the grill and it’s an easy way to quickly clean after barbecuing.

Use the finger method to tell how done your meat is


Ok so this might sound a little bit crazy, but I found this amazing way to tell how done your meat is with your fingers on simply recipes.com. I hate that when I use a meat thermometer there’s a risk of losing the moisture and juices in your meat which is the worst!!!! Check out this awesome guide here on how to tell how done your meat is using your fingers. Keep in mind that this method will take some time to figure out. So you’ll probably have to keep using a meat thermometer (bummer) for a little bit until you figure out exactly how this method works.


If you don’t quite trust yourself to figure out how done your meat is (ME!) or you are overly worried about food poisoning (also me) I recommend that you get a instant read thermometer They’re awesome and I love that when you use one of these you know exactly when your meat is done.

Use lemons when cooking fish

My last hack for all of you is to use lemons, especially when you’re cooking fish. Not only is it delicious (duh) but it helps prevent your fish from sticking to the barbecue which is the worst! I just put two or three lemon slices down on the grill and then put the fish on top of it! So you get your yummy grilled fish, without it sticking and you get extra yummy lemony flavor for your fish!

Check out this amazing grilled salmon recipe that is my favorite! It’s so easy to make and it’s a hit at any barbecue!
Do you have any amazing grilling hacks that you use? Help me out with my summer barbecues I’ve got coming up and share them in the comments below!

Food should be all about nutrition, energy, fun and enjoyment. I strongly believe that we are what we eat, and that should involve a wide range of food types, with as many of them cooked from scratch as possible.

I also believe in balance, which is why there is always room for a little sweetness in my food habits. This is where the inspiration for these indulgent chocolate and chili brownies comes in.

The richness of the dark chocolate, combined with the kick of the chili, results in a treat that can be served as a dessert, or is equally satisfying as a cheeky afternoon snack.

chocolate chili brownies

And you don’t need to layer it on with the self-guilt. Chocolate can be good for you – the darker the better. The higher the cocoa content (aim for at least 70% cocoa content) the more nutritious it is. Dark chocolate is a powerful source of antioxidants, among other health claims.

If you are a chocolate lover, eating dark chocolate will likely reduce your urge to consume huge amounts of it in one sitting, owing to the higher cocoa content.

The dried chili pepper adds more than just heat. According to research the capsaicin found in chili peppers can provide many health boosts, including an increase in immunity levels.  

You can adjust the spice factor depending on what level of heat your taste buds can handle. I usually add 1 tbsp of crushed chilies, but if you prefer a milder spice, you should probably reduce this to 1tsp.

You can add in extra ingredients depending on your preferences, chopped nuts such as almonds add a welcoming crunch, or a few sliced raspberries can provide the inside with a more moist and juicy texture.

If you’re not a fan of using refined sugar in your recipes you can substitute this with some honey or maple syrup.    


Ingredients

  • 8oz (1 cup) of unsalted butter
  • 1 cup sugar
  • 1 cup cocoa powder
  • 8oz (1 1/3 cups) good quality dark chocolate (at least 70% cocoa content)
  • 1 tbsp crushed dried chilies* (reduce to 1tsp for a milder taste)   
  • 1 cup plain flour

Making It

  1. Preheat oven to 375°F.
  2. Grease an 8” square baking tin.
  3.  In a bowl, mix the butter and sugar together until a creamy consistency is achieved.
  4. Add in the chili flakes/chopped chilies and the cocoa powder and mix in.
  5. Melt the chocolate. I use a silicone pot to melt it in the microwave, but you can also melt it by placing the chocolate in a bowl and placing it over a pot of boiling water. Just take care not to burn it.
  6. Add the melted chocolate to the bowl, avoiding the temptation to dip your finger in 😉 Stir in to combine.
  7. Transfer brownie mix to greasing baking tin and cook in preheated oven for 20 minutes. If after 20 minutes it is still soft to touch, turn the heat up a little and cook for a further 5 minutes to add some crunch to the exterior.
  8. Leave to cool before transferring to a wire rack. Slice into squares before serving.

*Recipe Notes

If you don’t have any chili flakes you can substitute with ½ tsp of cayenne powder for every 1 tsp of flakes. Alternatively you can use a small red chili, either deseeded or not, depending on your tastes.

Chocolate Chili Brownies

  • 8 ounces unsalted butter
  • 1 cup sugar
  • 1 cup cocoa powder
  • 8 ounces dark chocolate ( at least 70% cocoa content)
  • 1 tbsp crushed dried chilies or chili powder (reduce to 1 tsp for a milder taste)
  • 1 cup all purpose flour
  1. Preheat oven to 375°F.
  2. Grease an 8” square baking tin.
  3. In a bowl, mix the butter and sugar together until a creamy consistency is achieved.
  4. Add in the chili flakes/chopped chilies and the cocoa powder and mix in.
  5. Melt the chocolate & take care not to burn it.
  6. Add the melted chocolate to the bowl. Stir in to combine.
  7. Transfer brownie mix to greasing baking tin and cook in preheated oven for 20 minutes. If after 20 minutes it is still soft to touch, turn the heat up a little and cook for a further 5 minutes to add some crunch to the exterior.
  8. Leave to cool before transferring to a wire rack. Slice into squares before serving.

About Liana: Liana blogs over at Liana’s Kitchen! You can sign up for her newsletter right here to get more great recipes!