(This fermenting article is sponsored by Fermentools. They sent me their fermenting tools to test out for this post. Of course, I only promote products I trust and use myself, so rest assured the opinions I express are my honest opinions. Don’t fret over the whole sponsored post thing – you’ll have a much better experience fermenting if you use the right tools anyway.)

Fermenting is one of those homesteading skills that intimidates people, but it’s probably one of the easiest things you’ll learn.

We ferment frequently on our homestead, not just our food, but also our livestock’s feed

But we weren’t always so fermenting friendly. Before starting the homestead, I thought fermenting was just making fruit into wine. 

But it’s more than that. It’s a way to make your food more nutritious and flavorful.

My first attempt at fermenting sauerkraut was embarrassing. I used way too much salt and it never really fermented – nothing could grow in all that salt.

But I refined my skills by reading about fermenting and trying.

Fermenting used to mystify me too, and it’s one of those skills that’s best learned by doing.  

Now, I’m no microbiologist, but I’ve managed to learn to ferment without killing myself (I’ve never once gotten sick), and I’ve even gained enough knowledge to impart some of it to you.

I’m a regular person, and if I can do it, you can learn it too.

This is something you can try at home.

Want to try fermenting vegetables but afraid or confused where to begin? Learn to ferment veggies in this step-by-step system. From FrugalChicken

So, let’s take a look at fermenting vegetables and why you should try it.

The science behind fermenting

I’m going to get nerdy on you for a minute.

The main idea behind fermenting is to discourage bad bacteria from growing and to create an environment for good bacteria to proliferate. 

In the days before refrigeration, fermenting was a common method to preserving foods for months. 

And I can tell you it works. 

I’ve tested it with produce in 80 degree heat outside, and the fermenting vegetables still looked fresh and smelled fresh after 4 days while their non-fermented counterparts were nasty and rapidly decaying.

Seriously. So it works.

Here’s the deal:

Besides preserving the harvest, fermenting creates an environment in which Lactobacillus, the good bacteria, can proliferate.

Why?

Because you’re creating an anerobic environment in which most of the bad bacteria that decompose food can’t survive.

But Lactobacillus can.

The science of fermenting vegetables is really as simple as that.
And when that happens, your vegetables transform into a different sort of food. 

They’re more nutritious because Lactobacillus is known for being great for intestinal health and for making vegetables easier to digest.


To break it down:

When you ferment something, you submerge it in water or some other fluid which creates an anerobic (without oxygen) environment – bad bacteria can’t grow as well but the good bacteria can, fermenting your vegetables.

And similar to pulling weeds, as the good bacteria grow, and as the underwater environment weeds out the bad bacteria, your good bacteria “garden” prospers.

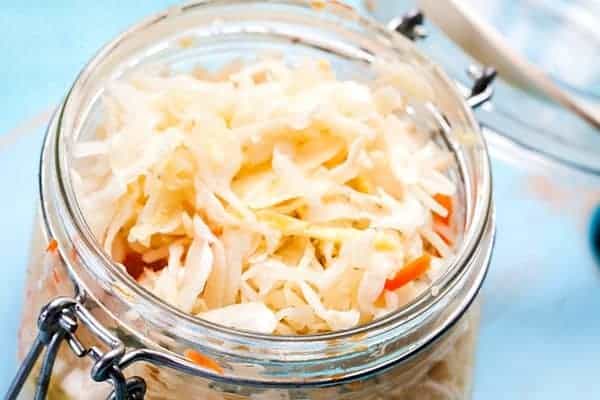
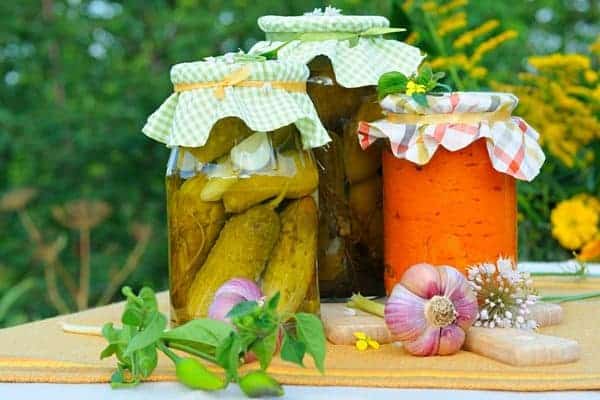
Probably the best known ferments are pickles, apple cider vinegar, yogurt (yup, yogurt), sourdough, and sauerkraut.

Want to try fermenting vegetables but afraid or confused where to begin? Learn to ferment veggies in this step-by-step system. From FrugalChicken

So, what’s the deal with this “good bacteria?”

Lactobacillus occurs naturally on fruits and vegetables, and it’s already found naturally in our body – our digestive system included.

Lactobacillus is a good thing – it increases our gut health, studies have shown. 

So, when it comes to fermenting, all you’re doing is creating an environment that allows the good bacteria to grow.

The introduction of good bacteria makes the food easier for you to digest – which means your body can easily absorb the nutrients (in other words, you consume more of the nutrients).

A recent study published by researchers at the University College Cork, in Cork, Ireland, showed there’s a large connection between the health of your brain and the overall health of your gut. 

It’s great for skin too. A study performed at Kyung Hee University in South Korea showed Lactobacillus, taken as a probiotic (in the form of fermented vegetables, for example), increases skin health, and boosts your immune system.

Pretty powerful stuff.

So, what are the basics of fermenting?

Water and other liquids

There’s no real magic to fermenting – for the simplest ferments, you’re submerging your chosen vegetables under water and allowing a naturally-occurring process to take place.

You can make it more complicated than that by introducing starters such as salt, whey, sugar and honey, but submerging in water or other liquid (such as a vegetable’s own juices) is the first step.

Salt, whey, sugar, and honey

When fermenting vegetables, you can add salt (e.g., create a brine) which further reduces the growth of bad bacteria (because they have a harder time living in a salty environment) or something like whey, which has a large amount of lactobacillus in it.

Want to try fermenting vegetables but afraid or confused where to begin? Learn to ferment veggies in this step-by-step system. From FrugalChicken

The salt also reduces the liquid in the vegetables you’re fermenting, making them crunchier and easier to chew.

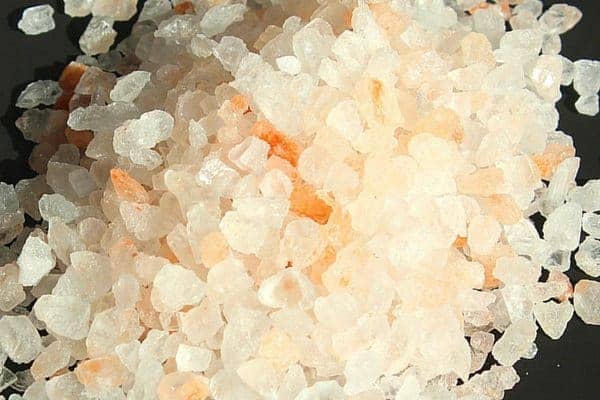
If you do use salt, I suggest using the salt Fermentools sends with their starter kit. You know you’re using the right stuff, since some salts aren’t the best options for fermenting.

The salt that comes with your Fermentools kit still contains minerals that are good for your body – other salts on the market might still retain minerals, while others won’t. 

Want to try fermenting vegetables but afraid or confused where to begin? Learn to ferment veggies in this step-by-step system. From FrugalChicken

Make life easy on yourself and use the Himalayan salt that comes with your kit.

For a ferment like apple cider vinegar, you can use sugar or honey in your ferment.

How long should I let my vegetables ferment?

You can ferment for a few days to about 6 months as a very general rule of thumb (some ferments might not last 6 months, it simply depends.)

Initially, the vegetables will just soften and the taste will alter a bit. 

It will taste good, and how the fermenting vegetables will taste depends on whatever your fermenting.

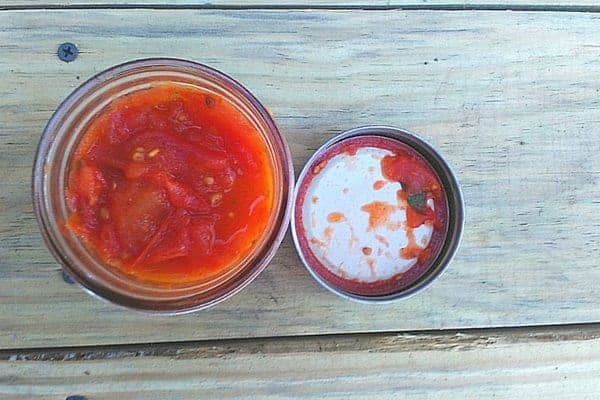
After a week or so, however, you’ll begin to notice bubbles forming inside your mason jar. These bubbles are a second transformation, and a very pleasant one.

Your vegetables begin to take on a fizzy quality – a sensation similar to the carbonation in very cold soda. 

You can continue to ferment, which will increase the “fizzy” quality. It’s up to you.

Want to try fermenting vegetables but afraid or confused where to begin? Learn to ferment veggies in this step-by-step system. From FrugalChicken

White vs. Black or Green

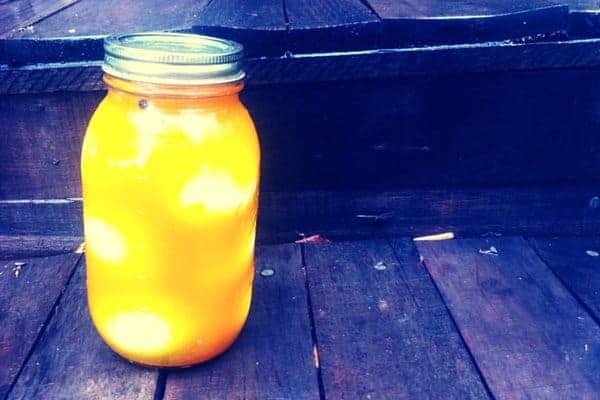
At some point, your fermenting veggies might get white “floaties” in it – in all probability, that’s the good bacteria doing its thing.

If you see black or green mold or floaties, or smell something off, just dump it. It’s not worth the risk.

How to store your fermenting vegetables

While I’m fermenting my vegetables, I keep the mason jar in a cool, dark place out of sunlight. 

A shelf in my kitchen suffices, and I keep it there until the veggies are done fermenting.

After, I personally keep the jar in my fridge, where the fermenting can continue (albeit at a slower pace).

In the days before refrigeration, people used to store them in cool areas of the house or a root cellar.

If you’re lucky enough to have a root cellar, you can store it there, making sure it’s covered and kept away from dust and hungry critters.

https://instagram.com/p/8CJKvcC85V/?taken-by=thefrugalchicken

When are my fermenting vegetables “done?”

It’s not that easy to answer this question about fermenting.

“Done” is a relative term. 

Your fermenting vegetables might be “done” in a week or in 6 months. It just depends on how you want it to taste.

The #1 rule with fermenting is if your vegetables smell bad or rotten or taste funky, toss ’em.

Personally, I’ve not had anything go rancid. 

But I always smell my ferment and taste a tiny bit before just diving in.

I personally prefer to wait between 1 week and a month before eating my fermented vegetables, but you can wait as short or as long (although it’s not recommended to wait longer than 6 months).

Some veggies, like peppers, do better fermenting for just a week or so, while others, like sauerkraut, will do better fermenting for a month or so.

It’s okay to open the fermenting jar up and peek inside to test for “doneness.”

Test it out, play with it, and see what you prefer. Part of the homesteading journey is seeing what works best for you and having fun developing a new skill.

What tools are needed for fermenting?

To begin fermenting, you will need:

  • A vessel for your veggies. (A ceramic crock is traditional. Glass and food-grade plastic work well too. Avoid metal.)
  • A way to weigh down the vegetables so they remain under water
  • A top to keep bugs and other stuff out of your ferment

Want to try fermenting vegetables but afraid or confused where to begin? Learn to ferment veggies in this step-by-step system. From FrugalChicken

Why I like Fermentools

All that being said, here’s why I suggest you use the Fermentools kit.

Here’s what you get in the kit:

  • An airlock
  • A rubber stopper
  • A mason jar lid (without the ring) crafted to fit the rubber stopper
  • A rubber ring (keeps the air out of the fermenting jar)
  • A glass weight to keep your veggies submerged
  • A large bag of Himalayan salt 
  • Directions for assembly (although it’s straight forward)
  • Recipes

The kit attaches to a mason jar, so you can easily use glass to begin fermenting at home.

The kit comes with a glass weight, which means you don’t have to search for a weight, then wonder if it’s actually working to keep your veggies submerged.

The airlock assures you that air can escape your ferment (essential to creating that anerobic environment) and that air cannot get in.

You will have a better experience and worry less using Fermentools. I know I do.

I’ve tried fermenting without Fermentools and it’s not as tidy.

In one instance, my apple cider vinegar was invaded by fruit flies, and I had to toss 3 weeks worth of work.

If I had used the airlock that came with my Fermentools kit, the flies would not have been able to get near my fermenting vinegar.

Where to buy Fermentools?

You can buy Fermentools on their website (www.fermentools.com) or on Amazon.

While you can buy these tools for a single mason jar, I suggest you buy the six pack Fermentools.

Once you start fermenting, and gain confidence, you will want to try it with multiple veggies at the same time.

Trust me on this.

I hope this article has piqued your curiosity about fermenting, and given you the confidence to try it out!

Want to try fermenting vegetables but afraid or confused where to begin? Learn to ferment veggies in this step-by-step system. From FrugalChicken

Your life will be changed.

Here’s a recipe to get you started.

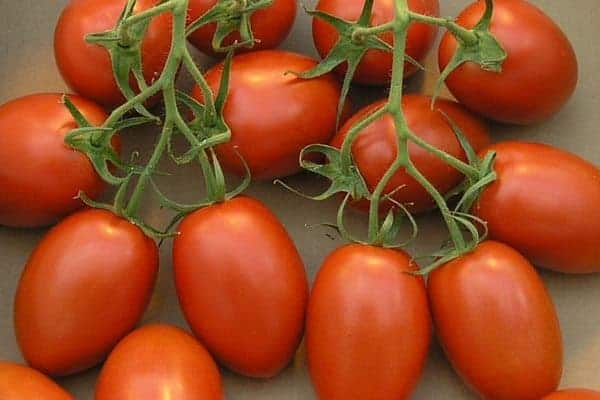
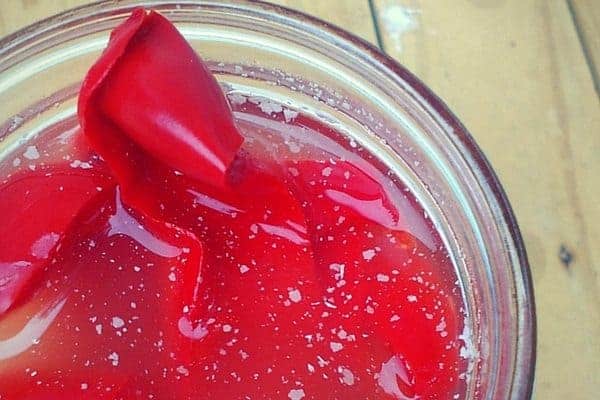
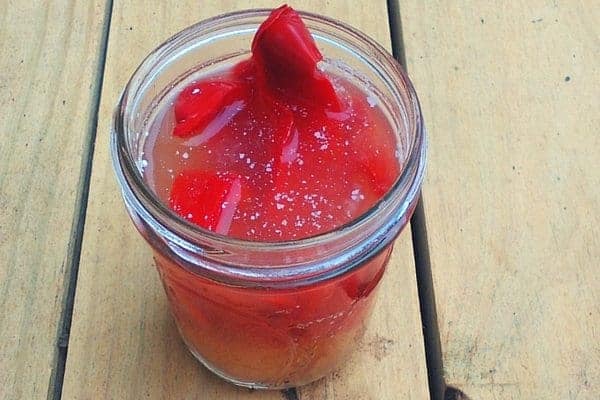
Fermented Red Peppers
Ingredients:
1 red bell pepper
1/8 tsp Fermentools Himalayan salt
Filtered water

Tools:

Fermentools Kit
Wide-mouth quart size Mason Jar
Mason jar ring

Cut your bell pepper into 1/4″ strips lengthwise

Pack into a clean, wide-mouth mason jar

In a separate bowl or jar, mix the salt with the filtered water.

Add to the mason jar with peppers, and fill until the peppers are covered, leaving a 1″ space between the top of the water and the lip of the mason jar.

Submerge the peppers under water using the glass weight in your Fermentools kit, pressing down if necessary. All the peppers need to be submerged!

Use the directions in your Fermentools kit to assemble the airlock and seal the mason jar.

I’d like to hear from you!

Do you think you’ll try fermenting? Why or why not? Email me at [email protected] or comment below!

Preparing your chicken coop for winter is easy, but I have a few hard and fast rules about it.

Untitled design (13)
In this very first FrugalChicken podcast, I discuss 5 tips to prepare your coop for winter, and which of my “rules” about raising chickens I sometimes break during the winter.

I decided to start a FrugalChicken podcast first, to help a larger audience of chicken owners.

Second, sometimes is easier for me to just TELL you what the heck I’m talking about, and sometimes it’s easier for readers to listen to chicken talk while cleaning or working out.

Chickens- Naturally Raising A Sustainable Flock AD (2)-min

I expect to come out with a new podcast every week.

I have an article about this topic coming out on another site, which of course I will share with you. 

In this podcast, I discuss 5 tips to help you winterize your coop including:

  • Different ways to keep your flock warm
  • How to make sure they stay healthy and producing eggs
  • Tips about what NOT to do
  • How to fight winter boredom
  • And other tips and stories

Where to buy the items I discuss in this episode:

Further reading:

Here’s an article I wrote for Manna Pro’s Hearty Homestead blog!

I’d like to hear from you!

Which if the tips in this episode will you use this winter? Email me at [email protected] or comment below!

Raising chickens for their eggs is probably one of the most rewarding aspects of homesteading, but it can be intimidating for new owners who fall instantly in love with our feathered friends.

I mean, who wants to hurt the creature that you’ve now let into your life?

I understand.

But luckily, raising them to lead the best lives possible isn’t hard at all.

There will be bumps in the road, and times when their fate is just simply out of your hands, but there’s a lot you can do as an owner to give them a wonderful life while they’re with you.

There are certain questions I’m always asked, so I’ve decided to answer them in one article.

Even if you’re not a new chicken owner, there might be one or two bits of information that will help you out.

Why aren’t my chickens laying?

This one is a toughie, because there can be a ton of reasons, and it depends on how you’re raising your chickens.

Here’s some food for thought to get you started.

Raising chickens is easy. But if you're confused about how to raise them to be healthy layers, here's the 6 most common questions with answers. From FrugalChicken

Are your hens the right age? 

The chickens you’re raising can start laying anywhere from 6 months old, and most chickens start laying around 7 to 12 months. 

Are you raising your chickens with the right diet? 

Research consistently shows that the better a hen eats, the better she lays.

Since, for the most part, we’re raising chickens to eat their eggs, it’s best to stick to certain guidelines. She should eat at least 16% protein in her feed.

Chickens that are fed only corn or scratch, or not fed anything at all because they’re free ranging, might not produce eggs as well as chickens fed a daily ration. 

Is there some sort of stress going on? 

This does make a difference. As you’re raising chickens, one thing to look out for is whether there are potential stresses in their environment.

One of our hens stopped laying after watching her constant companion get attacked by a dog. 

And I don’t mean she started laying somewhere else and we never found them. She just quit.

After she stopped laying, we gave it a couple weeks, then moved her into a coop with the remainder of our flock, and she hasn’t laid since, while our other chickens have picked up production. 
It happens.

Other sources of stress might be crowded living conditions or an inadequate diet.

Is she just old? 

While some chickens will lay for years and years, the average age most chickens stop laying regularly is 2-3 years old. 

How do I introduce new chickens to my flock?

If you’re raising chicks to replace old layers or just want to add to your flock, you will have to incorporate new chickens eventually.

Raising chickens is easy. But if you're confused about how to raise them to be healthy layers, here's the 6 most common questions with answers. From FrugalChicken

There’s a ton of ways to introduce new hens to an existing flock, including just putting the new hen in the coop, but here’s how I do it. 

First, isolate the hen for a week or two to make sure she’s healthy.

Assuming that goes well, I next put her a “Hello Box” for a day or so to keep her separated from the flock, but still able to interact with my other chickens.

https://instagram.com/p/ysXMZui83r/?taken-by=thefrugalchicken

It also reduces drama during feed time, because the new chickens can eat their dinner in peace.

If the vibes seem good, I let the hen out in 24 to 48 hours to integrate with the flock. 

There still might be scuffles as they sort out the pecking order, but in my experience, this method makes everything much simpler.

You’ll also get an idea if the new chicken will work for your flock. We introduced some new roosters, and it became very clear, very quickly that one just wasn’t going to work.

He fought my other roosters ALL. THE. TIME. 

Luckily, the Hello Box kept every one safe.

What should I feed my chickens?

Well, what your chickens should eat depends on their age.

Chicks (newborn to 12 weeks)

If you’re raising chicks, start them off with an 18% protein chick starter until they’re 10-12 weeks old.

You can give either medicated or unmedicated chick starter, although I recommend medicated starter to help prevent coccidiosis.

Raising chickens is easy. But if you're confused about how to raise them to be healthy layers, here's the 6 most common questions with answers. From FrugalChicken

Young Pullets (12 weeks until they lay)

My young pullets eat a grower feed of 16% – 18% protein.

Don’t give the young chickens you’re raising a layer feed – it has too much calcium and might harm them. Stick to a grower ration.

Layers

Once they begin to lay, my hens get to eat a higher protein ration in addition to the bugs and goodies they dig up in their tractor.

They also eat an extra calcium supplement, such as oyster shells, to ensure they get enough calcium so they don’t have to draw it from their bones to produce egg shells.

Raising chickens is easy. But if you're confused about how to raise them to be healthy layers, here's the 6 most common questions with answers. From FrugalChicken

How do I feed chickens that are different ages?

If I’m raising chickens of different ages together, I let them eat a starter/grower ration that’s around 18% protein.

It’s a good balance of protein, and not too much calcium.

You will have to provide a calcium supplement for your layers.

Should I let my chickens free range?

The answer to this question is: it depends.

Whether to let your chickens free range is a complicated topic, and depends on factors like the amount of predators in your area and whether you want to use a tractor or not. 

There’s advantages and disadvantages to allowing free ranging. You can also provide a tractor for your chickens if you want them to free range and eat bugs, worms, etc., but have predators in your area.

https://instagram.com/p/5I2f_RC881/?taken-by=thefrugalchicken

How much space do my chickens need in the coop?

Space is a consideration if you plan on raising chickens in a coop or run. 

The more space the better, but the minimum suggested space is 4 square feet per chicken if your birds will be allowed to free range or go into a run, and 10 square feet if they will be cooped all the time. 

If your coop can only be a certain size, you’re better off getting fewer birds. They’ll be happier, and so will you because they’ll lay better. 

Chickens that are confined to an area that’s too small start to develop nasty habits like egg eating and pecking at each other.

Waste can also build up, giving them respiratory diseases and nutritional deficiencies.

Raising chickens can be as complicated or as simple as you like. Chickens are fun livestock to raise, and using these tips, you can enjoy them for years.

I’d like to hear from you!

Is there a question you have about raising chickens? Contact me directly or comment below!

Raising chickens is easy. But if you're confused about how to raise them to be healthy layers, here's the 6 most common questions with answers. From FrugalChicken

T’is the season – for tomatoes on the homestead. Which, of course, means it’s time to make tomato sauce!

To preserve each and every tomato we harvest, I usually opt for making tomato sauce or salsa over simply canning stewed tomatoes or hot packing them.

We might do a few jars of just plain tomatoes for soups, stews, sauces, etc., but spaghetti is big here, so tomato sauce it is (salsa is a close second!). 

Making tomato sauce is one way we eat seasonally all year – even if it’s not tomato season.

Here’s a recipe for classic tomato sauce that has served me well over the years, and it only takes a few steps. 

How to make classic tomato sauce

This recipe yields two 1-quart size mason jars.

Grab 5 pounds of fresh from the garden tomatoes.

classic tomato sauce

For this recipe, I use Roma tomatoes and the odd heirloom tomato that has managed to ripen before or after the other tomatoes on the vine.

Any kind of tomato is fine, however, and you’re limited only by your imagination.

Decide if you will peel your tomatoes

I hate taking the skins off of any tomato. I hate waiting for the water to boil and for the skins to finally split.

And those suckers always seem to take forever to split. So, I just make tomato sauce with the skins intact.
Leaving the tomato skins on isn’t for everyone, so if you want to remove them, here’s how.

How to remove tomato skins

If you want to remove the skins, bring a large pot of water to a rolling boil. Place as many tomatoes as possible in the pot.

Meanwhile, grab a second pot and fill it with ice water.

When your tomato skins split (and it’s pretty obvious when that happens), immediately remove your tomatoes from the boiling water and dunk into the ice water.

You will need to remove the skins, but wait a few minutes until the tomatoes are cool. Even though the outside will feel cool, the insides will still be very hot.

Remove the tops of the tomatoes, and peel off the skins. This will make them easier to mash.

store tomato sauce in a mason jar

Ingredients

5 lbs fresh tomatoes

1/2 tsp salt

1 tbsp oregano (dried, more if fresh)

3 tablespoons basil (fresh only, any kind)

1/2 tsp cracked fresh pepper

Chopped onions to taste

1 clove garlic, sliced as thin as possible

1/4 c olive oil plus 2 tablespoons

Directions

Saute the chopped onions in your pot with 1/4 cup olive oil until they are just translucent. 

As the onions are cooking, chop your garlic. I actually use scissors (dedicated kitchen scissors) for this – it makes cutting the tiny cloves easier and I can get the slices super thin. 

Add the garlic to the pot and cook until softened.

I really don’t recommend any other oil for this sauce – olive oil adds an elegant flavor to tomato sauce that other sauces can’t replicate (sorry coconut oil, not today!)

Cut each tomato into small pieces about 1/4″ to 1/2″, and put them into a large pot. Crush the tomato pieces as much as possible – it will get easier as they heat up, so don’t worry if you can’t crush them very much.

To the pot, add 1/2 tsp of salt, 1 tablespoon of oregano, and 1 tablespoon of basil.

You can use dry basil for this, but I really recommend using fresh basil if possible – it tastes so much better than dry, and it will really lend that Italian bistro flavor to your tomato sauce.

tomato sauce is better with basil

You will add more herbs as the recipe goes on – remember to season as you go because the flavor of herbs changes as they heat up.

Add 1/2 tsp of cracked pepper, and any other herbs or spices you want (some people like red pepper flakes for some heat). Sometimes I add 1 cup of Merlot, but it’s completely optional.

Heat until boiling, and simmer for 1 hour, or until the tomatoes are completely broken down. Taste as you go along, and adjust the seasonings to your taste.

There really is no set formula for this – just keep tasting the sauce and adjusting as necessary, keeping in mind that you will add more basil at the end.

This should be a fun process, so don’t worry too much – have fun and experiment! If it’s not perfect, that’s okay – there will be other opportunities to refine and test your recipe.

Once the tomatoes are completely broken down, add the other 2 tablespoons of basil and simmer for another 15 minutes.

When the tomatoes are broken down and the taste is okay for you, remove the sauce from the heat and add 2 tablespoons of olive oil. The sauce will thicken as it cools.

Spoon into your clean mason jars, being sure to use a funnel to avoid spilling any.

Enjoy!

https://instagram.com/p/7ihIppi84P/?taken-by=thefrugalchicken

Chunky vs. Smooth Tomato Sauce

Some people prefer their tomato sauce chunky and some prefer it smooth.

Which are you?

This sauce tends to be on the chunkier side, so to make it smooth, use your immersion blender to soften it. Be sure to do this when the tomato sauce has cooled down – you don’t want to splatter hot sauce everywhere (ask me how I know!)

This recipe makes two 1-quart size jars. 

Canning tomato sauce is easy, and for water bath canning times, refer to Ball’s Blue Book.

I’d like to hear from you!

Which are you, a chunky sauce person or a smooth tomato sauce person? Leave a comment below!

https://plus.google.com/+MaatvanUitert/posts/32269JArfje

Tomato sauce rocks - captain obvious, right? Use this easy recipe to make classic tomato sauce that will transform your kitchen into an Italian bistro. From FrugalChicken

This time of year, the amount of eggs we have is totally out of control, and we’re always searching for new recipes to use them up. There’s only so many eggs I can scramble!

Sometimes we give them to the pigs (a great way to give them variety and extra protein and another big step towards self-sufficiency).

But, of course, if you don’t have pigs, you’re likely left with a whole lot of eggs and are scrambling (get it? yuk, yuk, yuk) for new recipes to use them up and escape the same ol’, same ol.

Here’s 50 recipes (newbies and some classic favorites!) I love that feature eggs!

Got so many eggs you don't know what to do with them? Or just love eggs? Here's 50+ recipes to keep you busy! From FrugalChicken

Breakfast

Eggs with Soldiers: Heat water until you have a rolling boil. Boil eggs for 2 minutes then remove and cool. Slice the small end off the egg and serve with strips of toast.

French toast: Crack two eggs into a bowl and whisk until scrambled. Heat a skillet, and dip bread, one slice at a time, into the scrambled eggs. Cook on the skillet, turning over until brown.

Perfect hard boiled eggs 

Eggs, kale, and mozzarella 

Soft Boiled Eggs: Place 4 eggs in a saucepan of boiling water, then cook over low heat, 7 to 8 minutes. Drain, peel and halve; top with herbed butter.

Scotch Eggs: Boil eggs and peel. Encase each egg with a layer of sausage. Roll in flour, dip in beaten eggs, then roll in bread crumbs. Fry in oil until crisp.

Hard Boiled Eggs: Place 6 eggs in a large pot, cover with cold water by and bring to a rolling boil for 8. Remove from hot water and place in cold water until cool. Drain, then peel.

Bacon-and-Egg Salad: Slice hard boiled eggs into 1/8” slices. To a bed of lettuce, spinach, or other leafy green, sprinkle crumbled bacon. Add sliced pear and an olive oil vinaigrette. Top with the eggs.

Breakfast Quesadillas With Scrambled Eggs, Spinach, and Black Beans

Got so many eggs you don't know what to do with them? Or just love eggs? Here's 50+ recipes to keep you busy! From FrugalChicken

Scrambled Eggs: Whisk eggs with crème fraiche and heat in an oiled pan until cooked through. Season with salt and pepper.

Spicy Scramble: To scrambled eggs, add 1/3 cup shredded cheddar, and diced jalapeno to taste (leaving out the seeds if you don’t want it too spicy).

Creamy Scrambled eggs: Mix 5 eggs with 2 tablespoons homemade cream cheese, 2 teaspoons chopped chives, and salt and pepper. Heat until cooked through.

Egg and English Muffin Sandwich: Beat 1 egg with salt and pepper in a ceramic mug; microwave 45 seconds. Serve on an English muffin and microwave for 30 seconds to melt the cheddar.

Breakfast stuffed peppers

Breakfast Burritos: Cook 1/2 cup diced chorizo, 1/2 diced onion and 1 tablespoon diced jalapeno in a nonstick skillet. Add 4 scrambled eggs. Divide evenly among tortillas, and top with salsa before rolling up.

Got so many eggs you don't know what to do with them? Or just love eggs? Here's 50+ recipes to keep you busy! From FrugalChicken

Classic Cheese Omelet: Crack 3 eggs into a bowl and whisk until scrambled. Pour into a hot pan glazed with 1 tablespoon of oil and cook over medium heat (do not stir the eggs at all. When firm, add shredded cheese to half of the eggs and fold. Heat for 2 minutes or until the cheese is melted.

Spinach Omelet: Mix beaten eggs with salt and pepper. Before folding, add chopped spinach and 2 tablespoons chevre.

Strawberry Omelet: Beat eggs for a classic omelet, and before folding, fill with sliced strawberries. Top with ricotta.

Bacon Omelet: Cook and crumble 1 slice bacon. Toast 1/4 cup corn in the drippings; add 2 tablespoons salsa. Make an omelet but before folding, fill with the bacon and corn.

Ham Omelet: Beat 8 eggs with 2 tablespoons milk, and salt and pepper. Cook in a large skillet as directed for Classic Omelet (No. 25); fill with 1/2 cup each diced ham, gruyère and sautéed peppers.

Poached Eggs: Bring a skillet of water to a simmer. Crack eggs into individual cups (best to use a pan specific to poached eggs), slip into the water and poach until the whites set.

Got so many eggs you don't know what to do with them? Or just love eggs? Here's 50+ recipes to keep you busy! From FrugalChicken
Eggs Benedict: Top 2 poached eggs with a hollandaise sauce and serve on English muffins with lox or fried Canadian bacon.

Huevos Rancheros: Fry two eggs over easy. Add salsa, ham, bacon, and beans, serve hot.

Birds in a Nest: Cut a circle out of the middle of a slice of whole wheat bread. Toast the bread in a nonstick skillet. When slightly browned, crack an egg into the hole, add salt and pepper, cover and cook until the white sets.

Fried Eggs: Crack 4 eggs into a skillet with 2 teaspoons bacon drippings. Add salt and pepper; cook until the edges are opaque, 2 minutes. Cover and cook 4 to 6 more minutes.

Curry Coconut Scrambled Eggs: Crack 4 eggs into a pan with melted coconut oil. Add 1/8 tsp curry. Scramble until eggs are cooked.

Fried Egg Sandwich: Make 1 Fried Egg and fry 2 slices bacon. Serve on a toasted English muffin.

Eggs & Hash Browns: Fry 1 cup each chopped onion and grated potato in a cast-iron skillet with butter until crisp. Add 1/2 cup grated cheese and crack in 2 eggs. Fry the eggs until set and serve with buttered toast.

Country Fry-Up: Grill 2 sausage links, 2 sausage patties, and 4 bacon slices. Fry two eggs, and season with salt and pepper. Serve with buttered toast.

Paleo Crepes 

Ham and Eggs Breakfast Bowl 

Quick Nosh

Classic Deviled Eggs: Halve peeled hard boiled eggs lengthwise. Scoop out the yolks. Mix with 1 tablespoon relish, 3 tablespoons mayonnaise, 1 teaspoon mustard, and a pinch each of cayenne, salt and pepper. Scoop the yolks back into the whites!

Egg drop soup: Bring 1 quart of chicken stock to a boil. Crack 4 eggs into a bowl and whisk. When the stock is at a rolling boil, pour the eggs in slowly, stirring at the same time. Continue to heat until the eggs are firm.

Got so many eggs you don't know what to do with them? Or just love eggs? Here's 50+ recipes to keep you busy! From FrugalChicken

Pickled Eggs (also an excellent way to preserve eggs!)

Tea Eggs: A favorite! Boil eggs in their shells for several minutes then cool. Crack the shells but don’t peel. Simmer in a saucepan with 1/2 cup soy sauce, 3 cups water, 4 star anise pods, 3 black tea bags and a slice of orange peel for 1 hour. Drain the eggs and peel.

Egg & Mushroom Salad: To a bed of mixed leafy greens, add 4 slices of hard boiled eggs and sliced and grilled portobello mushrooms. Add a vinaigrette made with balsamic vinegar and olive oil.

Bacon-and-Egg Salad: Slice hard boiled eggs into 1/8” slices. To a bed of lettuce, spinach, or other leafy green, sprinkle crumbled bacon. Add sliced pear and an olive oil vinaigrette. Top with the eggs.

Moroccan Eggs: Toast 1 cup chickpeas and some ground cumin and paprika in a cast iron skillet with olive oil over high heat. Remove from heat, and crack 4 eggs into the cast iron skillet. Bake at 350 degrees until the whites are firm.

Savory Dinner

Egg and Mushroom Pie 

Tomato Basil Frittata

Egg Souffle

Steak and Eggs: Season 1 pound of your favorite steak cut with salt and pepper. Grill the steak until cooked. in plain butter. Crack two eggs into a hot skillet, and fry them sunny side up. Top the steak with butter and the eggs.

Ham Frittata: Whisk 8 eggs, 1/2 cup milk, 3/4 cup shredded cheese, and salt and pepper. Sauté 4 ounces diced ham in a cast iron skillet with oil. Add the eggs; cook until the bottom sets, then bake at 325 degrees F, 25 minutes.

Salmon, Dill, and Goat Cheese Quiche 

Spring Frittata: Soak 1/2 cup stale bread cubes in 1/2 cup milk; mix with 8 beaten eggs. Add 3/4 cup ricotta, 1 teaspoon chopped thyme, and salt and pepper. Sauté 1 cup shredded zucchini in an ovenproof nonstick skillet with oil. Add the egg mixture.

Erin’s Baked Eggs on a Bed of Roasted Cherry Tomatoes

Spanish tortilla

Extras

Hollandaise Sauce

Eggnog

I’d like to hear from you!

How do you think you’ll use up all your eggs? Email me or comment below!

One frequent question I get is about feeding a flock of chickens that are different ages.

Not sure how to feed your flock when your chickens are different ages? It's easy if you remember two simple rules of thumb. From FrugalChicken

It can be confusing since chicks have different requirements than laying hens.

On our farm, we keep chicks and laying hens separate because both are precious commodities. The hens produce eggs, but the chicks will be our future egg layers (and they’re oh so adorable). 

We want to make sure every chickens has exactly what she needs.

But not everyone has that option – and it can be confusing to know what’s best to feed in a flock of mixed ages.

In fact, it’s such a common question for chicken owners that I’m not the only blog that gets queried.

I was recently tapped by feed manufacturer Manna Pro for an answer – so I wrote an article for their Hearty Homestead blog.

Not sure how to feed your flock when your chickens are different ages? It's easy if you remember two simple rules of thumb. From FrugalChicken

If you’re going to keep your whole flock in the same coop, it’s important to provide the basic nutritional needs of everyone, from chick to laying hen.

Since chicks require a 18 – 20% feed, but hens require a layer feed (which has extra calcium), and growing pullets require a third feed altogether, it can get confusing.

For the answer, you can read my entire article on Manna Pro’s Hearty Homestead blog!

Be sure to check out my free guide, Chicken Nutrition: A Step-By-Step System To Feeding Your Hen From Chick To Layer! Get Instant Access!