Table of Contents (Quickly Jump To Information)
Today I wanted to share a simple DIY hanging pumpkin treat that you can make for your chickens.
The idea for this project comes from reader Herdy Bell! Thanks for sharing it with us Herdy!
My chickens love pumpkins and since it’s right after Halloween there tend to be a lot of leftover pumpkins around! You can snag great deals on pumpkins at grocery stores or at farms after Halloween. I always stock up on pumpkin, so that I can feed them to my flock.
Remember, however, that pumpkins are treats – not a replacement for a good basic diet.
Now this project is pretty simple, basically you’re just going to hang a pumpkin in your coop.
You might ask, why would I hang my pumpkin and not just give it to them? Well you can definitely just slice your pumpkin in half and give it to them. Trust me they’ll love it.
But hanging the pumpkin provides some different environmental interest for your chickens. It’s something new and fun for them to do. Providing environmental activities is important, especially going into the winter months.
When winter comes and chickens tend to be in the coop more, bad behaviors (such as picking feathers, or picking on others) can set in very easily. And that can make your life difficult.
Providing stimulating activities in your coop or run for your chickens can distract them from developing negative behaviors.
Plus it’s just fun to watch your chickens play with and figure out new toys and treats!
Here’s how to make this DIY Hanging Pumpkin Treat
All you need is:
- A pumpkin
- Rope or twine
- Serrated kitchen knife
- Drill

Step One: Drill a hole
Now the first thing you need to do is drill a hole in the stem of your pumpkin. You’re going to want to choose a pumpkin with a think, sturdy stem. Then you need to drill a hole through the pumpkin’s stem horizontally, as close to the base as possible.
After you drill the hole you can thread your twine through the hole. I recommend using thicker twine so that the weight of the pumpkin doesn’t break it.
You can also thread a second piece of twine through the hole to make sure that it’s secure. After your twine is threaded through, you just need to tie the two ends of the twine together so that you can easily hang the pumpkin from something in your coop.
Step Two: Scrape off parts of the outer pumpkin shell
Next you need to scrape off parts of the outer shell/skin. This will make it easier for your chickens to be able to get to the insides and seeds of the pumpkin.
You could do this a variety of different ways. I used a small serrated knife I had in my kitchen. All I did was start sawing at the side of the pumpkin with the serrated knife.
The point here is you want to take parts of the outer layer of the pumpkin off, so that your chickens have access to the soft insides of the pumpkin.
After sawing with the knife I was able to pull off parts of the skin and keep going. You don’t have to take off all the skin (that would take forever), just enough that your chickens will have access to the insides.
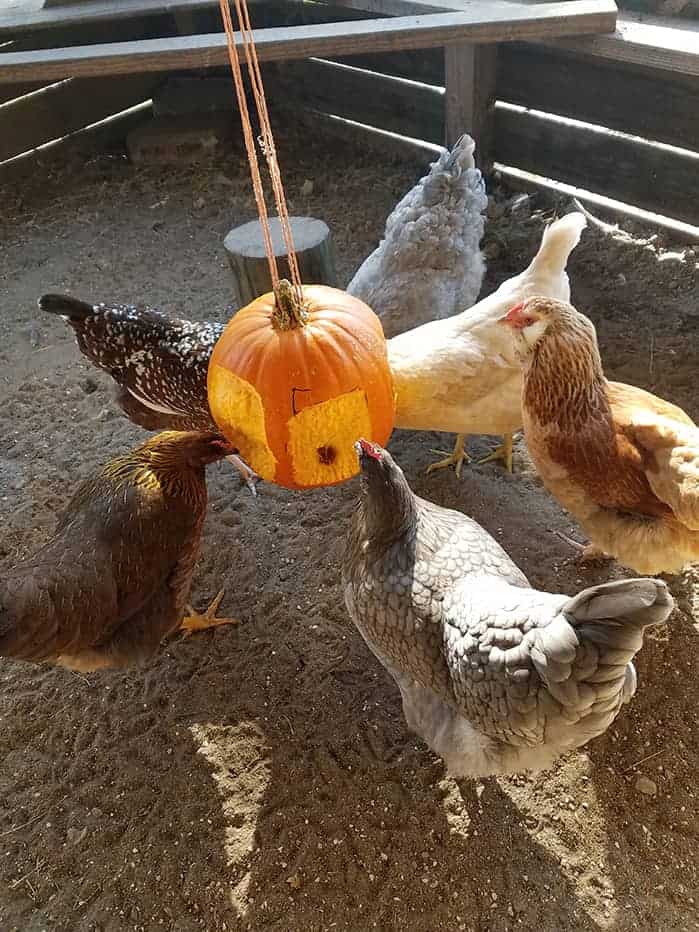
Step 3: Hang your pumpkin
Now you can hang your pumpkin in your coop! I would hang it fairly close to the floor of your coop/run, around 6-12 inches off the ground, just to be safe.
And that’s it! I love how simple and easy it is to make this DIY treat for your flock! Thanks again Herdy for sharing your idea with us!
More Chicken Treat Articles:
- Try This Adorable DIY Herb Pot For Healthier Backyard Chickens!
- Pumpkin Seed, Cayenne, and Wormwood Deworming Treat For Backyard Chickens
- 4 Ingredient Chamomile & Black Soldier Fly Larvae Granola
- 5 Backyard Chicken Friendly High Protein Treats For Fall
- Pepitas & Chamomile Whole Grain Protein Mix
Maat van Uitert is a backyard chicken and sustainable living expert. She is also the author of Chickens: Naturally Raising A Sustainable Flock, which was a best seller in it’s Amazon category. Maat has been featured on NBC, CBS, AOL Finance, Community Chickens, the Huffington Post, Chickens magazine, Backyard Poultry, and Countryside Magazine. She lives on her farm in Southeast Missouri with her husband, two children, and about a million chickens and ducks. You can follow Maat on Facebook here and Instagram here.


![Keep Your Chickens Safe On Halloween! [Podcast]](https://thefrugalchicken.com/wp-content/uploads/2016/10/chickens-halloween.jpg)